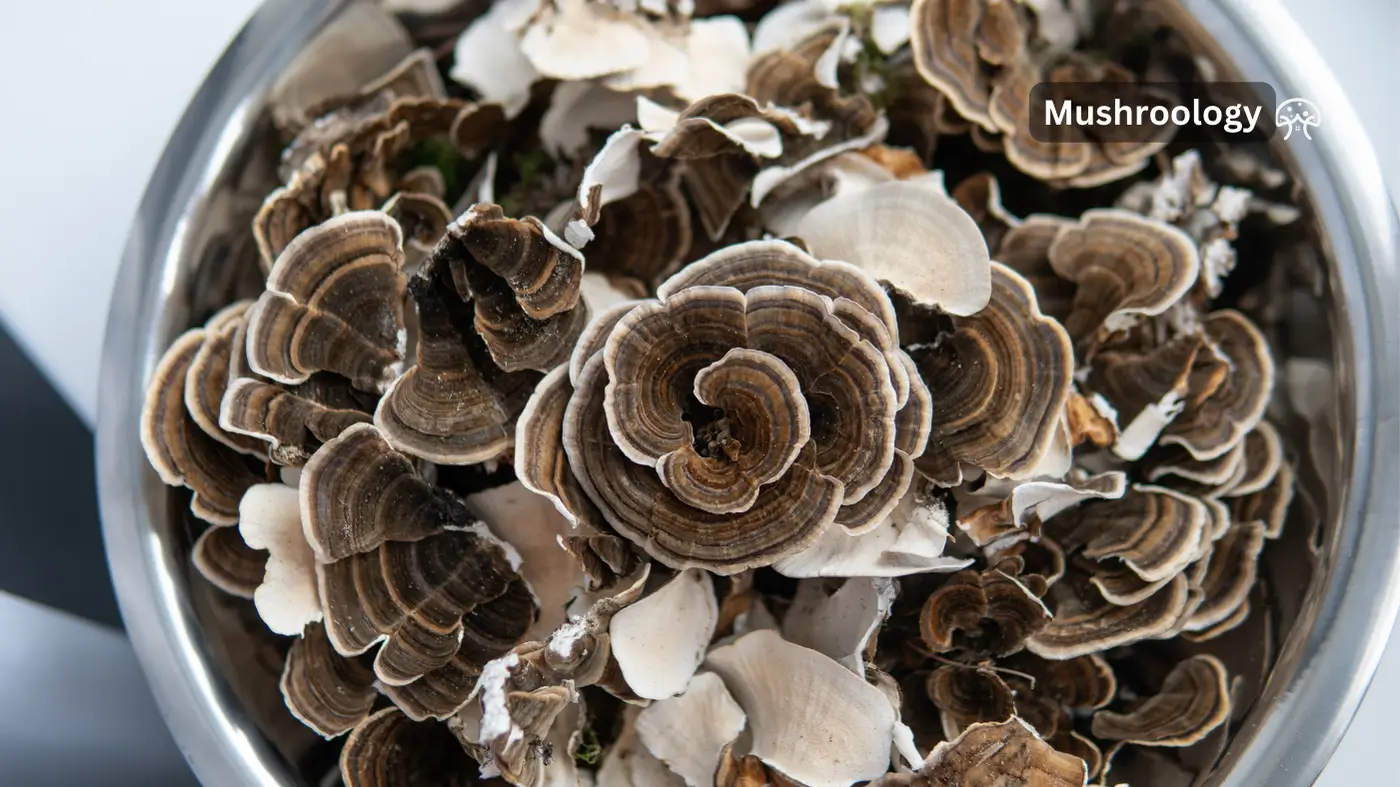
Everything you need to know about cultivating Trametes versicolor at home
You can grow turkey tail mushrooms using three proven methods: grow kits (easiest, ready in 2-4 weeks), log cultivation (best yields, 6-12 months), or sawdust blocks (year-round control, 3-4 months). Beginners should start with grow kits costing $15-30 that include everything needed.
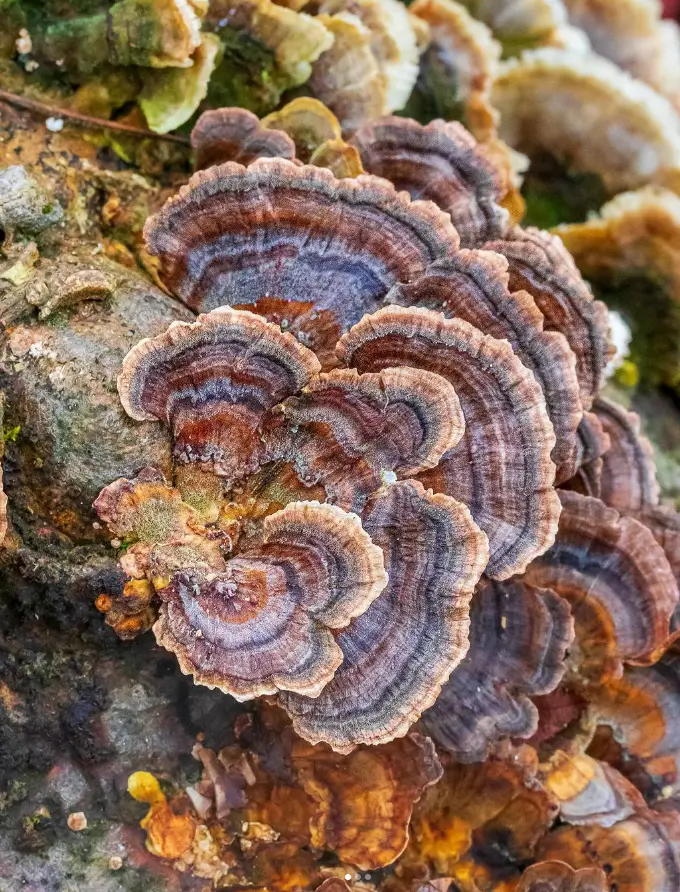
You’ve probably seen turkey tail mushrooms growing on dead logs during forest walks and wondered if you could cultivate these medicinal fungi at home.
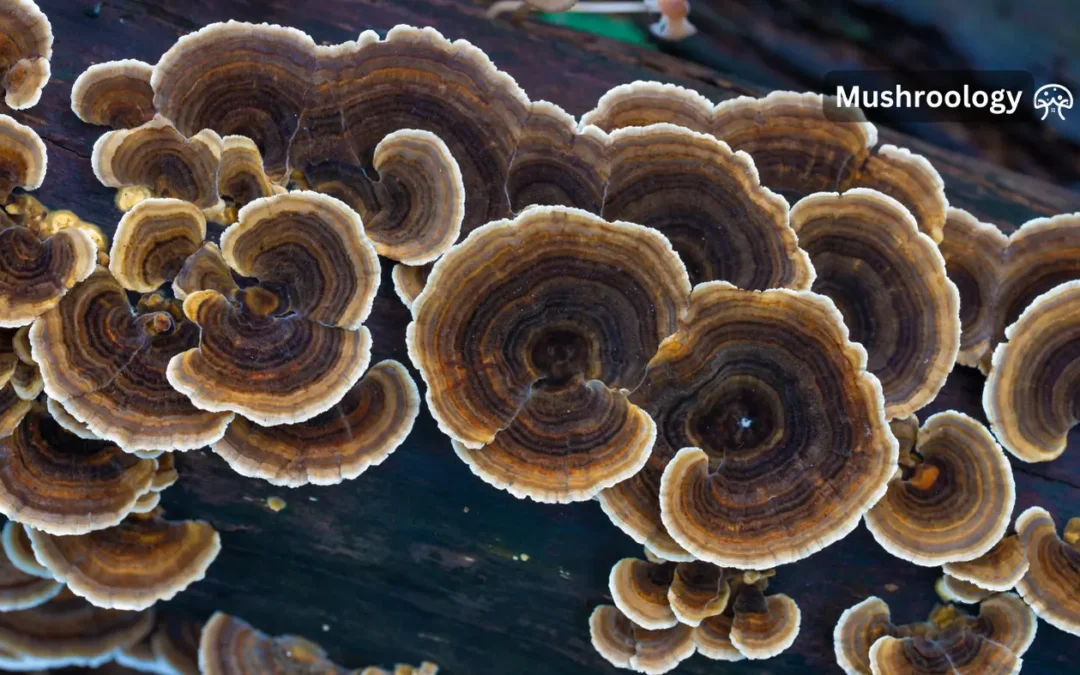
Turkey Tail mushrooms (Trametes versicolor), also known as “cloud polypore” are gaining popularity due to their potential health benefits. These versatile fungi boast a beautiful fan-shaped appearance and are prized for their medicinal properties. Growing Turkey Tail mushrooms at home is surprisingly achievable, even for beginners with the right knowledge and equipment.
Top 3 turkey tail growing methods compared
Method
Timeline
Cost
Difficulty
Best For
Grow Kits
2-4 weeks
$15-30
⭐
Beginners, indoor growing
Log Cultivation
6-12 months
$5-10/log
⭐⭐⭐
Long-term yields, outdoor space
Sawdust Blocks
3-4 months
$8-15
⭐⭐⭐⭐
Year-round control, experienced growers
Choose your cultivation method
Grow kit method
Ideal for: Complete beginners with limited space and equipment.
The grow kit method is the simplest way to get started with turkey tail cultivation. These kits come pre-inoculated with turkey tail mycelium and require minimal setup.
Pros:
No specialized equipment needed
Step-by-step instructions included
High success rate
Can be grown indoors year-round
Cons:
Less customization
Higher cost per harvest
Usually smaller yields than DIY methods
How to grow turkey tail mushrooms on logs
Ideal for: Those with outdoor space and patience for longer-term results.
The log method is the most traditional and natural way to grow turkey tail mushrooms. It involves inoculating hardwood logs with turkey tail spawn.
Pros:
Most natural growing environment
Logs can produce for years
Larger yields over time
More sustainable
Cons:
Longer waiting period for first harvest (10-12 months)
Requires outdoor space
More labor-intensive initially
Growing turkey tail mushrooms indoors with sawdust blocks
Ideal for: Intermediate growers looking for faster results than logs.
This method uses sterilized sawdust blocks supplemented with nutrients to grow turkey tail mushrooms indoors.
Pros:
Faster colonization than logs
Can be done indoors
More control over growing conditions
Higher yields than grow kits
Cons:
Requires more equipment (pressure cooker/autoclave)
More technical knowledge needed
Higher contamination risk
Instagram @fungiwoman
Growing turkey tail mushrooms using a kit
If you’re new to mushroom cultivation, starting with a grow kit is the most straightforward approach. Here’s how to succeed with a turkey tail grow kit:
Unbox and inspect your kit. Check that the mycelium (white, thread-like growth) is visible and there’s no contamination (unusual colors or smells).
Find an appropriate location. Choose a spot with indirect light and temperatures between 68-77°F (20-25°C). Avoid direct sunlight or heating/cooling vents.
Follow the kit’s specific instructions. Most kits require you to open the bag, mist with water, and place in the humidity tent.
Maintain proper humidity. Mist the inside of the humidity tent 1-2 times daily to maintain high humidity levels. Don’t spray directly on the growing substrate.
Watch for primordia formation. Small bumps or “pins” will start to form, which will develop into turkey tail mushrooms. This typically begins 2-4 weeks after setting up the kit.
Allow for proper air exchange. While humidity is important, so is fresh air. Open the humidity tent briefly each day to allow for air exchange.
Be patient. Turkey tail mushrooms grow more slowly than culinary varieties like oyster mushrooms. Full development can take several weeks
Growing turkey tail mushrooms on logs
Log cultivation is the most traditional method for growing turkey tail mushrooms and produces the most natural results. Here’s how to do it:
Materials needed
Freshly cut hardwood logs (oak, maple, beech, alder, or birch)
Turkey tail spawn (dowel plugs or sawdust spawn)
Drill with 12mm (1/2 inch) bit
Hammer (for dowel plugs) or spawn applicator (for sawdust)
Wax (cheese wax or beeswax)
Brush for applying wax
Heat source for melting wax
Step-by-step process
Select appropriate logs. Choose hardwood logs cut from healthy living trees within the last 4-5 weeks. Logs should be 4-8 inches in diameter and 2-3 feet long
Clean the logs. Brush off any dirt, moss, or lichen from the bark without damaging it. This helps prevent contamination from competing fung.
Drill holes in the logs. Create holes approximately 1-1.5 inches deep using a 12mm drill bit. Space holes about 6 inches apart in a diamond pattern around the log.
Inoculate the logs.
For dowel spawn: Tap the dowels into the drilled holes with a hammer until they’re flush with the bark
For sawdust spawn: Use an inoculator tool or improvise with a turkey baster to fill each hole with spawn
Seal with wax. Melt the wax and apply it over each inoculated hole to prevent contamination and moisture loss. Some growers also seal the cut ends of the logs
Place logs in an appropriate location. Find a shady, moist area outdoors. You can lay logs on the ground, lean them against a structure, or stack them in a log crib.
Wait for colonization. Turkey tail mycelium needs about 10-12 months to fully colonize a log. During this time, maintain moisture by watering during dry periods.
Watch for fruiting. The first mushrooms typically appear in late summer or early fall of the year following inoculation. Logs can continue producing for 3-5 years.
Growing turkey tail mushrooms on sawdust blocks
The sawdust block method for growing turkey tail mushrooms is indeed an excellent choice for intermediate growers seeking faster results than log cultivation. Here are the key details of this method:
Substrate Preparation
The ideal substrate mix for turkey tail mushrooms on sawdust blocks typically consists of:
78% hardwood sawdust or hardwood fuel pellets
20% wheat bran (or other nitrogen-rich supplements like rice bran)
1% gypsum
1% brown sugar
Water to achieve 60-65% moisture content
Sterilization Process
Sterilization is crucial to prevent contamination. The substrate should be sterilized by:
Boiling the moistened sawdust mixture in a large pot or container
Maintaining the boil for 1-2 hours to eliminate competing microorganisms
Allowing the mixture to cool before inoculation
Inoculation and incubation
After sterilization:
Mix turkey tail spawn thoroughly into the cooled substrate
Pack the inoculated mixture into filter-patch bags or containers with small air holes
Incubate in a dark, warm environment (70-75°F or 21-24°C) for about 2-3 weeks
Colonization and fruiting
For optimal results:
Allow the mycelium to colonize and form a thick layer for about 3 months in the high CO2 environment of the sealed bag
Remove the top 1/4 to 1/3 of the bag to expose the colonized substrate
Place in a fruiting chamber with proper humidity and indirect light
Harvest the thick layer of fruit bodies that form on the exposed surface
Advantages of the sawdust block ,ethod
Faster colonization compared to logs, with fruiting possible in as little as a few weeks
Can be done indoors, allowing for year-round cultivation
Provides more control over growing conditions, leading to more consistent yield
Higher yields compared to grow kits
Challenges
Requires specialized equipment like a pressure cooker or autoclave for proper sterilization
Demands more technical knowledge and attention to sterile technique
Higher risk of contamination if proper procedures are not followed
Tips for successful Turkey Tail cultivation
Here are some additional tips to enhance your chances of successfully cultivating Turkey Tail mushrooms at home:
Maintain optimal conditions:
Temperature: Aim for a consistent temperature range between 68°F and 77°F (20°C and 25°C) during the colonization and fruiting stages.
Humidity: Maintain high humidity levels, around 80-90%, throughout the fruiting stage. Regularly misting the fruiting chamber or using a humidifier can help achieve this.
Airflow: Provide adequate fresh air exchange to prevent stagnation and promote healthy fungal growth. Create small holes in the grow bags or fruiting chamber for passive air circulation.
Light: While direct sunlight should be avoided, some indirect sunlight can be beneficial during fruiting. Aim for around 12 hours of diffused light per day.
Prevent contamination:
Sterilization: Ensure proper sterilization of all equipment and materials used in the cultivation process to minimize the risk of contamination. This is especially crucial for the DIY method.
Cleanliness: Maintain a clean and hygienic environment throughout the cultivation process. Wash your hands thoroughly before handling any materials or mushrooms.
Monitoring: Regularly inspect your grow kits or DIY setups for signs of mold or other contaminants. If contamination occurs, isolate and dispose of the affected materials promptly to prevent further spread.
Be patient!
Patience: Cultivating mushrooms takes time. Be patient and allow the mycelium to colonize the substrate fully before expecting fruiting bodies to appear.
Experimentation: As you gain experience, you can experiment with different substrates, spawn types, and fruiting conditions to optimize your results.
How to harvest turkey tail mushrooms properly
Instagram @mushroom__mama_official
Proper harvesting techniques ensure continued production while maintaining mushroom quality for medicinal use.
When to harvest turkey tail mushrooms
You should harvest turkey tail mushrooms when they reach full size but before the edges become brittle and dry. Fresh specimens have vibrant colors and slightly flexible texture.
Timing indicators: Harvest when mushrooms are 2-6 inches (5-15 cm) across with distinct color zones. Avoid specimens with faded colors, insect damage, or completely rigid texture.
Seasonal considerations: Prime harvesting occurs during active growing periods in spring and fall when mushrooms are fresh and potent.
Harvesting technique and tools
Cutting method: Use sharp scissors or a knife to cut mushrooms at the base, leaving the attachment point intact. This allows potential regrowth from the same location.
Sustainable practices: Take only what you need and leave smaller specimens to mature. Harvest no more than 75% of mushrooms from any single location to support ecosystem health.
Processing fresh turkey tail after harvest
Cleaning process: Remove debris with a soft brush, avoiding water unless absolutely necessary. Trim any tough or damaged portions before processing.
How to store Turkey Tail Mushrooms
Storing turkey tail mushrooms properly is essential to maintain their quality, potency, and longevity. Here are the best methods for storing both fresh and dried turkey tail mushrooms:
Storing Fresh Turkey Tail Mushrooms
1. Refrigeration
Container: Store fresh turkey tail mushrooms in a breathable container, such as a paper bag or a loosely covered container. Avoid plastic bags or airtight containers as they trap moisture and can cause the mushrooms to spoil quickly.
Temperature: Place the container in the refrigerator at a temperature between 34-38°F (1-3°C).
Moisture Control: To prevent excess moisture, place a dry paper towel or a clean cloth in the container with the mushrooms to absorb any residual moisture.
Shelf Life: Fresh turkey tail mushrooms are best used within a week to ensure optimal flavor and texture.
Storing Dried Turkey Tail Mushrooms
1. Airtight Containers
Store dried turkey tail mushrooms in an airtight container to protect them from moisture and humidity. Glass jars or resealable bags with the air squeezed out are ideal.
Keep the container in a cool, dark place, such as a pantry or cupboard, to avoid exposure to light which can degrade the quality over time.
Label the container with the name and date of the dried mushrooms to keep track of their freshness.
Dried mushrooms can be stored for several years, but it is best to use them within a year for optimal flavor and potency.
2. Adding Moisture Absorbers
For long-term storage, consider adding an oxygen absorber or food-safe silica desiccant packet to the container. This helps to absorb any residual moisture and keeps the mushrooms fresh.
Freeze your Turkey Tail Mushrooms
Clean the mushrooms thoroughly and remove any dirt or debris.
Blanch the mushrooms by boiling them for 1-2 minutes, then immediately transfer them to a bowl of ice water to cool. This step helps preserve their quality and extend their shelf life.
Divide the mushrooms into portion sizes that you are likely to use at once. This makes it convenient to defrost only what you need.
Place the portions in airtight containers, freezer bags, or vacuum-sealed bags.
Label each container with the name and date.
Store the containers in the freezer. Frozen turkey tail mushrooms can be stored for up to 12 months.
Preparation: Steep dried turkey tail mushrooms in alcohol (such as vodka) for several weeks.
Storage: Store the tincture in a cool, dark place away from direct sunlight. Tinctures can last for several years if stored properly.
By following these storage methods, you can ensure that your turkey tail mushrooms remain fresh and potent, allowing you to enjoy their medicinal benefits for an extended period.
Where do turkey tail mushrooms grow?
Turkey tail mushrooms are highly adaptable and can be found in a variety of environments across the globe. Here are some key details about their natural habitat:
Turkey tail mushrooms are found almost anywhere in the world, including North America, Europe, Asia, and other regions. They are particularly prolific in North America and are one of the most common forest mushrooms.
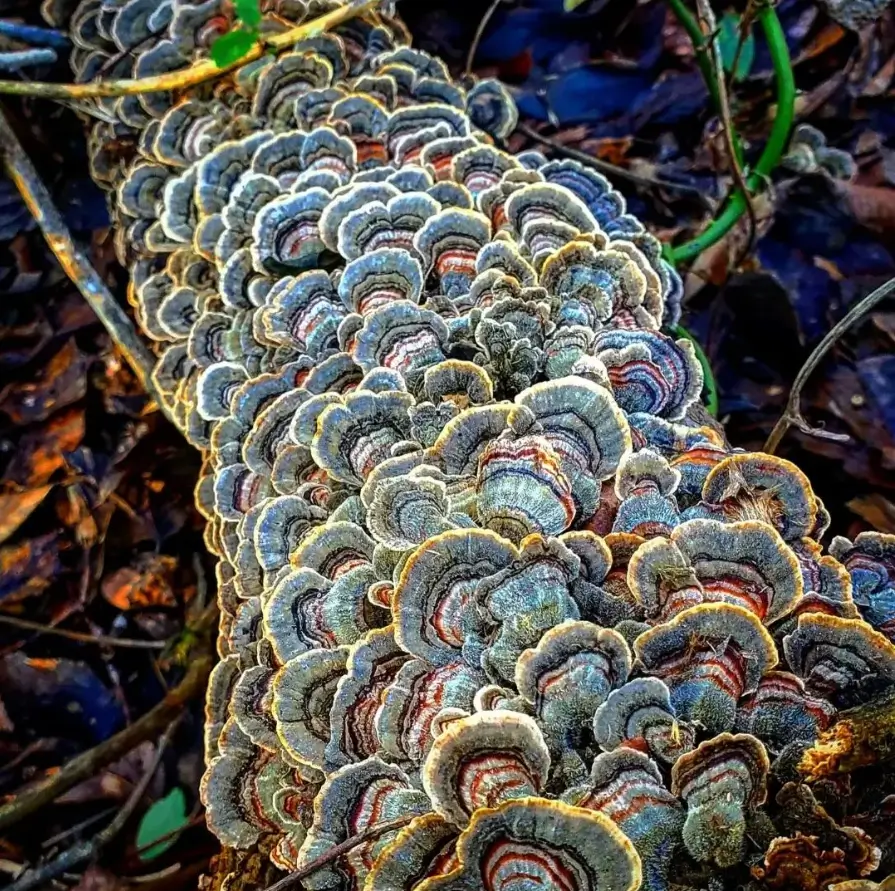
Turkey tail mushrooms primarily grow on dead or decaying hardwood logs, stumps, and fallen branches. They are saprotrophic, meaning they feed on decomposing organic matter, which helps in nutrient recycling in forest ecosystems.
They are most commonly found on hardwood trees such as oak, beech, maple, and birch. Occasionally, they can also grow on coniferous trees like fir and pine.
These mushrooms can grow year-round, but they are most noticeable and abundant in the autumn and winter months when they release their spores.
Ecological Role
Turkey tail mushrooms play a crucial role in breaking down tough materials in wood, returning nutrients to the soil, and maintaining forest health.
They cause white rot in the wood they colonize, which helps decompose lignin and cellulose, the primary components of wood.
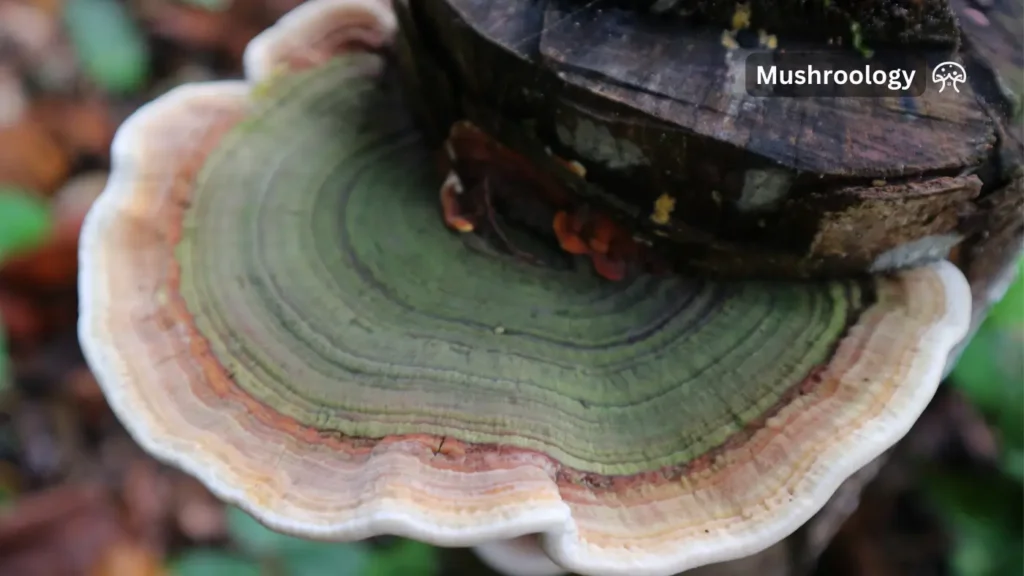
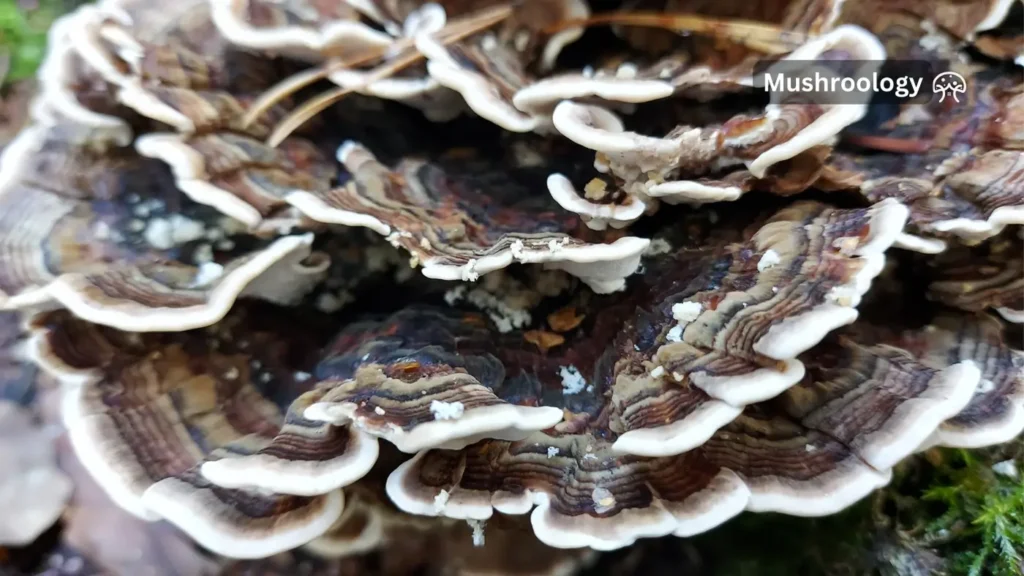
Turkey tail mushrooms are recognized by their multicolored, concentric zones on the cap, which resemble a turkey’s tail feathers. The underside of the cap is white and porous.
They often grow in groups, rows, or clusters, forming layered structures on the wood.
When foraging, look for them on the trunks of downed trees, dead stumps, or branches in deciduous forests. They are relatively easy to find due to their distinctive appearance and widespread presence.
Ensure proper identification by checking for the characteristic multicolored bands and white porous underside to avoid confusing them with lookalikes such as the false turkey tail (Stereum ostrea).
FAQs About Turkey Tail Mushroom
What is turkey tail mushroom?
Turkey tail mushroom (Trametes versicolor) is a type of medicinal fungus that grows on dead logs and trees worldwide. It gets its name from the colorful stripes on its cap, which resemble the tail feathers of a wild turkey. It has been used in traditional medicine for centuries, particularly in Asia.
2. What are the potential health benefits of turkey tail mushroom?
Turkey tail is rich in antioxidants and polysaccharides, such as PSK (polysaccharide-K) and PSP (polysaccharide-peptide), that have been studied for their potential benefits on the immune system. Research suggests it may help boost the immune response in people with certain cancers when used alongside conventional treatments like chemotherapy. Additionally, it is being studied for its potential role in gut health and fighting infections.
3. How is turkey tail mushroom consumed?
Turkey tail is typically consumed as a supplement in capsule or powder form, or as an ingredient in teas and soups. It is not typically eaten as a culinary mushroom due to its tough texture.
4. Are there any side effects of turkey tail mushroom?
Turkey tail is generally considered safe for consumption, but some people may experience mild side effects such as upset stomach, nausea, or darkened stools. It’s essential to consult with your doctor before taking turkey tail supplements, especially if you are pregnant, breastfeeding, or have any underlying health conditions.
5. Where can I buy turkey tail mushroom?
Turkey tail mushroom supplements can be found at health food stores, pharmacies, and online retailers. It’s important to choose reputable brands that offer high-quality, pure extracts.
6. What is the best way to grow turkey tail mushrooms?
The most common and effective way to cultivate turkey tail mushrooms is on hardwood logs, such as oak, maple, or beech. You can also grow them on supplemented sawdust blocks or even indoors using grow kits.
7. What are the ideal conditions for growing turkey tail mushrooms?
Turkey tail mushrooms thrive in a shaded and humid environment. They prefer temperatures between 18-24°C (64-75°F) and high humidity levels. Proper ventilation is crucial to prevent mold growth. Logs should be kept moist but not waterlogged.
8. How long does it take to grow turkey tail mushrooms?
The time to fruiting for turkey tail mushrooms can vary, but it usually takes about 6-12 months for the mycelium to colonize the substrate and produce mushrooms. The timing can be affected by factors like temperature, humidity, and the type of substrate used.
9. How do I know when turkey tail mushrooms are ready to harvest?
Turkey tail mushrooms are typically ready to harvest when the edges of the fruiting bodies start to turn brown or when the mushrooms become brittle and dry. Harvesting at this stage ensures that the mushroom has reached its peak potency for medicinal purposes.
10. Can I grow turkey tail mushrooms indoors?
Yes, you can grow turkey tail mushrooms indoors using grow kits available from various suppliers. These kits typically contain a pre-colonized substrate, like sawdust or wood chips, and instructions for creating the ideal growing conditions indoors.
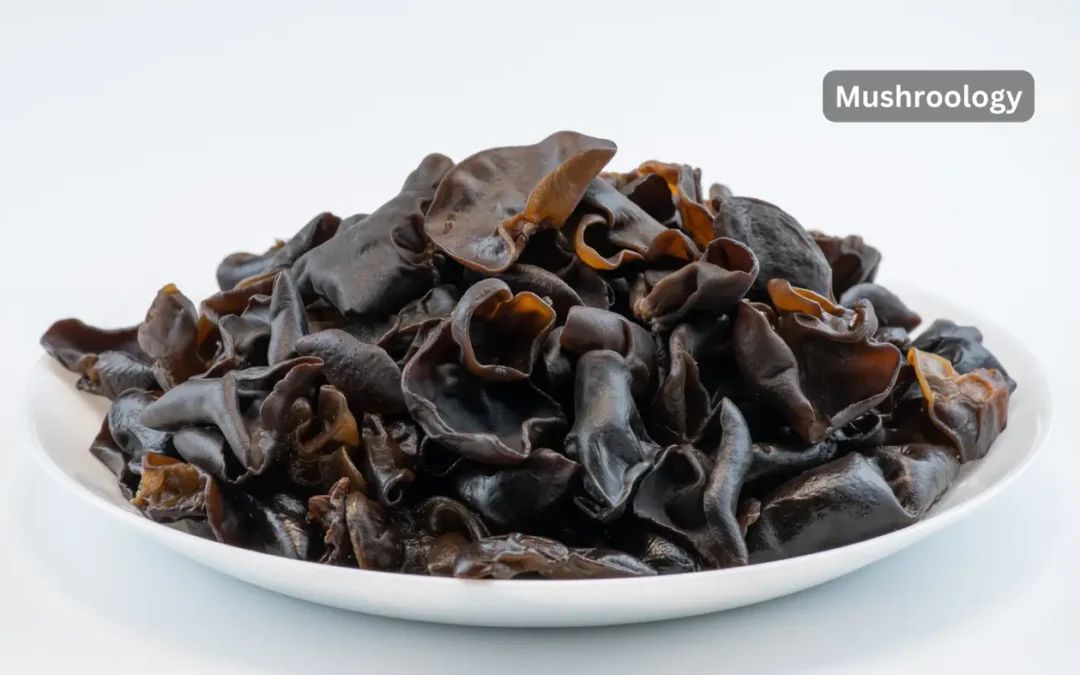
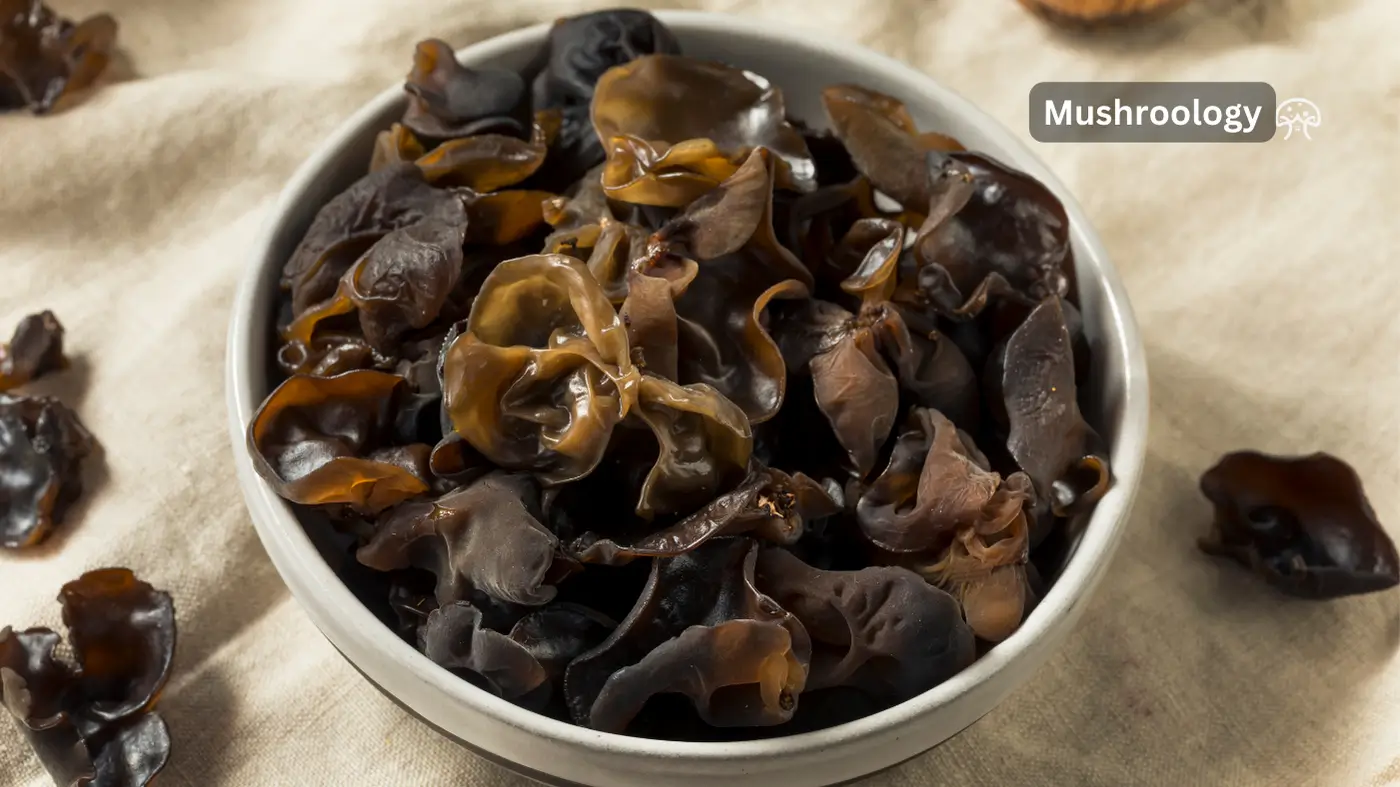
Wood ear mushrooms, also known as black fungus, jelly ear, or tree ear mushrooms, are a culinary delight and packed with numerous health benefits. These mushrooms have been used in traditional Chinese medicine for centuries and are now gaining recognition worldwide for their nutritional and medicinal properties. Here’s an in-depth look at the health benefits of wood ear mushrooms and why you should consider incorporating them into your diet.
Low in Calories and Fat: With only about 20-25 calories per serving, wood ear mushrooms are an excellent low-calorie food option.
Rich in B Vitamins: They are particularly high in B vitamins such as riboflavin (B2), pantothenic acid (B5), and folate (B9), which are crucial for energy metabolism and red blood cell formation.
Minerals: These mushrooms provide significant amounts of copper, iron, magnesium, selenium, and zinc, all of which play vital roles in various bodily functions.
2. Wood ear mushrooms are rich in antioxidants
Wood ear mushrooms are rich in antioxidants, which help protect your body from damage caused by free radicals:
Selenium: This mineral acts as a potent antioxidant, supporting heart health, joint health, and the immune system.
Polysaccharides and Flavonoids: These compounds have been linked to antioxidant activity, potentially reducing the risk of chronic diseases and supporting overall well-being.
3. Wood ear mushrooms provide immune system support
The polysaccharides found in wood ear mushrooms have immunomodulatory effects, meaning they can help regulate and boost the immune system:
Beta-Glucans: These compounds stimulate the activity of phagocytes, immune cells that ingest harmful particles, bacteria, and dead or dying cells, enhancing the body’s defense mechanisms.
Prebiotics: Wood ear mushrooms contain prebiotics that feed beneficial gut bacteria, promoting digestive health and maintaining bowel regularity.
Cholesterol Management: The dietary fiber and polyphenols in wood ear mushrooms help lower LDL (bad) cholesterol levels, which can reduce the risk of heart disease.
Blood Clotting: Compounds like adenosine and polysaccharides in these mushrooms inhibit blood clotting and platelet aggregation, improving circulation and potentially preventing heart attacks and strokes.
5. Blood Sugar Regulation
For individuals concerned about blood sugar levels, wood ear mushrooms may offer benefits:
Steady Blood Glucose Levels: Hot water extracts of wood ear mushrooms have been shown to help maintain steady blood sugar levels after meals, preventing spikes in blood glucose.
6. Brain Health
Wood ear mushrooms may also support brain health:
Inhibition of Beta Secretase: These mushrooms have been found to inhibit the activity of beta secretase, an enzyme that releases beta amyloid proteins linked to degenerative diseases like Alzheimer’s.
7. Anti-Inflammatory Properties
The anti-inflammatory compounds in wood ear mushrooms can help reduce inflammation in the body:
Chronic Inflammation: By reducing chronic inflammation, these mushrooms may help prevent various health issues, including arthritis and other inflammatory conditions.
How to Clean Wood Ear Mushrooms
Cleaning wood ear mushrooms is an essential step to ensure they are free from dirt, debris, and any potential contaminants. Here are the detailed steps to clean both dried and fresh wood ear mushrooms:
Cleaning Dried Wood Ear Mushrooms
Soak the Mushrooms:
Place the dried wood ear mushrooms in a bowl and cover them with warm water. Allow them to soak for about 15-20 minutes until they rehydrate and expand to their original size.
Alternatively, you can use cold water and soak them for about 1 hour or even overnight for a better texture.
Rinse and Rub:
After soaking, drain the water and rinse the mushrooms under running water.
Rub each mushroom gently between your fingers to remove any dirt or debris hidden in the folds.
Trim the Tough Parts:
Use a knife or scissors to trim off the tough stems or any hard parts where the mushroom was attached to the wood.
Final Rinse:
Give the mushrooms a final rinse under running water to ensure they are clean and free from any remaining dirt.
Cleaning Fresh Wood Ear Mushrooms
Brush or Cloth Method:
Use a dry brush, such as a mushroom brush, pastry brush, or toothbrush, to gently scrub away any dirt or debris from the surface of the mushrooms.
Alternatively, you can use a damp cloth to wipe the mushrooms clean, which allows for a more thorough cleaning without soaking the mushrooms in water.
Rinse Method:
Place the mushrooms in a colander and rinse them under cold running water. Gently rub the mushrooms with your fingers to remove any dirt.
If the mushrooms are particularly dirty, you can dunk them in a bowl of clean water and swish them around to dislodge any debris.
Trim the Tough Parts:
As with dried mushrooms, trim off any tough stems or hard parts using a knife or scissors.
Drying:
After cleaning, pat the mushrooms dry with a clean kitchen towel or paper towels to remove excess water before cooking.
Avoid Over-Soaking: Do not soak the mushrooms for too long as it can affect their texture and may lead to spoilage.
Use Immediately: It is best to use the cleaned mushrooms immediately or within a day to ensure freshness and prevent spoilage.
How to store wood ear mushrooms
Are you looking to keep your wood ear mushrooms fresh and flavorful for as long as possible? Let’s discover the essential steps to properly store both fresh and dried wood ear mushrooms, ensuring they remain in prime condition for your culinary adventures.
1. Store Fresh Wood Ear Mushrooms
Fresh wood ear mushrooms require careful handling to maintain their texture and prevent spoilage. Here’s how you can store them effectively:
Refrigeration
Container: Place the fresh wood ear mushrooms in a paper bag or wrap them in paper towels. This helps absorb excess moisture and prevents the mushrooms from becoming slimy.
Temperature: Store the mushrooms in the main compartment of your refrigerator, where the temperature is consistent. Avoid the door shelves, as temperatures can fluctuate.
Shelf Life: Fresh wood ear mushrooms can last up to one week in the refrigerator when stored properly.
2. Store Rehydrated Wood Ear Mushrooms
If you’ve rehydrated more wood ear mushrooms than you need, freezing them is the best way to preserve their quality:
Freezing
Immediate Freezing: Freeze the rehydrated mushrooms immediately to prevent bacterial growth.
Blanching: Quickly blanch the mushrooms in hot water before freezing to help preserve their texture.
Storage: Place the blanched mushrooms in a freezer-safe bag or container, removing as much air as possible before sealing.
3. Store Dried Wood Ear Mushrooms
Dried wood ear mushrooms have a long shelf life when stored correctly. Follow these steps to keep them fresh:
Airtight Containers
Container: Store dried mushrooms in an airtight container, such as a glass jar or resealable plastic bag. This prevents moisture from entering and spoiling the mushrooms.
Location: Keep the container in a cool, dark, and dry place, such as a pantry or cupboard. Avoid warm locations as heat can reduce their shelf life.
Shelf Life: Dried wood ear mushrooms can last for six months to a year when stored properly.
Cold Storage
Refrigeration or Freezing: For maximum shelf life, store dried mushrooms in the refrigerator or freezer. This helps maintain their freshness and prevents spoilage due to heat and moisture.
Preparation: Before using dried mushrooms, rehydrate them by soaking in warm water for 15-30 minutes until they regain their original texture.
How Long Do Wood Ear Mushrooms Last?
Understanding the shelf life of wood ear mushrooms is crucial for ensuring their freshness and safety. Whether you have fresh, dried, or rehydrated wood ear mushrooms, knowing how long they last and how to store them properly can make all the difference.
1. Fresh Wood Ear Mushrooms
Fresh wood ear mushrooms have a relatively short shelf life and need to be stored properly to maximize their freshness.
Refrigeration
Whole, Uncooked: Fresh wood ear mushrooms can last for 7 to 14 days when stored in the refrigerator. Place them in a paper bag or wrap them in paper towels to absorb excess moisture and prevent them from becoming slimy.
Sliced, Uncooked: If you’ve already sliced the mushrooms, they will last for about 5 to 7 days in the fridge.
Cooked: Cooked wood ear mushrooms should be consumed within 3 to 5 days when stored in the refrigerator.
2. Rehydrated Wood Ear Mushrooms
Rehydrated wood ear mushrooms have a very short shelf life due to their tendency to attract bacteria that produce toxins.
Refrigeration
Short-Term: After rehydrating, wood ear mushrooms should be used within 3 to 4 days if stored in a covered dish or container in the refrigerator.
Freezing: For longer storage, it is recommended to freeze rehydrated wood ear mushrooms immediately. This helps prevent bacterial growth and preserves their texture. Blanch them quickly in hot water before freezing for best results.
3. Dried Wood Ear Mushrooms
Dried wood ear mushrooms have the longest shelf life and are the most convenient for long-term storage.
Airtight Storage
Shelf Life: When stored in an airtight container in a cool, dry, and dark place, dried wood ear mushrooms can last for 1 to 2 years. This method prevents moisture from entering and spoiling the mushrooms.
Freezing: For maximum shelf life, store dried mushrooms in the freezer. This can extend their shelf life to up to 3 years.
How to maximize Shelf Life of wood ear mushrooms?
Humidity and Ventilation: Ensure a balance between humidity and ventilation. Too much humidity can promote mold growth, while inadequate humidity can cause the mushrooms to dry out and shrivel.
Temperature Consistency: Keep your storage area at a consistent temperature to prevent spoilage. For fresh mushrooms, the refrigerator should be set at or below 40°F (4°C).
Avoid Washing Before Storage: Do not wash fresh mushrooms before storing them, as this can cause them to absorb water and spoil more quickly.
Regular Inspection: Regularly check stored mushrooms for any signs of spoilage, such as mold, an off smell, or a slimy texture, and discard any affected pieces to prevent contamination.
Can You Eat Wood Ear Mushrooms Raw?
While it might be tempting to try wood ear mushrooms raw, it’s best to cook them to ensure they are safe to eat and to enjoy their full range of textures and flavors.
Why You Shouldn’t Eat Wood Ear Mushrooms Raw
Bacterial Contamination
One of the primary reasons to avoid eating wood ear mushrooms raw is the risk of bacterial contamination. Raw wood ear mushrooms can harbor harmful bacteria that may lead to foodborne illnesses. Cooking the mushrooms thoroughly helps to eliminate these bacteria, making them safe to eat.
Digestive Issues
Consuming raw wood ear mushrooms can also cause digestive discomfort. The mushrooms have a tough, gelatinous texture that can be difficult to digest when not cooked. Cooking helps to soften the mushrooms, making them easier on your digestive system.
What Does Wood Ear Mushroom Taste Like?
Wood ear mushrooms, are a unique ingredient in many Asian cuisines. While they may not be known for their strong flavor, their distinctive texture and ability to absorb the flavors of the dishes they are cooked with make them a versatile and valued component in various recipes.
Mild and Earthy
Wood ear mushrooms have a very mild flavor, often described as slightly earthy or woodsy. This subtle taste allows them to blend seamlessly into a variety of dishes without overpowering other ingredients. They are particularly good at absorbing the spices and nuances of the dishes they are added to, making them a versatile ingredient in many culinary applications.
Savory Umami
While the mushrooms themselves do not impart a strong flavor, they do have a hint of savory umami, which can enhance the overall taste of a dish. This makes them a great addition to soups, stews, and stir-fries where they can soak up the flavors of the broth and seasonings.
Texture
The texture of wood ear mushrooms is one of their most distinctive features and is often the main reason they are included in recipes:
Crunchy and Gelatinous
Crunchy: When cooked, wood ear mushrooms maintain a firm, crunchy texture that adds a pleasant contrast to softer ingredients in a dish. This crunchiness is particularly appreciated in dishes like hot and sour soup, stir-fries, and salads.
Gelatinous: They also have a slightly gelatinous, jelly-like consistency, which can provide a unique mouthfeel. This texture is often described as slippery but pleasant, adding an interesting dimension to the dishes they are included in.
Are There Any Known Side Effects of Consuming Wood Ear Mushrooms?
Here’s a detailed look at the known side effects of consuming wood ear mushrooms and precautions you should take.
1. Allergic Reactions
While allergic reactions to wood ear mushrooms are relatively rare, they can occur, particularly in individuals who are sensitive to fungi. Symptoms of an allergic reaction may include:
Itching
Swelling
Rash
Difficulty breathing
If you experience any of these symptoms after consuming wood ear mushrooms, seek medical attention promptly.
2. Digestive Distress
Some people may experience digestive discomfort after consuming wood ear mushrooms. This can include:
Bloating
Gas
Upset stomach
If you are trying wood ear mushrooms for the first time, it’s advisable to start with a small portion to gauge your body’s response.
3. Interactions with Medications
Wood ear mushrooms could potentially interact with certain medications, particularly:
Blood-thinning medications: Wood ear mushrooms have natural anticoagulant properties, which can enhance the effects of blood-thinning medications and increase the risk of bleeding.
Medications affecting blood sugar levels: If you are taking medications for diabetes, consult your healthcare provider before incorporating wood ear mushrooms into your diet, as they may affect blood sugar levels.
4. Contaminant Risk
Wild-harvested wood ear mushrooms can carry the risk of contamination with harmful substances from their environment. It’s advisable to purchase wood ear mushrooms from reputable sources that follow proper harvesting and handling practices. Contaminated mushrooms can lead to foodborne illnesses, so proper cleaning and cooking are essential.
5. Culinary Precautions
Improper preparation of wood ear mushrooms can result in an unappetizing, rubbery texture. To avoid this:
Rehydrate dried mushrooms properly: Soak them in warm water until they are soft and pliable.
Cook thoroughly: Always cook wood ear mushrooms before consuming them to kill any potential bacteria and improve their texture.
6. Risk of Anaphylaxis
In rare cases, wood ear mushrooms can cause anaphylaxis, a severe and life-threatening allergic reaction. This is caused by proteins in the mushrooms that can trigger a severe immune response.
Symptoms include severe hypotension, difficulty breathing, and loss of consciousness. If you have experienced anaphylaxis after consuming wood ear mushrooms, avoid them entirely and consult a healthcare professional.
While wood ear mushrooms offer numerous health benefits, it’s important to be aware of their potential side effects.
Always start with a small portion if you are trying them for the first time, and consult your healthcare provider if you are on medication or have known allergies. Proper handling, cleaning, and cooking are crucial to avoid any adverse effects and to enjoy the unique texture and mild flavor of wood ear mushrooms safely.
Your complete guide to Trametes versicolor health benefits, backed by clinical research
You’ve probably heard about Turkey tail mushrooms supporting cancer treatment and immune health. But what does current science actually prove? After reviewing thousands of studies, researchers have identified specific compounds in Turkey tail (Trametes versicolor) that show measurable health benefits, particularly for immune function and gut health.
Bottom Line: Clinical studies show Turkey tail mushroom’s PSK and PSP compounds can support cancer treatment outcomes when used alongside conventional therapy. Research also confirms prebiotic benefits for gut health and immune system modulation, but you shouldn’t use Turkey tail as a replacement for medical treatment.
What makes Turkey tail mushroom benefits unique
Turkey tail mushrooms contain two scientifically validated compounds that set them apart from other medicinal fungi. Polysaccharide-K (PSK) and polysaccharide peptide (PSP) have been studied in over 400 clinical trials since the 1970s.
According to the National Cancer Institute, PSK is approved as an anticancer drug in Japan and has been used as adjuvant therapy in thousands of cancer patients since the mid-1970s. This makes Turkey tail one of the most researched medicinal mushrooms in the world.
The mushroom’s fan-shaped appearance resembles a turkey’s tail, hence the name. In traditional Chinese medicine, it’s called Yun Zhi (cloud mushroom), while Japanese practitioners know it as kawaratake. These colorful brackets grow on dead hardwood trees throughout North America and are among the most common mushrooms you’ll find in forests.
Key bioactive compounds:
PSK (polysaccharide-K or krestin): 100 kDa protein-bound polysaccharide
PSP (polysaccharide peptide): Similar structure, different protein composition
Beta-glucans: Immune-modulating polysaccharides
Phenolic compounds: Over 35 different antioxidant molecules
How Turkey tail mushroom benefits your immune system
Turkey tail mushrooms work as immune modulators, meaning they help balance rather than simply boost immune function. Clinical research published in 2024 shows these mushrooms can increase cancer-fighting cells in the immune system.
The mechanism involves specific recognition of beta-glucans by immune receptors in your digestive tract. When these receptors detect Turkey tail’s unique polysaccharides, they trigger increased surveillance and antibody production against harmful pathogens.
Proven immune benefits:
Increased natural killer (NK) cell activity
Enhanced T-cell and B-cell function
Improved white blood cell counts during treatment
Better recovery of immune function after radiation therapy
A 2012 clinical trial found breast cancer patients taking Turkey tail capsules recovered immune function after radiation therapy more quickly than those who didn’t. UCLA Health research confirms Turkey tail acts as a nonspecific immune modulator, supporting overall immune system balance.
Turkey tail mushroom benefits for cancer support
Turkey tail shows the strongest scientific evidence for supporting conventional cancer treatment. Six randomized clinical trials in lung cancer patients found that those receiving PSK improved in immune function, body weight, well-being, and survival outcomes.
Cancer types with research support:
Gastric cancer: PSK improved survival when added to chemotherapy
Colorectal cancer: Better 10-year survival rates with PSK plus standard treatment
Lung cancer: Enhanced immune function and quality of life
Breast cancer: Faster immune recovery after radiation therapy
Recent 2024 analysis shows modest evidence for better survival among cancer patients when Turkey tail is used alongside conventional treatment. However, Turkey tail extract doesn’t treat cancer on its own – it works as a complementary therapy under medical supervision.
Important: The FDA hasn’t approved Turkey tail for cancer treatment in the United States. In Japan, PSK is prescription medication used with chemotherapy, not a replacement for conventional treatment.
Safety Warning
Turkey tail supplements can’t replace cancer treatment medications
Always consult your oncologist before using Turkey tail during cancer therapy
Some compounds may interact with chemotherapy drugs like cyclophosphamide and tamoxifen
The North American Mycological Association emphasizes medical supervision for therapeutic mushroom use
Turkey tail mushroom benefits for gut health
Turkey tail acts as a prebiotic, feeding beneficial bacteria in your gut microbiome. 2024 research reviews confirm Turkey tail can alter your microbiome composition and help your body regulate its own bacterial balance.
Your gut houses 70-80% of immune cells, making gut health directly connected to immune function. Turkey tail’s prebiotic effects support both digestive wellness and immune system strength.
Gut health research findings:
Increases beneficial Bifidobacterium and Lactobacillus bacteria
Reduces harmful Clostridium and Staphylococcus populations
Improves gut bacterial diversity over 8-week supplementation
Acts similarly to commercial prebiotic supplements
A randomized clinical trial published in Gut Microbes gave healthy volunteers 3,600 mg (3.6 grams) of Turkey tail PSP daily for eight weeks. Results showed increased beneficial bacteria and suppressed growth of potentially harmful microorganisms.
Test-tube studies confirm Turkey tail extract significantly increases helpful bacteria while reducing populations of problem bacteria that can cause infections and digestive issues.
How Turkey tail mushroom benefits work as prebiotics
Unlike probiotics (live beneficial bacteria), prebiotics are food for the good bacteria already in your gut. Turkey tail’s PSP and PSK compounds can’t be digested by human enzymes, but gut bacteria can ferment them into beneficial metabolites.
Think of your gut microbiome like a garden – probiotics are like planting new flowers, while prebiotics like Turkey tail are the fertilizer that helps existing plants thrive. Research shows PSP in Turkey tail improves gut health through this prebiotic activity.
Prebiotic mechanisms:
Selective fermentation by beneficial bacteria strains
Production of short-chain fatty acids that feed intestinal cells
Enhanced gut barrier function and reduced inflammation
Improved nutrient absorption and metabolic health
Turkey tail mushroom side effects you should know
Turkey tail mushrooms are generally well-tolerated, but you should understand potential side effects before starting supplementation. Clinical safety data from 2024 shows few adverse events in healthy adults.
Common side effects (rare):
Mild digestive upset or constipation
Flu-like symptoms in sensitive individuals
Darkened nail beds (harmless but noticeable)
Serious side effects requiring medical attention:
Allergic reactions in people with mushroom or mold allergies
Potential anaphylaxis in severely allergic individuals
Interactions with prescription medications
WebMD’s clinical database reports that some cancer patients receiving both chemotherapy and PSK experienced nausea, vomiting, low white blood cell counts, and liver problems. However, it’s unclear whether these effects came from chemotherapy or PSK supplementation.
Turkey tail mushroom interactions with medications
Turkey tail can interact with several medication types. Recent pharmaceutical research identifies specific drug interactions you need to know about.
Medications that may interact:
Chemotherapy drugs: May alter how cyclophosphamide and tamoxifen are processed
Immunosuppressants: Could counteract medications for autoimmune conditions or organ transplants
Blood thinners: May increase bleeding risk when combined with warfarin or similar drugs
Diabetes medications: Could cause blood sugar to drop too low
Why interactions occur: Turkey tail’s immune-stimulating properties can interfere with immunosuppressive medications. The compounds may also affect liver enzymes that process certain drugs, changing how quickly medications are eliminated from your body.
Memorial Sloan Kettering Cancer Center emphasizes consulting healthcare providers before combining Turkey tail with any medications, especially cancer treatments.
Turkey tail mushroom benefits during pregnancy and breastfeeding
Current safety data doesn’t support Turkey tail use during pregnancy or breastfeeding. Clinical safety reviews note insufficient research to establish safety for pregnant or nursing women.
Pregnancy considerations:
No established safe dosage for pregnant women
Immune system changes during pregnancy make effects unpredictable
Potential interactions with prenatal vitamins or medications
Risk-benefit analysis favors avoiding use until after breastfeeding
Breastfeeding concerns:
Unknown whether PSK or PSP compounds pass into breast milk
Potential effects on nursing infant’s developing immune system
No clinical trials in breastfeeding mothers
The cautious approach is avoiding Turkey tail supplements during pregnancy and breastfeeding. Focus on proven safe immune support like adequate sleep, nutrition, and stress management instead.
How to use Turkey tail mushroom safely
Turkey tail supplements come in various forms with different concentrations of active compounds. Dosage research from clinical trials provides guidance for safe use.
PSK extract: 3,000-9,000 mg (3-9 grams) daily in cancer studies
PSP extract: 1,080-3,600 mg (1.08-3.6 grams) daily for gut health
Safety guidelines:
Start with small doses to test tolerance
Take with food to reduce digestive upset
Choose products from reputable manufacturers with third-party testing
Store in cool, dry places away from direct sunlight
Quality considerations include looking for standardized extracts that specify PSK or PSP content. The FDA doesn’t regulate supplements like prescription drugs, so product quality varies significantly between manufacturers.
Best time to take Turkey tail mushroom
Clinical studies used various dosing schedules, but consistent daily use shows better results than sporadic supplementation. Research timing suggests:
Optimal timing:
Morning with breakfast for immune support
Split doses throughout the day for gut health benefits
Consistent daily use for 8+ weeks to see measurable effects
Cycling periods (4 weeks on, 1 week off) for long-term use
Timing to avoid:
Right before bedtime (may cause mild stimulation)
During acute illness without medical supervision
Immediately before or after immunizations (discuss with doctor)
Frequently asked questions about Turkey tail mushroom benefits
Q: How long does it take to see Turkey tail mushroom benefits? A: Research shows gut health improvements within 2-4 weeks, while immune function benefits may take 6-8 weeks of consistent use. Cancer support studies used 6 months to several years of supplementation.
Q: What are the main Turkey tail mushroom benefits for cancer patients? A: Clinical studies show PSK can improve survival rates, immune function, and quality of life when used alongside conventional cancer treatment. It’s approved as prescription medication in Japan for this purpose.
Q: Can Turkey tail mushroom benefits help with autoimmune diseases? A: Turkey tail acts as an immune modulator rather than simply boosting immunity. However, people with autoimmune conditions should consult doctors before use, as it may interfere with immunosuppressive medications.
Q: Are Turkey tail mushroom side effects dangerous? A: Most people tolerate Turkey tail well. Serious side effects are rare but can include allergic reactions in people with mushroom allergies and medication interactions. Always consult healthcare providers before starting.
Q: How do Turkey tail mushroom benefits compare to other medicinal mushrooms? A: Turkey tail has the most extensive clinical research for cancer support, while reishi and lion’s mane have stronger evidence for other conditions. Turkey tail excels specifically in immune modulation and gut health.
Q: Can you get Turkey tail mushroom benefits from eating whole mushrooms? A: Wild Turkey tail mushrooms are too tough and woody to eat. Supplements use extraction methods to concentrate the beneficial PSK and PSP compounds that aren’t available from eating raw mushrooms.
Helpful resources for Turkey tail mushroom information
Local oncologists and integrative medicine practitioners
Recommended books:
“Mycelium Running” by Paul Stamets
“The Fungal Pharmacy” by Robert Rogers
“Healing Mushrooms” by Tero Isokauppila
Now you understand what current science says about Turkey tail mushroom benefits. You’ll see better results if you choose quality extracts, use appropriate dosages, and work with healthcare providers when using Turkey tail for serious health conditions.
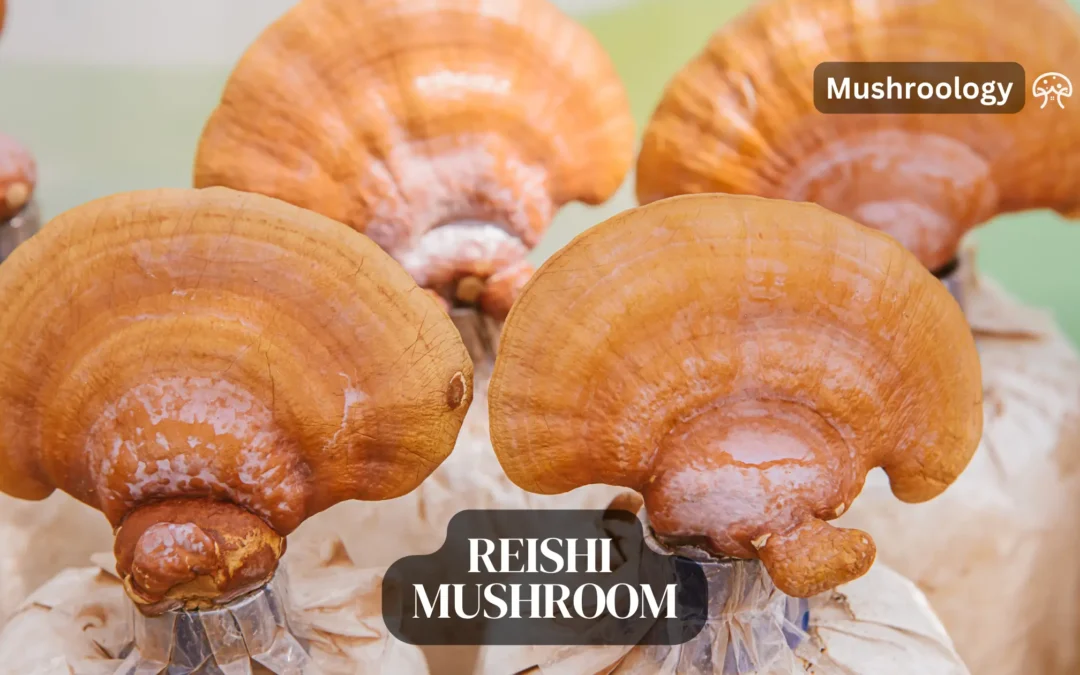
What you need to know to successfully grow reishi mushrooms (Ganoderma lucidum) indoors
You’ve probably heard about reishi mushrooms and their health benefits. Now you’re ready to grow reishi mushrooms yourself. Here’s the thing – it’s easier than you think, but you need the right approach.
Growing reishi mushrooms at home takes patience. These medicinal fungi need 2-3 months from start to harvest, but the wait is worth it. According to mycologist Paul Stamets in “Growing Gourmet and Medicinal Mushrooms,” home cultivation gives you fresher, more potent mushrooms than store-bought options.
Safety Warning
Never eat wild mushrooms without 100% expert identification
Reishi mushrooms are NOT for culinary use – they’re woody and bitter
Process them into teas or tinctures for medicinal use
Contact the North American Mycological Association (NAMA) for identification help
Instagram @lunarootsmagick
How you prepare substrate to grow reishi mushrooms
Your reishi substrate is the foundation for success. You’ll need hardwood pellets and wheat bran – that’s it. The Mushroom Cultivator by Stamets and Chilton recommends this simple recipe for a 5-pound (2.3 kg) block:
5 cups hardwood pellets
1.25 cups wheat bran
6 cups water
Soak the pellets in water for 30 minutes until they break down into sawdust. Mix in the bran thoroughly. When you squeeze the mixture, only a couple drops should come out – that’s your target 65% moisture content.
Pack this reishi substrate into filter patch bags. Sterilize at 250°F (121°C) for 90 minutes in a pressure cooker. Let it cool completely – this takes about 8 hours.
Try this: Add 1 tablespoon (15 ml) of gypsum per 5 pounds (2.3 kg) of substrate. Cornell University’s mushroom program found this improves yields by 15-20%.
What supplies you need to grow reishi mushrooms indoors
You won’t need expensive equipment to grow reishi mushrooms. Here’s your shopping list:
Reishi spawn (grain or sawdust)
Hardwood pellets from any hardware store
Wheat bran from the grocery store
Filter patch grow bags
Pressure cooker or autoclave
Sharp knife for harvesting
Food dehydrator for drying
The University of Kentucky Cooperative Extension recommends starting with pre-made spawn rather than spores. You’ll get more consistent results and faster colonization – typically 14-21 days versus 30+ days with spores.
How you create perfect conditions for reishi mushroom cultivation
Temperature matters when you grow reishi mushrooms. During colonization, maintain 75-82°F (24-28°C). The mushrooms won’t grow well below 70°F (21°C) or above 85°F (29°C).
Once your substrate turns white with mycelium, it’s time to fruit. Lower the temperature to 71-77°F (22-25°C) and increase humidity to 85-90%. According to research from Fungi Perfecti laboratories, this temperature drop triggers fruiting.
You’ll see “antlers” first – finger-like projections that look alien. These form when CO2 levels are high. Want the classic bracket shape? Increase fresh air exchange. The mushrooms sense oxygen levels and change their growth pattern.
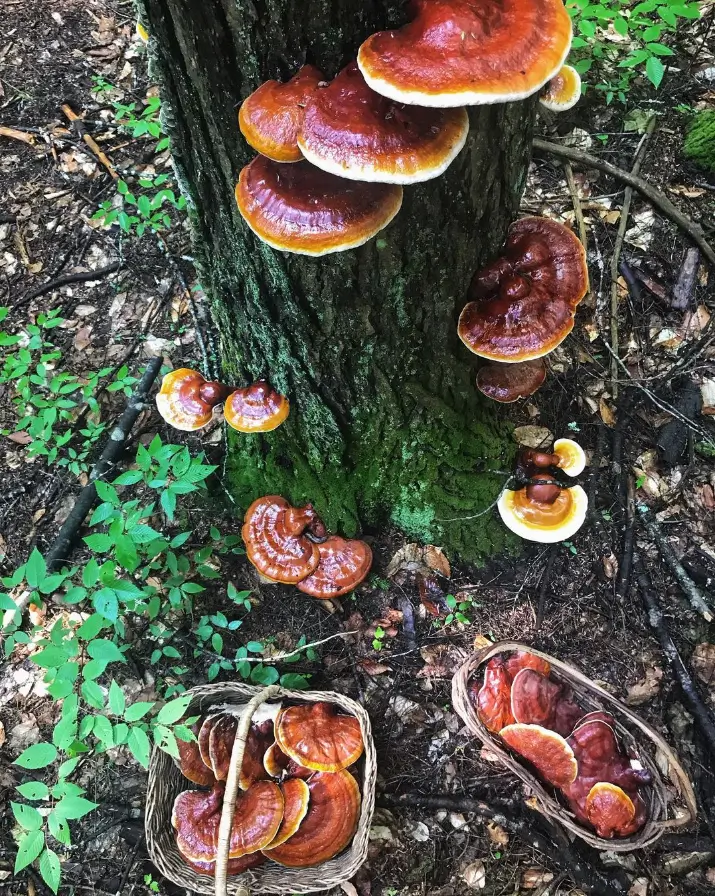
When you should harvest reishi mushrooms
Timing your harvest makes all the difference. You’ll know when to harvest reishi mushrooms by watching the edges. They start white, turn orange, then deep red.
The Chinese University of Hong Kong’s medicinal mushroom research shows peak potency occurs just before spore release. That’s when the entire mushroom has a shiny, varnished appearance – typically 2-3 months after fruiting begins.
Cut at the base with a sharp knife. Fresh reishi stores for 4 weeks in a paper bag in your refrigerator. For long-term storage, slice immediately and dry at 95-115°F (35-46°C) until crisp.
Why reishi substrate preparation determines your success
Your substrate quality directly impacts yields. The Journal of Agricultural Technology found that supplemented hardwood produces 25% more mushrooms than plain sawdust.
Mix ratios matter. Too much bran (over 20%) invites contamination. Too little (under 15%) slows growth. Stick to the proven 80:20 sawdust-to-bran ratio.
Local alternatives work too. Rice bran substitutes perfectly for wheat bran in Asia, according to Thailand’s Naresuan University research. Experiment with what’s available – just keep the ratios consistent.
How indoor cultivation beats outdoor growing
Indoor reishi mushroom cultivation gives you control. You manage temperature, humidity, and contamination risks. The World Journal of Microbiology found indoor yields average 0.5-0.7 pounds (227-318 g) per 5-pound (2.3 kg) block.
Outdoor log cultivation takes 6-12 months versus 2-3 months indoors. Plus, you’ll deal with pests, weather, and inconsistent results. Save outdoor methods for when you’re experienced.
Troubleshooting common problems when you grow reishi mushrooms
Green mold on substrate? You have Trichoderma contamination. Remove affected bags immediately – it spreads fast. Next time, sterilize longer or check your sterile technique.
Antlers but no brackets? Increase fresh air. Open bags wider or add more air holes. Reishi mushrooms need oxygen to form proper brackets.
Slow colonization? Check your temperature with a reliable thermometer. Even 5°F (3°C) below optimal slows growth significantly. The substrate might also be too dry – it should feel like a wrung-out sponge.
Instagram @ dr.elderberry
Frequently asked questions about growing reishi mushrooms
Q: How long does it take to grow reishi mushrooms from start to harvest? A: Most reishi mushrooms take 60-90 days total: 14-21 days for colonization, then 45-70 days for fruiting at 71-77°F (22-25°C).
Q: What’s the best reishi substrate recipe for beginners? A: Use 5 cups hardwood pellets, 1.25 cups bran, and 6 cups water. This makes about 5 pounds (2.3 kg) of substrate with ideal 65% moisture.
Q: Can you grow reishi mushrooms without a pressure cooker? A: No. Proper sterilization at 250°F (121°C) requires pressure. Without it, contamination rates exceed 90%, according to Fungi Perfecti research.
Your local mycological society for hands-on workshops
Now you understand how to grow reishi mushrooms successfully. You’ll get better results when you maintain proper temperatures and moisture levels throughout the process.
Your next step: Order quality reishi spawn from a reputable supplier like Fungi Perfecti or Field & Forest Products. Start with one 5-pound (2.3 kg) block to learn the process.
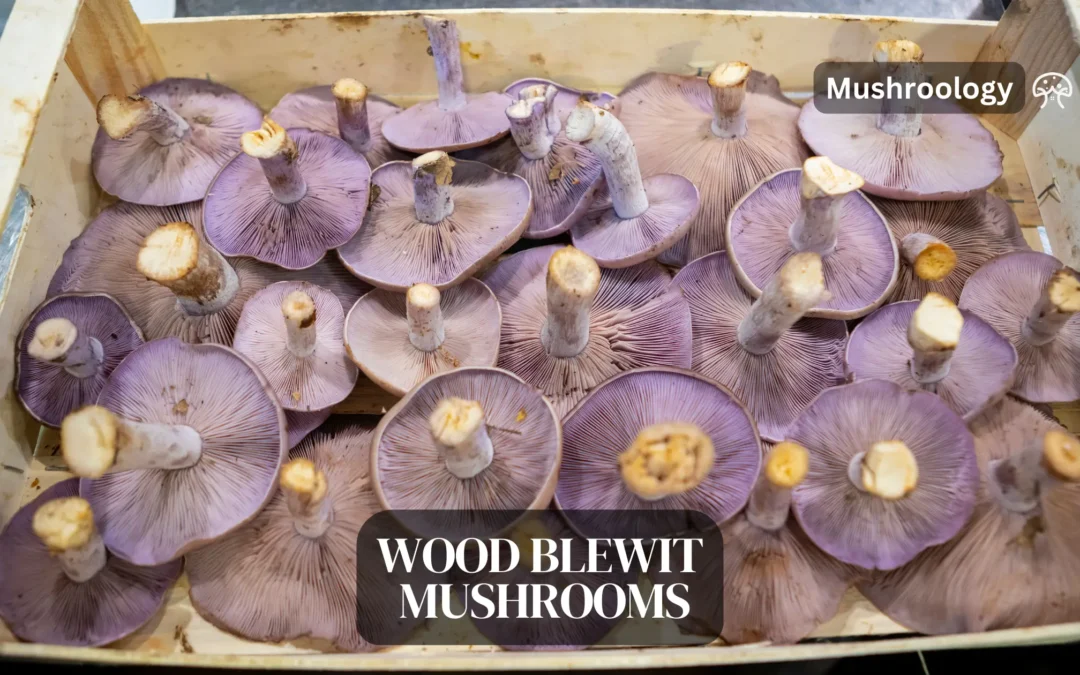
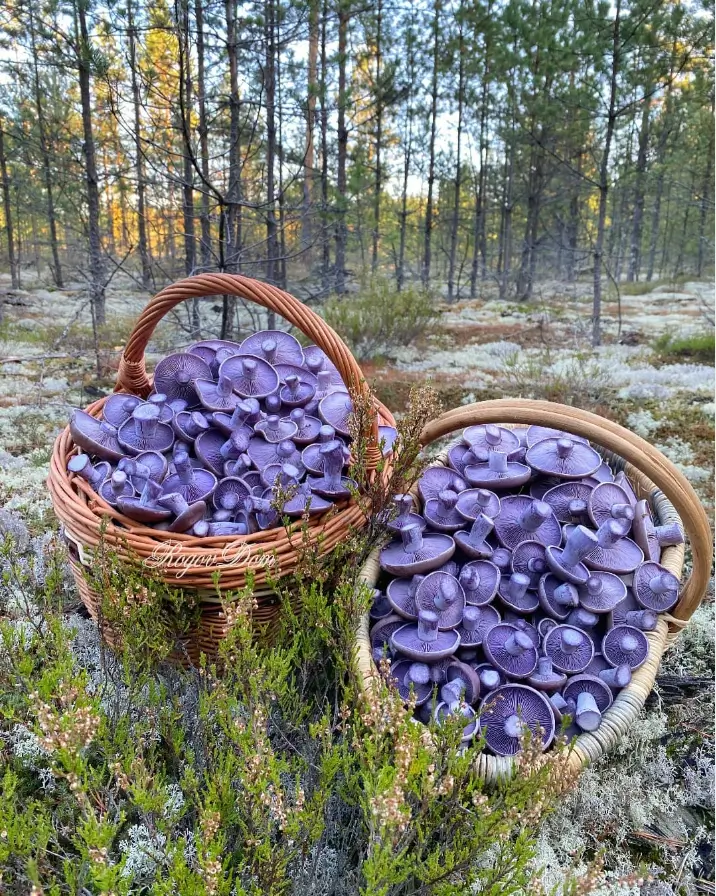
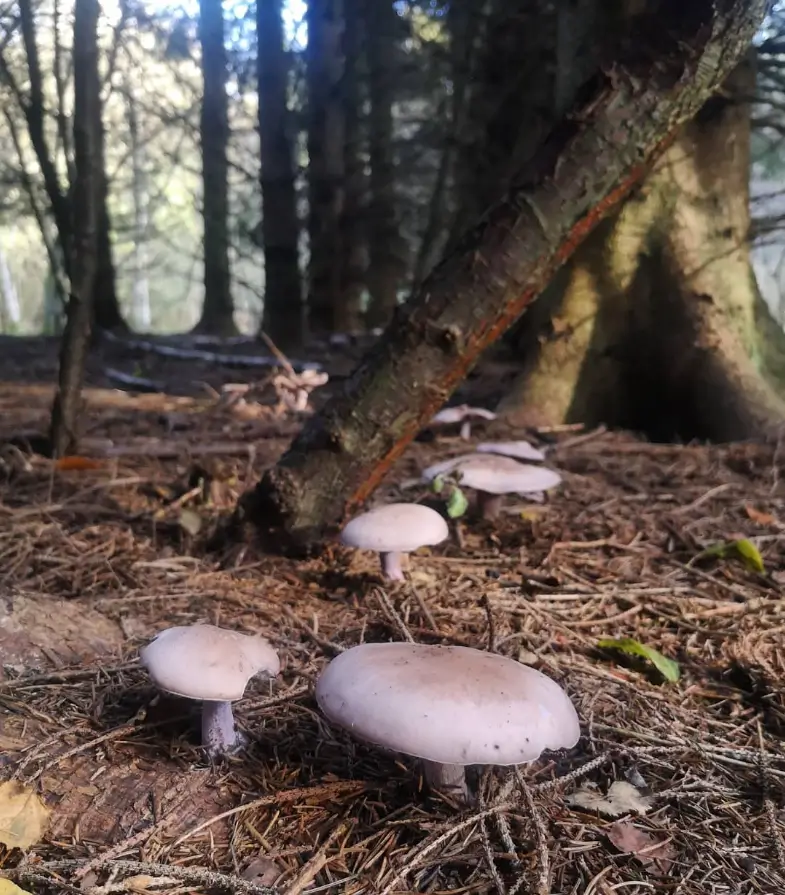
Everything you need to know about blewit mushrooms (Lepista nuda) – from finding them in the wild to growing your own
You’ve probably seen these striking purple mushrooms at farmers markets or wondered about that violet-tinged fungus in your local woods. Wood blewit mushrooms (Lepista nuda) are one of the few edible mushrooms you can still find fruiting into December. Here’s what you need to know about identifying, cooking, and even growing these unique fungi at home.
What is a blewit mushroom?
Wood blewit mushrooms are edible fungi with distinctive purple to lilac coloring when young. The name “blewit” comes from the old English “blue hat,” referring to their violet-blue caps. According to mycologist David Arora in “Mushrooms Demystified,” these mushrooms belong to the Lepista genus and fruit from October through December in most temperate regions.
Key identification features of blewit mushrooms:
Cap: 2-6 inches (5-15 cm) wide, violet to lilac when young, fading to tan
Gills: Purple-tinged, crowded, and attached to the stem
Stem: 2-4 inches (5-10 cm) tall, fibrous, same color as cap
Spore print: Pale pink to buff
Smell: Sweet, perfumed, sometimes described as frozen orange juice
Habitat: Leaf litter, compost, wood chips
The British Mycological Society notes that wood blewits are one of the most commonly sold wild mushrooms in European markets, particularly in France where they’re called “pied bleu.”
Safety Warning
Never eat any wild mushroom without 100% positive identification
Several purple mushrooms are toxic – always verify with multiple sources
Wood blewits must be thoroughly cooked – they’re toxic when raw
Join your local mycological society for hands-on identification training
Instagram @rogovdom
Are blewit mushrooms psychedelic?
No, wood blewit mushrooms are NOT psychedelic. This common misconception likely comes from their purple color. Dr. Paul Stamets confirms in “Mycelium Running” that Lepista nuda contains no psilocybin or other psychoactive compounds. They’re simply gourmet edible mushrooms when properly cooked.
Wood blewit mushroom identification in the field
When you’re looking for wood blewits, you’ll find them in deciduous woods, gardens, and even compost heaps. Peak season runs from October through December when temperatures drop to 40-50°F (4-10°C).
Where to find blewit mushrooms
Research from the North American Mycological Association shows wood blewits grow in:
Hardwood leaf litter (especially oak and beech)
Garden compost and mulch beds
Wood chip piles after 6-12 months aging
Under hedgerows and shrubs
Urban parks with organic debris
They need a hard frost to trigger fruiting, which is why you’ll see them when other mushrooms have stopped. Cornell University’s mushroom blog reports finding them fruiting through snow in upstate New York.
How to identify wood blewit mushrooms safely
Step-by-step blewit mushroom identification:
Check the color – Young specimens show purple/lilac on cap, gills, and stem
Smell the mushroom – Should have sweet, perfumed aroma (not unpleasant)
Look at the gills – Crowded, attached to stem, never free
Make a spore print – Should be pale pink to buff, never white or brown
Check the habitat – Growing in leaf litter or organic matter, not on living trees
Verify the season – Late fall through winter after first frost
Similar species to avoid:
Some Clitocybe species – white spore prints
Cortinarius species (webcaps) – can be deadly poisonous
Purple brittlegills (Russula) – gills break like chalk
How to grow wood blewit mushrooms at home
You can grow wood blewits outdoors in garden beds or indoors in containers. Unlike many mushrooms, they’re actually easier to grow outdoors because they need cold temperatures to fruit.
Wood blewit growing requirements
According to research from the University of Kentucky’s mushroom production guide:
Temperature: Colonization at 60-70°F (15-21°C), fruiting needs frost or 32-40°F (0-4°C)
Substrate: Hardwood chips, straw, aged compost
Time to fruit: 6-12 months outdoors, 3-4 months indoors with cold treatment
Yield: 1-2 pounds per square foot (5-10 kg/m²) of bed
Outdoor wood blewit cultivation (easiest method)
Growing wood blewits in garden beds mimics their natural habitat:
Choose your location (April-May)
Shaded area under trees or north side of building
Well-draining soil enriched with compost
Prepare hardwood substrate recipe
40% aged hardwood chips (oak preferred)
40% straw
20% finished compost
Mix to 65% moisture (squeeze test – few drops)
Create your bed
Lay cardboard as weed barrier
Spread substrate 4-6 inches (10-15cm) deep
Inoculate with 5-10% spawn by weight
Maintain through summer
Keep moist but not waterlogged
Add 2 inches (5cm) straw mulch
No fruiting expected first year
Harvest after first frost
Mushrooms appear October-December
Can fruit for 3-5 years from one bed
Indoor wood blewit cultivation
For indoor growing, follow Paul Stamets’ method from “Growing Gourmet and Medicinal Mushrooms”:
Substrate preparation
Pasteurize straw at 160°F (71°C) for 1 hour
Cool to 75°F (24°C)
Mix with 10-15% blewit spawn
Incubation
Pack in bags or containers
Keep at 65-70°F (18-21°C)
Full colonization in 3-4 weeks
Cold treatment (critical step)
Move to 35-40°F (2-4°C) for 2-3 weeks
This simulates winter conditions
Fruiting
Return to 50-60°F (10-15°C)
Maintain 85-90% humidity
Provide indirect light
Mushrooms in 7-14 days
Troubleshooting wood blewit cultivation
No mushrooms after cold treatment?
Extend cold period to 4 weeks
Ensure substrate moisture at 60-65%
Check spawn viability (should smell sweet)
Green mold contamination?
Substrate too wet or not properly pasteurized
Start over with fresh materials
Mushrooms but poor yield?
Add more nutrition (bran or soybean meal at 5%)
Ensure proper ventilation during fruiting
Frequently asked questions about blewit mushrooms
Q: Are wood blewit mushrooms edible? A: Yes, wood blewits are edible and delicious when thoroughly cooked for 15-20 minutes. Never eat them raw as they contain heat-sensitive toxins.
Q: Are blewit mushrooms psychedelic? A: No, wood blewits (Lepista nuda) contain no psychoactive compounds. They’re purely culinary mushrooms sold in gourmet markets worldwide.
Q: When do wood blewit mushrooms grow? A: Wood blewits fruit from October through December after the first hard frost when temperatures drop below 50°F (10°C).
Q: How do you identify wood blewit mushrooms? A: Look for purple-lilac caps and gills when young, sweet perfumed smell, pink spore print, and growth in leaf litter or compost after frost.
Q: What’s the best wood blewit mushroom recipe? A: Sauté sliced blewits in butter for 15-20 minutes with garlic and fresh herbs. Their firm texture works great in cream sauces and risottos.
Q: How long does it take to grow wood blewits? A: Outdoor beds fruit in 6-12 months after spring inoculation. Indoor cultivation takes 3-4 months including necessary cold treatment.
“The Mushroom Cultivator” by Paul Stamets – growing techniques
Local mycological societies for foraging walks
Now you know how to identify, cook, and grow wood blewit mushrooms. Start by looking for them at farmers markets to try their unique flavor. Once you’re hooked, set up an outdoor bed this spring for your own harvest next winter.
Your next step: Join a local mushroom foray this fall to see wood blewits in their natural habitat with experienced identifiers.
Instagram @wildpicker
Blewit mushroom recipes and cooking methods
Wood blewits taste mild and slightly sweet with a firm, meaty texture. French chef Raymond Blanc describes them as having “hints of aniseed with an almost fruity finish.” They must be cooked for at least 15-20 minutes to break down toxins present in raw mushrooms.
Classic blewit mushroom recipe: Sautéed with garlic and herbs
Ingredients:
1 pound (450g) fresh wood blewits, cleaned
3 tablespoons (45ml) butter or olive oil
3 cloves garlic, minced
1/4 cup (60ml) white wine
Fresh thyme and parsley
Salt and pepper
Method:
Slice blewits 1/4 inch (6mm) thick
Heat butter in large pan over medium-high heat (350°F/175°C)
Add mushrooms, don’t crowd the pan
Cook 15-20 minutes until liquid evaporates
Add garlic, cook 2 minutes
Deglaze with wine, add herbs
Season and serve immediately
The Mycological Society of San Francisco recommends pairing blewits with cream sauces, risottos, or egg dishes. Their firm texture holds up well in soups and stews.
Storage and preservation
Fresh wood blewits last 5-7 days in a paper bag in your refrigerator at 35-38°F (2-3°C). For longer storage:
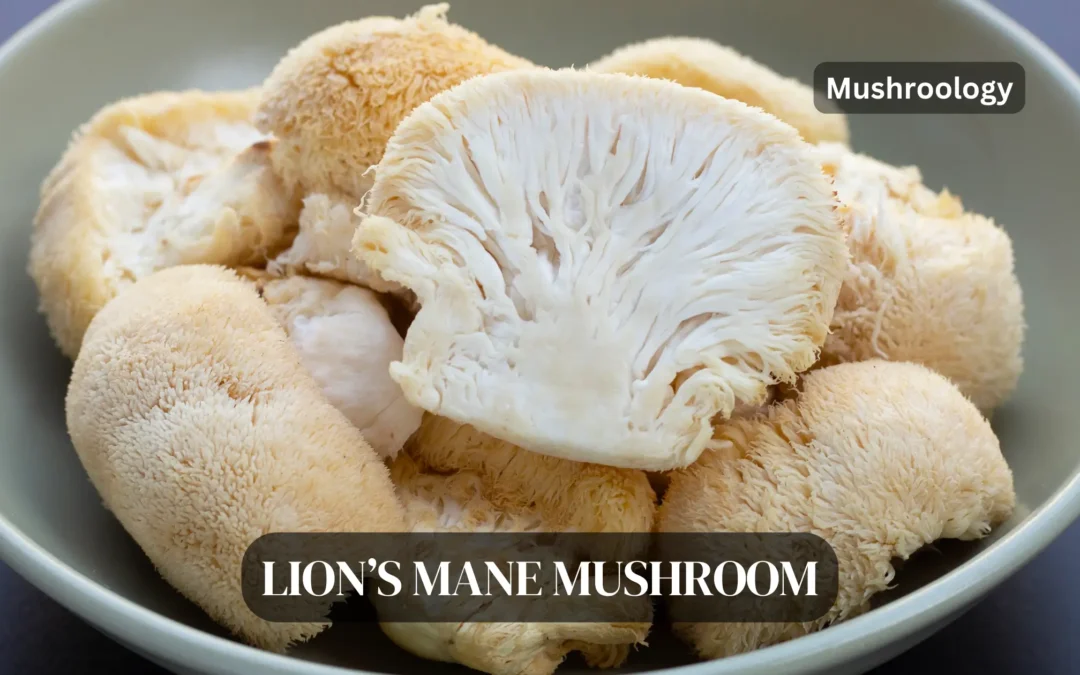
Everything you need to successfully grow lion’s mane mushrooms in buckets, bags, or on logs
You’ve probably seen those stunning white, shaggy mushrooms that look like a cheerleader’s pom-pom and wondered if you can grow lion’s mane at home. The answer is yes – but you’ll need the right approach. Here’s exactly how to grow these brain-boosting beauties, whether you’re working indoors or out in your backyard.
How fast does lion’s mane grow at home?
When you’re growing lion’s mane mushrooms, patience pays off. These aren’t your typical fast-growing oyster mushrooms. According to Cornell University’s Small Farms Program, lion’s mane (Hericium erinaceus) takes about 3-4 weeks from inoculation to harvest when grown indoors at 65-75°F (18-24°C).
Here’s your timeline:
Colonization: 14-21 days after inoculation
Pinning: 5-7 days after introducing fruiting conditions
Harvest ready: 7-14 days after pins appear
Total time: 26-42 days for your first mushrooms
The North American Mycological Association (NAMA) notes that once established, you can harvest every 2-3 weeks for multiple flushes.
What you need to know about lion’s mane growth stages
You’ll see white mycelium spreading like a web through your substrate first. When it looks like cottage cheese forming on the surface, you’re close to fruiting. Those tiny white bumps will transform into full mushrooms faster than you’d expect – sometimes doubling in size within 24 hours during the final stage.
Safety Warning
Never eat wild mushrooms without 100% positive identification by an expert
Join your local mycological society for hands-on training
Even experienced foragers can mistake toxic species for edible ones
Where does lion’s mane grow naturally?
Before you start growing lion’s mane at home, it helps to understand where these mushrooms thrive in nature. You’ll find wild lion’s mane on dead or dying hardwood trees throughout North America, Europe, and Asia.
Lion’s mane prefers:
Oak trees (all species)
Maple, beech, and birch
Wounds on living trees
Dead logs and stumps
Temperatures between 55-75°F (13-24°C)
Mycologist Paul Stamets reports in “Growing Gourmet and Medicinal Mushrooms” that lion’s mane fruits from July through February depending on your region – earlier in cooler climates, later in warmer areas.
Is lion’s mane easy to grow for beginners?
Here’s the honest truth: lion’s mane isn’t the easiest mushroom for your first growing project. The mycelium develops slower than oyster mushrooms, giving contamination more time to take hold. Dr. Tradd Cotter from Mushroom Mountain recommends starting with oyster mushrooms first, then moving to lion’s mane once you’ve got the basics down.
That said, you can absolutely succeed with lion’s mane if you:
You’ll get the best results with Masters Mix – a 50/50 blend of hardwood pellets and soy hulls. Research from the University of Wisconsin shows this combination produces 25% higher yields than plain sawdust.
Keep your containers at 70-75°F (21-24°C) in darkness. You’ll see white mycelium spreading within 3-5 days. Full colonization takes 14-21 days.
Step 5: Initiate fruiting
When fully white, it’s time to fruit:
Drop temperature to 60-65°F (15-18°C)
Increase humidity to 90-95%
Provide indirect light 12 hours daily
Remove tape from holes or cut slits in bags
Growing lion’s mane on logs outdoors
Log cultivation takes longer but produces for years. The Mushroom Cultivation Handbook by Peter Oei confirms logs can fruit for 4-6 years once established.
Your log growing process:
Select fresh hardwood logs
4-8 inches (10-20cm) diameter
3-4 feet (0.9-1.2m) long
Cut during dormant season
Drill and inoculate
Drill 5/16-inch (8mm) holes 6 inches (15cm) apart
Insert plug spawn
Seal with wax
Stack in shade
Keep moist but not soaked
Wait 6-12 months for colonization
Force fruiting
Soak logs 24 hours in cold water
Stand upright
Fruit in 1-2 weeks
Growing lion’s mane in buckets outdoors
You can also grow lion’s mane in buckets outside:
Use the same bucket prep as indoor growing
Place in shaded area after colonization
Natural temperature swings often trigger fruiting
Cover during heavy rain
When to harvest lion’s mane mushrooms
Timing your harvest makes the difference between prime mushrooms and disappointment. You’ll know lion’s mane is ready when the teeth (spines) are 1/4 to 1/2 inch (6-12mm) long and the mushroom stops expanding.
Signs it’s harvest time:
Spines elongated but still white
Feels firm like a damp sponge
No yellowing or browning
Before spore release (white powder)
How to harvest: Don’t use a knife – it damages the mycelium. Instead, grasp the base and twist while pulling. Remove the entire mushroom to prevent contamination.
How long does it take to grow lion’s mane? (Timeline summary)
Indoor growing:
Substrate prep to harvest: 3-4 weeks
Between flushes: 2-3 weeks
Total flushes possible: 2-3
Log cultivation:
Inoculation to first fruit: 1-2 years
Production lifespan: 4-6 years
Flushes per year: 1-2 (spring and fall)
Lion’s mane growing temperature and conditions
Temperature control determines your success. Research from the Journal of Agricultural Technology shows lion’s mane has specific requirements:
Colonization phase:
Temperature: 70-75°F (21-24°C)
Humidity: 60-70%
No light needed
Fruiting phase:
Temperature: 60-65°F (15-18°C)
Humidity: 85-95%
Light: 100-200 lux (indirect daylight)
Common problems and solutions
Yellow or brown mushrooms: Lower temperature to 60°F (15°C) and increase fresh air
No pins forming: Check humidity – needs 90%+ to initiate
Contamination: Green or black mold means start over with better sterilization
Slow growth: Increase temperature during colonization, decrease during fruiting
Storage tips for your harvest
Fresh lion’s mane lasts 5-7 days in a paper bag in your refrigerator at 34-38°F (1-3°C). For longer storage:
Slice and dehydrate at 115°F (46°C)
Freeze after blanching 2 minutes
Make tinctures or powder
Frequently asked questions about growing lion’s mane
Q: How long does it take to grow lion’s mane mushrooms at home?
A: Indoor growing takes 3-4 weeks from inoculation to harvest at 65-75°F (18-24°C). Log cultivation takes 1-2 years for first fruits.
Q: What’s the best substrate for lion’s mane mushrooms?
A: Masters Mix (50/50 hardwood pellets and soy hulls) gives highest yields. Supplemented hardwood sawdust with 10-20% wheat bran works well too.
Q: Can you grow lion’s mane in a bucket?
A: Yes! Drill 1/4-inch holes every 4-6 inches around a 5-gallon bucket. This method works great indoors or outdoors in shade.
Q: When should I harvest lion’s mane?
A: Harvest when spines reach 1/4 to 1/2 inch long and the mushroom stops expanding but before any yellowing appears.
Q: Is lion’s mane easy to grow for beginners?
A: Lion’s mane is moderately difficult due to slow colonization. Start with a kit or try oyster mushrooms first to learn basics.
Now you know exactly how to grow lion’s mane mushrooms at home. Start with a growing kit if you’re new to mushroom cultivation, then move to making your own substrate once you’ve got some experience.
Your next step: Order lion’s mane spawn and gather your supplies – you’ll be harvesting your own brain-boosting mushrooms in just 3-4 weeks!