Pholiota adiposa – the Chestnut Mushrooms
Pholiota adiposa is a species of edible mushroom commonly known as the chestnut mushroom. It is found in North America, Europe, and Asia where it grows both saprophytically on dead wood and parasitically on living hardwood trees, particularly beech.
Description and Identification

Chestnut mushrooms can be identified by the following key characteristics:
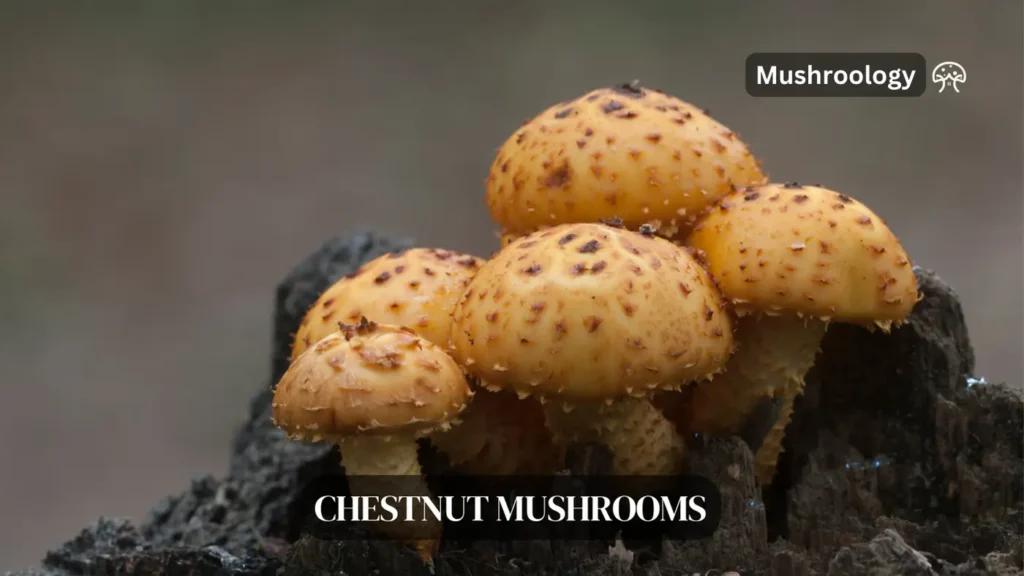
- Cap: 2-10 cm in diameter, convex becoming flat, yellow to chestnut brown in color with darker scales that are denser in the center. The cap surface is slimy when wet.
- Gills: Crowded, adnate, pale yellow when young turning rusty brown with age.
- Stem: 2-8 cm long, 0.5-1.5 cm thick, cylindrical, yellow with brown scales below a faint ring zone. Stems often join together at the base.
- Flesh: Yellowish in color.
- Spore Print: Rusty brown
- Habit: Grows in dense clusters on hardwood stumps and logs
Chestnut mushrooms have a mild, nutty flavor and slightly crunchy texture that holds up well when cooked. However, proper identification is crucial as there are some poisonous look-alikes such as the deadly Galerina marginata.
Gathering Supplies for Growing Chestnut Mushrooms

Before you begin your chestnut mushroom growing journey, it’s important to gather all the necessary supplies. Here’s what you’ll need:
Chestnut Mushroom Spawn or Liquid Culture
The first and most important supply is the chestnut mushroom spawn or liquid culture. Spawn is basically mushroom mycelium that has been grown on a substrate like grain or sawdust. Liquid culture is a liquid solution containing mushroom mycelium. You can purchase chestnut mushroom spawn or liquid culture from reputable suppliers online or at specialty mushroom shops.
Hardwood Substrate
Chestnut mushrooms prefer to grow on hardwood. A common substrate recipe is 78% hardwood sawdust, 20% wheat bran, 1% sugar, and 1% gypsum. The hardwood sawdust provides the main food source, while the bran, sugar and gypsum provide extra nutrients and help with moisture retention. You can source these ingredients individually or purchase pre-mixed mushroom substrate.
Mushroom Grow Bags
Mushroom grow bags are specially designed plastic bags with filter patches that allow for gas exchange while preventing contaminants from entering. They come in various sizes, but 5-10 pound bags work well for home growing. Look for bags that are thick and durable, with a 0.2-0.5 micron filter patch.
Pressure Cooker or Large Pot
To pasteurize your substrate and prevent contamination, you’ll need a pressure cooker or a large pot. A pressure cooker allows you to reach higher temperatures and sterilize the substrate more thoroughly. However, a large pot can also work for pasteurization if you don’t have access to a pressure cooker.
Clean Growing Environment
Chestnut mushrooms require a clean, temperature-controlled environment to fruit properly. A spare room, basement, or garage can work well as long as you can control the temperature, humidity, and light. You’ll want to be able to maintain a temperature between 60-70°F (15-21°C), humidity between 85-95%, and indirect light exposure[18].
Other Supplies
A few other handy supplies include:
- Rubbing alcohol for sterilizing surfaces and equipment
- Spray bottles for misting and maintaining humidity
- Thermometer and hygrometer for monitoring temperature and humidity
- Gloves and face mask for sterile inoculation
- Sharp knife or scalpel for cutting bags
- Shelving or racks for incubating and fruiting blocks
By gathering all these supplies before you start, you’ll be well-prepared to begin your chestnut mushroom growing adventure. In the next section, we’ll go over the step-by-step process of inoculation, incubation, and fruiting.
Step-by-Step Guide to Growing Chestnut Mushrooms
Step 1: Prepare the Substrate
To create an ideal growing medium for your chestnut mushrooms, you’ll need to prepare a hardwood-based substrate. A common recipe is:
- 78% hardwood sawdust (preferably beech, oak or maple)
- 20% wheat bran
- 1% sugar
- 1% gypsum
Mix these ingredients thoroughly until evenly distributed. Slowly add water while mixing until the substrate reaches approximately 60-65% moisture content. You can test this by squeezing a handful of the mix – it should hold together without dripping water.
Next, fill your mushroom grow bags about 2/3 to 3/4 full with the moistened substrate mix. Pack it down gently to remove air pockets but don’t compact it too tightly. Leave some space at the top for the spawn.
Seal the bags with a filter patch or micropore tape to allow for gas exchange while preventing contaminants from entering. If using an autoclavable grow bag, fold the top over and secure it with a metal clamp or zip tie.
Sterilize the bagged substrate in a pressure cooker at 15 PSI for 2.5 hours. Allow to cool completely to room temperature before inoculating. If you don’t have a pressure cooker, you can pasteurize the substrate in boiling water or steam for 2-4 hours instead.
Step 2: Inoculate the Substrate
Once your substrate bags have cooled, it’s time to introduce the chestnut mushroom mycelium. If using liquid culture, shake it vigorously first to distribute the mycelium evenly.
Working in a still-air environment like in front of a flow hood or inside a glovebox, carefully open each bag. Inoculate the bags by injecting 3-5ml of liquid culture syringe or adding a layer of grain spawn across the top surface of the substrate. Use about 1 cup of grain spawn for every 5-7lbs of substrate.
After inoculation, reseal the bags, label them with the date and species, and gently mix or shake to distribute the spawn if desired. Be careful not to rip or puncture the bags.
Step 3: Incubation
Place your inoculated substrate bags in a clean area with stable temperature between 68-75°F (20-24°C) to incubate. Indirect light or darkness is fine at this stage. Avoid areas with drafts, high humidity or direct sunlight.
Over the next 2-4 weeks, the white mycelium will start to visibly spread throughout the substrate, eventually colonizing it completely. Avoid disturbing the bags during this time to allow the mycelium to grow undisturbed. The bags may puff up with built up CO2 – this is normal.
Step 4: Fruiting Initiation
Once the substrate is fully colonized with no visible patches of uncolonized sawdust, it’s time to initiate fruiting. This is triggered by exposing the bags to cooler temperatures, light, humidity and fresh air.
Move your bags to a humidity-controlled fruiting room or chamber. Ideal conditions are:
- Temperature: 50-60°F (10-16°C)
- Humidity: 85-95%
- Light: Indirect natural light or 12 hours artificial light per day
- Fresh Air: Plenty of air circulation without direct drafts
To create an opening for the mushrooms, cut a 4-inch slit or “X” on the side of each bag using a clean, sharp blade. Some growers completely remove the top of the bag. Arrange the bags on a shelf with the cut side facing outwards.
Mist the exposed substrate 2-4 times per day to maintain high humidity. Within 1-2 weeks, you should see tiny chestnut mushroom pins starting to form.
Step 5: Fruiting and Harvest
Continue maintaining optimal fruiting conditions as the pins develop into full-size mushrooms. Chestnut mushrooms can take 7-14 days to mature after pinning.
Mushrooms are ready to harvest when the caps are fully developed but still convex, before the edges start to flatten out or turn upwards. Gently twist and pull to remove clusters from the substrate.
Use a clean knife to cut the stems, keeping the cluster intact. Avoid pulling out chunks of substrate. Brush off any debris but do not wash the mushrooms until just before use.
Each bag can produce 2-3 flushes of mushrooms, spaced about 2 weeks apart. After harvesting a flush, keep the bag in fruiting conditions and a second flush may form from the same opening. Once a bag stops producing, remove it and start again with a new substrate bag.
With practice and patience, you’ll be able to grow bountiful harvests of homegrown chestnut mushrooms! While not the easiest mushroom for beginners, they are a rewarding challenge for the adventurous home cultivator.
FAQ
What is the scientific name of chestnut mushrooms?
The scientific name of chestnut mushrooms is Pholiota adiposa. They are also known by common names like cinnamon cap mushrooms, brick tops, and kuritake.
What do chestnut mushrooms look like?
Chestnut mushrooms have distinctive yellow to orange-brown convex caps measuring 2-10 cm across, covered in darker scales. The gills are pale yellow when young, turning rusty brown with age. The stems are 3-12 cm long, slender, and scaly below a faint ring zone. They grow in dense clusters on hardwood.
What is the flavor and texture of chestnut mushrooms?
Chestnut mushrooms have a mild, nutty flavor sometimes compared to shiitake but less intense. They have a firm, meaty texture that remains pleasantly crunchy and chewy after cooking.
How do you grow chestnut mushrooms?
Chestnut mushrooms can be grown at home using hardwood logs, stumps, or enriched sawdust substrate inoculated with spawn. Optimal conditions are 55-70°F (13-21°C) and moderate humidity. Outdoor log cultivation or indoor growing in bags can both yield good results.
When do chestnut mushrooms fruit?
In the wild, chestnut mushrooms fruit in the fall from August to October. When cultivated indoors, they can fruit year-round. Primordia formation takes 1-2 weeks after full colonization, followed by another 1-2 weeks until mature mushrooms are ready to harvest.
Are there any poisonous look-alikes to chestnut mushrooms?
While chestnut mushrooms are considered edible, some Pholiota species may cause reactions, especially if consumed with alcohol. Deadly Galerina marginata mushrooms are potential look-alikes. Proper identification by an expert is crucial for wild foraging.
What are the health benefits of chestnut mushrooms?
Chestnut mushrooms are nutritious, containing protein, fiber, vitamins, minerals and beneficial compounds like polysaccharides. Studies suggest they have anti-inflammatory, immune-boosting and antimicrobial properties. However, more research is needed on the medicinal potential of this species.