For enthusiasts and cultivators alike, nameko mushrooms (Pholiota nameko), a treasured ingredient in traditional Miso soup, offer a delightful venture into mycoculture.
Optimal Growing Conditions for Nameko Mushrooms
Here is a detailed overview of the optimal growing conditions for nameko mushrooms:
Temperature
Nameko mushrooms thrive in cooler temperatures compared to many other cultivated mushroom species. The ideal temperature range for nameko growth and fruiting is between 45-65°F (7-18°C).
More specifically:
Mycelium growth occurs between 39-90°F (4-32°C) with an optimal range of 77-79°F (25-26°C)
Primordia (pin) formation is triggered when temperatures drop to 50-60°F (10-15°C)
Fruiting occurs between 55-65°F (13-18°C)
Temperatures above 68°F (20°C) will result in smaller mushrooms with thin stems and caps that open prematurely.
Sustained temperatures below 41°F (5°C) will slow growth significantly but not cause the mycelium to die.
Humidity
Nameko mushrooms require very high humidity levels, especially during the pinning and fruiting stages:
- Primordia formation: 98-100% relative humidity
- Fruiting: 88-95% relative humidity
Insufficient humidity will inhibit pin formation, cause mushrooms to abort, and result in deformed, shriveled fruiting bodies lacking their characteristic gelatinous coating. Frequent misting (2-4 times daily) is recommended to maintain surface moisture on the substrate. Care must be taken to avoid over-watering which can lead to bacterial contamination.
Light
While not as crucial as temperature and humidity, nameko mushrooms require some light to develop proper fruiting bodies, typically between 500-1000 lux. Indirect, ambient lighting is sufficient. Avoid prolonged exposure to direct sunlight which can overheat and dry out the substrate.
CO2 & Fresh Air Exchange
Nameko mycelium is sensitive to carbon dioxide levels, especially during the pinning stage. CO2 concentrations should be maintained between:
- Primordia formation: 500-1000 ppm
- Fruiting: <1000 ppm
Proper ventilation is necessary to prevent CO2 buildup. Fresh air exchanges of 4-8 per hour are recommended during fruiting.
Fruiting Season
In nature, nameko mushrooms typically fruit in the fall when temperatures first drop below 50°F (10°C), especially after heavy rainfall. Growers can simulate these conditions indoors by initiating fruiting in late autumn and utilizing cold shock techniques like refrigeration to stimulate pinning.
By carefully monitoring and maintaining these parameters, cultivators can achieve bountiful nameko harvests with multiple flushes over the course of a growing season. The key is providing consistently cool temperatures, high humidity, gentle indirect light, and adequate fresh air exchange.
How to Grow Nameko Mushrooms on Logs at Home
Benefits of Growing Nameko Mushrooms on Logs
- Sustainable and eco-friendly method of mushroom cultivation
- Produces high-quality, flavorful mushrooms with a firm texture
- Logs can produce multiple flushes over several years
- Low-maintenance once logs are inoculated and established
Selecting the Right Logs for Nameko Cultivation
Nameko mushrooms grow best on hardwood logs, particularly:
- Cherry
- Alder
- Beech
- Oak
- Birch
- Poplar
Choose logs that are 3-8 inches (7.6-20.3 cm) in diameter and 36-40 inches (91-102 cm) long. Freshly cut logs should be used within 4 weeks of felling to minimize competition from other fungi.
Inoculation Process
Materials Needed
- Drill with 8.5mm (5/16″) or 12mm (7/16″) bit
- Nameko plug spawn or sawdust spawn
- Wax (cheese wax or beeswax)
- Applicator or dauber for applying wax
- Labels or tags for identifying inoculated logs
Steps
1. Drill holes in the logs to a depth of 1 inch (2.5 cm), following a diamond pattern with approximately 50 holes per log.
2. Insert plug spawn or sawdust spawn into the drilled holes.
3. Seal the inoculated holes with melted wax using an applicator.
4. Label the logs with the date and type of mushroom inoculated.
Incubation and Fruiting Conditions
Incubation
- Place inoculated logs directly on the ground in a shaded area, protected from sun and wind.
- Maintain moisture by ensuring logs receive 1 inch (2.5 cm) of rain per week or irrigate if needed.
- Incubation time ranges from 2-6 months, depending on the time of year logs are inoculated.
Fruiting
- Nameko mushrooms fruit in the fall when temperatures drop below 50°F (10°C) for the first time, especially after heavy rainfall.
- Ideal fruiting conditions:
- Temperature: 45-65°F (7-18°C)
- Humidity: 90-95%
- Light: 500-1000 lux indirect light
- Typically produces 2 flushes a few weeks apart in the fall.
Harvesting and Storage
Harvest nameko mushrooms when the caps are fully developed but before they begin to flatten or turn up at the edges. Gently twist and pull the clusters from the log, taking care not to damage the bark.
Store harvested nameko mushrooms in a refrigerator at 36-40°F (2-4°C) for up to 2 weeks in a paper bag or container that allows for air circulation.
By following these step-by-step instructions and providing the ideal growing conditions, you can successfully cultivate flavorful and nutritious nameko mushrooms on logs at home. With proper care, your nameko logs can produce multiple flushes over several years, providing a sustainable and rewarding source of gourmet mushrooms.
How to Grow Nameko Mushrooms on Substrate at Home
Substrate Preparation
Nameko mushrooms grow best on a hardwood sawdust-based substrate supplemented with a nitrogen-rich additive like wheat bran. A typical nameko substrate recipe consists of:
- 80% hardwood sawdust (preferably oak, beech, or maple)
- 10-20% wheat bran
- 1-5% corn flour, rice bran, or millet
- 1-2% calcium carbonate (agricultural lime) or gypsum
These ingredients provide the necessary nutrients and structure for optimal mycelium growth and fruiting. The sawdust serves as the primary carbon source, while wheat bran provides nitrogen and other essential nutrients. Corn flour or rice bran acts as a secondary nutrient source and helps improve substrate water retention. Calcium carbonate or gypsum is added to buffer the substrate pH and prevent compaction.
Mixing and Sterilization
To prepare the substrate, thoroughly mix the dry ingredients until evenly distributed. Slowly add water while mixing until the desired moisture content is reached (around 60-65% by weight). The substrate should feel slightly moist but not wet, and no water should squeeze out when a handful is compressed.
Next, fill the moistened substrate into heat-resistant grow bags, typically polypropylene or high-density polyethylene, leaving enough headspace for mycelium growth. Seal the bags with a filter patch or microporous tape to allow for gas exchange while preventing contaminants from entering.
Sterilize the filled bags in an autoclave or pressure cooker at 15 psi (121°C) for 2-3 hours to eliminate any competing microorganisms. Allow the bags to cool to room temperature before inoculation.
Water Content Adjustment
Proper substrate moisture content is crucial for nameko mycelium growth and fruiting. The ideal water content for nameko substrate is between 60-65% by weight. To adjust the moisture level:
- Weigh a sample of the mixed substrate before adding water.
- Slowly add water while mixing until the substrate feels slightly moist but not wet.
- Weigh the moistened substrate sample again.
- Calculate the moisture content using the formula: (Wet Weight – Dry Weight) / Wet Weight x 100.
- Adjust by adding more water or dry ingredients as needed.
Maintaining consistent moisture content across batches ensures reliable and predictable growth and yields.
Substrate Filling and Bag Sealing
Once the substrate is mixed and moistened, it’s time to fill the grow bags. Use heat-resistant polypropylene or high-density polyethylene bags with a filter patch or microporous tape for gas exchange. Fill each bag with 2-5 lbs (0.9-2.3 kg) of substrate, compacting it gently to remove air pockets. Leave 2-4 inches (5-10 cm) of headspace at the top of the bag for mycelium growth.
Seal the bags securely using an impulse sealer or by tying them tightly with string or zip ties. If using filter patch bags, ensure the patch is not obstructed. For bags without filter patches, cover any holes or punctures with microporous tape to allow for gas exchange while keeping out contaminants.
Incubation Period and Conditions
After sterilization, allow the substrate bags to cool to room temperature before inoculating with nameko liquid culture or grain spawn. Inoculate each bag with 1-2 oz (30-60 ml) of liquid culture or 1-2 cups (100-200 g) of grain spawn. Seal the inoculation points with microporous tape.
Incubate the inoculated bags at 70-75°F (21-24°C) for 15-30 days until fully colonized. Maintain a relative humidity of 60-70% during incubation. Keep the bags in a dark, clean environment with good air circulation to prevent CO2 buildup and contamination.
The mycelium will gradually colonize the substrate, appearing as a white, fuzzy growth. Once the substrate is fully colonized, the bags are ready for fruiting induction.
By carefully preparing and inoculating a nutritious, well-balanced substrate, nameko growers can ensure a strong foundation for a successful and bountiful mushroom harvest.
Inoculation
Inoculation is the process of introducing nameko mycelium to the sterilized substrate. The two most common inoculation methods are liquid culture and grain spawn.
Liquid Culture Inoculation
Liquid culture is a sterile, liquid nutrient medium that contains pure nameko mycelium. To inoculate with liquid culture:
1. Shake the liquid culture well to evenly distribute the mycelium.
2. Using a sterile syringe, inject 1-2 oz (30-60 ml) of liquid culture into each substrate bag through a self-healing injection port or by making a small hole in the bag and covering it with microporous tape.
3. Distribute the liquid culture evenly throughout the bag by gently massaging the substrate.
Grain Spawn Inoculation
Grain spawn consists of sterilized grains, such as rye or millet, fully colonized with nameko mycelium. To inoculate with grain spawn:
- Cut a small opening in the substrate bag using a sterile scalpel or scissors.
- Pour 1-2 cups (100-200 g) of grain spawn into the bag, distributing it evenly across the top of the substrate.
- Seal the opening with microporous tape to maintain a sterile environment while allowing for gas exchange.
After inoculation, gently mix the spawn or liquid culture into the substrate by massaging the bag. This helps distribute the mycelium evenly and speeds up colonization.
Incubation
Based on the information provided in the search results, the incubation period for nameko mushrooms can vary depending on the inoculation time and substrate used:
- If inoculated in late winter or early spring on sawdust substrate, the spawn run can take about 6 months until it finishes in August.
- If inoculated in September on sawdust substrate, the spawn run takes 70-80 days (about 2-3 months).
- On sterilized grain spawn, the incubation period at 75-85°F (24-29°C) lasts about 2 weeks.
- In general, the colonization period on supplemented sawdust substrate takes 2-4 weeks at 68-77°F (20-24°C), followed by a resting period of 4-6 weeks.
So in summary, the typical incubation times are:
- Grain spawn: 2 weeks at 75-85°F (24-29°C)
- Sawdust spawn: 2-3 months at 68-77°F (20-24°C)
- Late winter/spring inoculation on sawdust: up to 6 months
The main work during the spawn run is managing temperature and moisture. After the incubation period, the fully colonized substrate is ready for fruiting induction
Temperature and Humidity
Incubate the inoculated substrate bags at 70-75°F (21-24°C) for 15-30 days until fully colonized. Maintain a relative humidity of 60-70% during incubation. Higher temperatures can lead to faster colonization but may also increase the risk of contamination.
Light and Air Exchange
Keep the bags in a dark, clean environment during incubation, as light is not necessary for mycelium growth. Ensure good air circulation around the bags to prevent CO2 buildup, which can inhibit growth. If using bags without filter patches, open them briefly every few days to allow for fresh air exchange.
Monitoring Progress
Monitor the bags regularly for signs of contamination, such as green, blue, or black mold, or uneven, splotchy growth. Remove any contaminated bags immediately to prevent the spread to other bags. Healthy nameko mycelium should appear white, dense, and evenly distributed throughout the substrate.
Fruiting
Once the substrate is fully colonized, it’s time to initiate the fruiting stage. Fruiting is triggered by changes in temperature, humidity, light, and air exchange.
Fruiting Induction
To induce fruiting, cut or punch holes in the substrate bags to expose the colonized substrate to fresh air. Place the bags in a fruiting chamber or room with the following conditions:
- Temperature: 55-65°F (13-18°C)
- Humidity: 90-95% relative humidity
- Light: 500-1000 lux of indirect, ambient light for 12 hours per day
- Fresh Air Exchange: 4-8 air exchanges per hour
Maintain high humidity by misting the bags and the surrounding environment 2-4 times daily. Avoid direct misting of the substrate surface, as this can cause damage and contamination.
Pinning and Fruiting
Nameko pins, or primordia, typically form 7-14 days after fruiting induction. Pins appear as small, white, or light brown bumps on the surface of the substrate. Maintain optimal fruiting conditions to encourage pin development and growth.
Mushrooms will mature 7-10 days after pinning, reaching a size of 1-2 inches (2.5-5 cm) in diameter. Nameko mushrooms are ready to harvest when the caps are fully developed but before they begin to flatten or turn up at the edges.
Multiple Flushes
After the first flush of mushrooms is harvested, the substrate can be re-soaked in cold water for 12-24 hours to rehydrate it and stimulate additional flushes. Drain the excess water and return the bags to the fruiting chamber, maintaining optimal conditions. Nameko substrate typically produces 2-3 flushes over 6-8 weeks before it is exhausted.
By carefully managing the inoculation, incubation, and fruiting stages, nameko growers can maximize yields and produce high-quality mushrooms consistently. Attention to detail, cleanliness, and maintaining optimal environmental conditions are key to success.
Harvest and Storage
Harvest nameko mushrooms when young, just as the cap begins to detach from the stem. Gently twist and pull to remove without damaging the substrate. Nameko can be stored in the refrigerator at 36-40°F (2-4°C) for up to 2 weeks.
With patience and by maintaining optimal conditions, it’s possible to grow bountiful nameko mushrooms at home. The key factors are cool temperatures, high humidity, and proper light during fruiting. By following this guide, you’ll be well on your way to enjoying homegrown nameko in soups, stir-fries, and more.
Tantalizing Recipes and Uses for Your Home-Grown Nameko
After cultivating your own nameko mushrooms, you’ll undoubtedly be eager to showcase their nutty, delicate flavor in the kitchen. I love incorporating these mushrooms into my cooking, particularly because they retain a pleasant firmness even after being cooked.
One of my personal favorite ways to enjoy them is in a traditional Miso soup; their gelatinous coating adds a luxurious mouthfeel to the broth. But beyond Miso soup, these mushrooms are versatile; think of sautéed nameko as a side dish with garlic and herbs, or toss them into a stir-fry for that extra crunch.
Another recipe where my home-grown nameko shines is in a rich, creamy risotto. Their texture stands out against the soft rice, and the umami depth they provide can really take this Italian classic to new heights.
Just be sure to add them towards the end of the cooking process to maintain their unique textural integrity. Or, if you’re in the mood for something simpler, a nameko omelette can make a fulfilling breakfast with minimal effort. The key is always to keep the seasoning balanced to allow the mushrooms’ natural flavors to be the star.
I also find that nameko mushrooms make fantastic pickles. Pickling them with a blend of soy sauce, vinegar, and a dash of sugar—plus a sprinkle of chili flakes for heat—produces a delectable condiment that can pep up sandwiches or salads.
And let’s not forget about vegan cuisine; nameko can be a worthy ingredient in plant-based dishes, providing texture and flavor to typically meatless meals. No matter how you choose to prepare them, your home-grown namekos are sure to impress. Their unique character and the story of how you grew them makes every dish not just a meal, but an experience.
Nameko mushrooms FAQs
What are the nutritional benefits of nameko mushrooms?
Nameko mushrooms are low in calories and fat but provide a good source of important nutrients. They are rich in dietary fiber, proteins, vitamins (such as B vitamins), minerals (including potassium, phosphorus, and copper), and antioxidants. Nameko contains a water-soluble dietary fiber called mucin, which enhances protein absorption, protects the stomach wall, and may help prevent osteoporosis.
What are the culinary uses of nameko mushrooms?
Nameko mushrooms are popular in Japanese cuisine, often used in miso soups, soba noodles, and dishes with grated daikon. Their gelatinous coating acts as a natural thickener for soups, stews, and sauces. Nameko can also be sautéed, stir-fried, grilled, or added to pasta, noodle dishes, pizza, and crostini. They pair well with lighter red wines, dark green vegetables, red meats, shallots, game, and fowl.
What are the ideal growing conditions for nameko mushrooms?
Nameko mushrooms prefer cooler temperatures between 45-65°F (7-18°C) and high humidity levels of 90-95%. They typically fruit in the fall when temperatures drop below 50°F (10°C), especially after heavy rainfall. Nameko grows well on hardwood logs like beech, oak, birch, and cherry. The ideal logs have a diameter of 3-8 inches and a length of 36-40 inches.
How do nameko mushrooms differ from other varieties?
Nameko mushrooms are known for their unique gelatinous coating, which gives them a slippery texture and appearance. This sets them apart from other common varieties like shiitake, enoki, and maitake. Nameko has a mild, slightly nutty flavor with earthy and butterscotch notes. They are smaller in size compared to many other cultivated mushrooms, with caps typically reaching 5-8 cm in diameter.
What are the potential health benefits of nameko mushrooms?
Studies suggest that nameko mushrooms may have anti-inflammatory, antioxidant, anti-hyperlipidemic, and antitumor properties. A controlled study found that consuming nameko more than once a week was associated with a nearly 50% reduction in stomach cancer risk compared to those who ate no mushrooms. Nameko polysaccharides have shown promise in promoting cell proliferation, reducing oxidative stress, and facilitating wound healing.
How should nameko mushrooms be stored to maximize shelf life?
Fresh nameko mushrooms are highly perishable and typically last only 2-4 days due to their moist, sticky nature. To extend their shelf life, store nameko in the refrigerator at around 36-40°F (2-4°C) in an open paper bag or unsealed container to allow air circulation. Avoid washing the mushrooms until ready to use, as excess moisture can accelerate spoilage. Properly stored, nameko can last up to 2 weeks in the refrigerator.
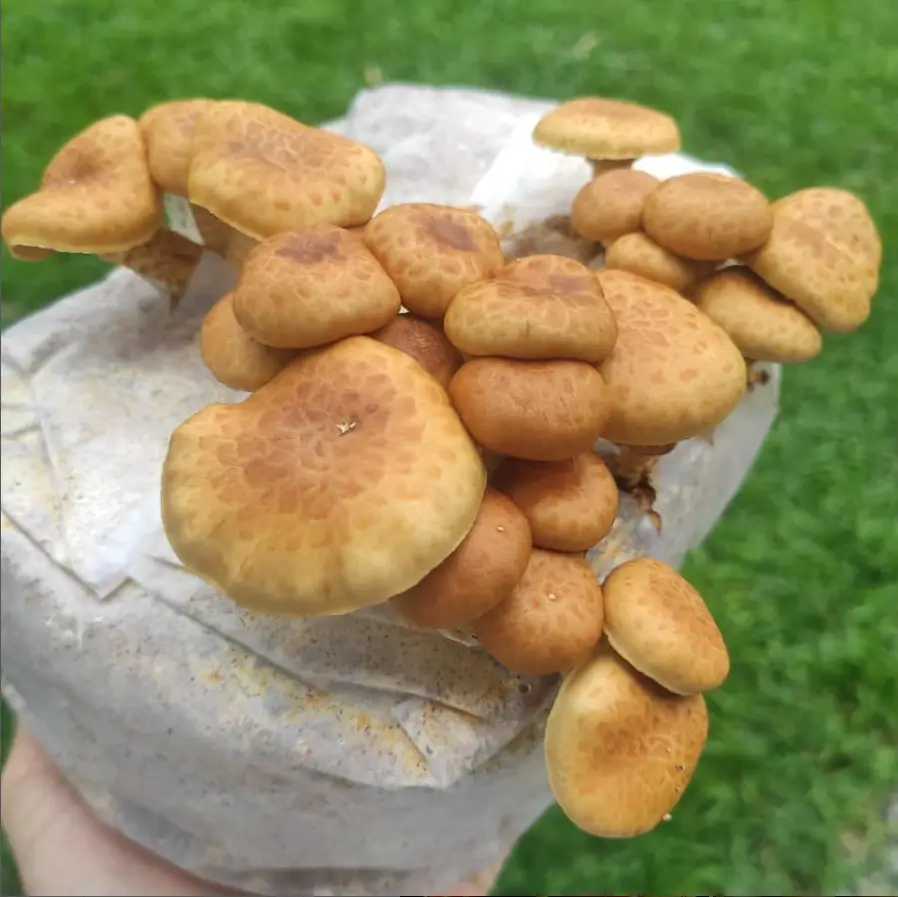
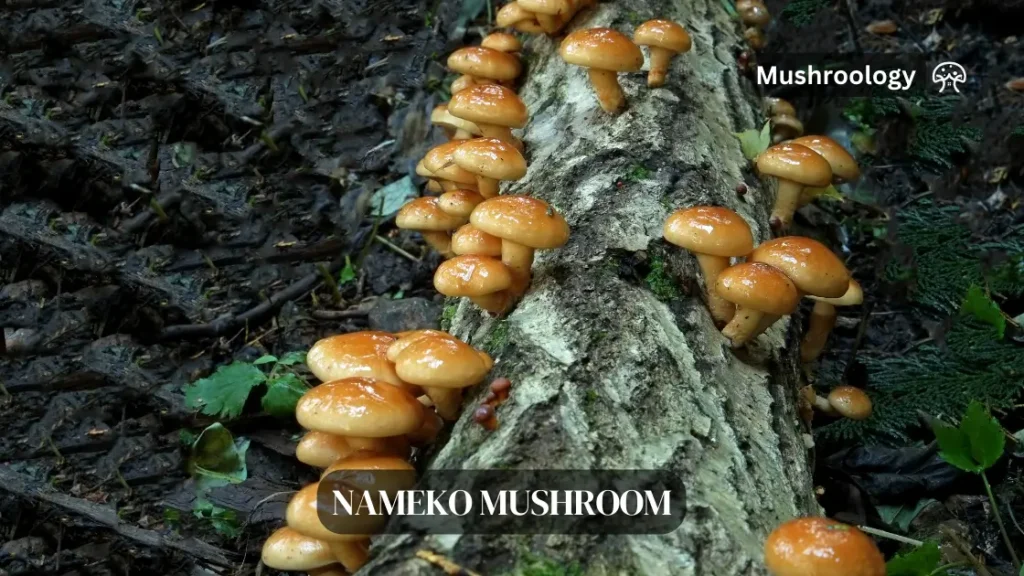
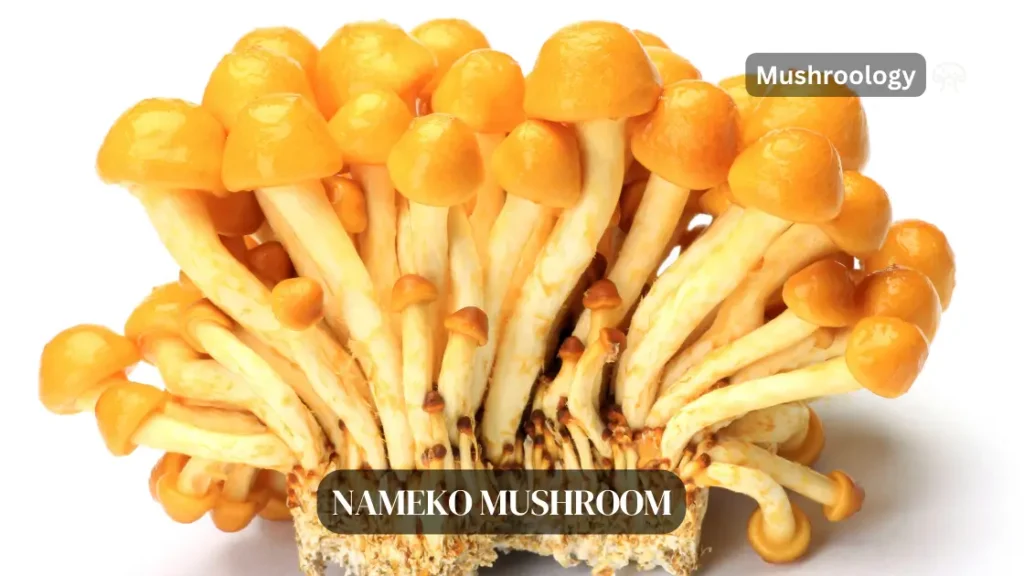
How can you identify nameko mushrooms?
Nameko mushrooms have distinct physical characteristics that set them apart. They have small to medium-sized caps with a convex shape when young, becoming flatter with age. The caps are amber or light brown in color with a glossy, slimy appearance due to their gelatinous coating. Nameko grows in clusters on dead hardwood trees and has white or light yellow, slender stems. In the wild, they are typically found in the fall on beech, oak, and cherry trees.