Did you know that button mushrooms, cremini mushrooms, and portobello mushrooms are all the exact same species – just harvested at different ages? If you’ve ever wondered what a button mushroom becomes when it matures, you’re about to discover the fascinating transformation of Agaricus bisporus through its lifecycle.
Agaricus bisporus at a glance
Species: Agaricus bisporus (the same for all three types!)
Common varieties: Button mushroom, cremini (baby bella), portobello mushroom
Key difference: Maturity stage only – it’s literally just age
Growing time: 14-28 days from pin to portobello
Whether you’re comparing button mushrooms vs baby bella or wondering if portobello and button mushrooms are the same species – yes, they absolutely are! Let’s trace this incredible journey step-by-step.
The Agaricus bisporus mushroom lifecycle: from spore to fruiting body
1. Spore germination (Days 1-10)
All Agaricus bisporus mushrooms – whether destined to become button, cremini, or portobello – begin as microscopic spores. When these spores land on suitable substrate under the right conditions:
Temperature needed: 70-75°F (21-24°C)
Humidity required: 85-95%
Time to germinate: 5-10 days
What forms: Thread-like filaments called hyphae
2. Mycelial growth (Days 10-25)
The portobello mushroom mycelium (same as button mushroom mycelium) expands rapidly:
Forms a white, cotton-like network throughout the substrate
Breaks down organic matter for nutrients
Establishes the foundation for fruiting bodies
Critical fact: This mycelium is identical whether growing button or portobello mushrooms
3. Primordia formation (Days 25-30)
Pin-like structures emerge from the mycelium:
Size: 2-5mm initially
Color: White to light brown
Key point: These pins will become button, cremini, or portobello depending on when harvested
4. Fruiting body formation (Days 30+)
This is where the magic happens – the rapid transformation begins!
Distinct maturity stages of Agaricus bisporus
Stage 1: Button mushrooms (button stage of mushroom)
Timeline: 14-17 days from pinning
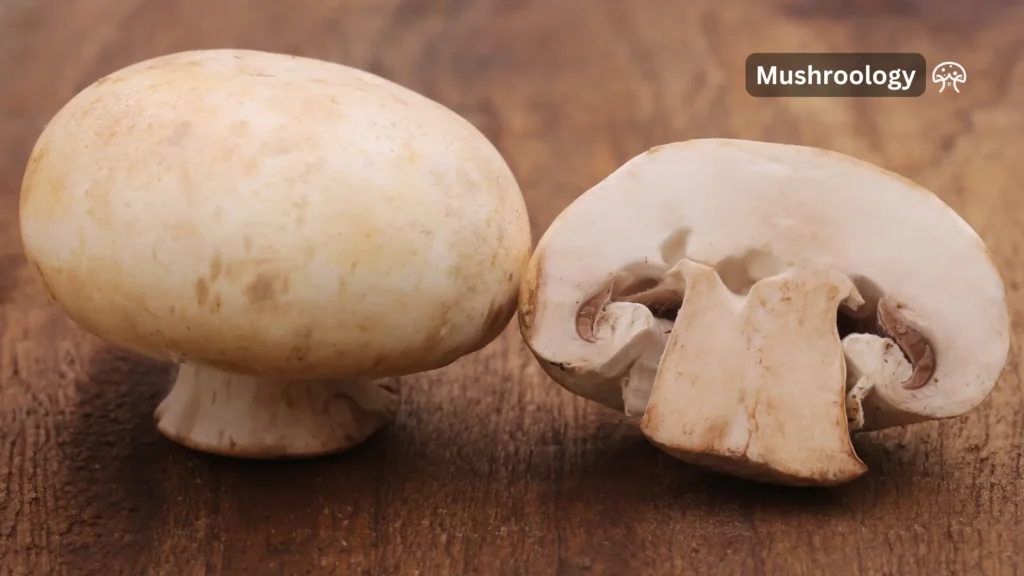
Cap size: 20-30mm (about 1 inch) Velum mushroom characteristic: Completely intact, covering all gills Color: Pure white to cream Texture: Soft, high moisture content (92-94%) Flavor: Very mild, almost neutral
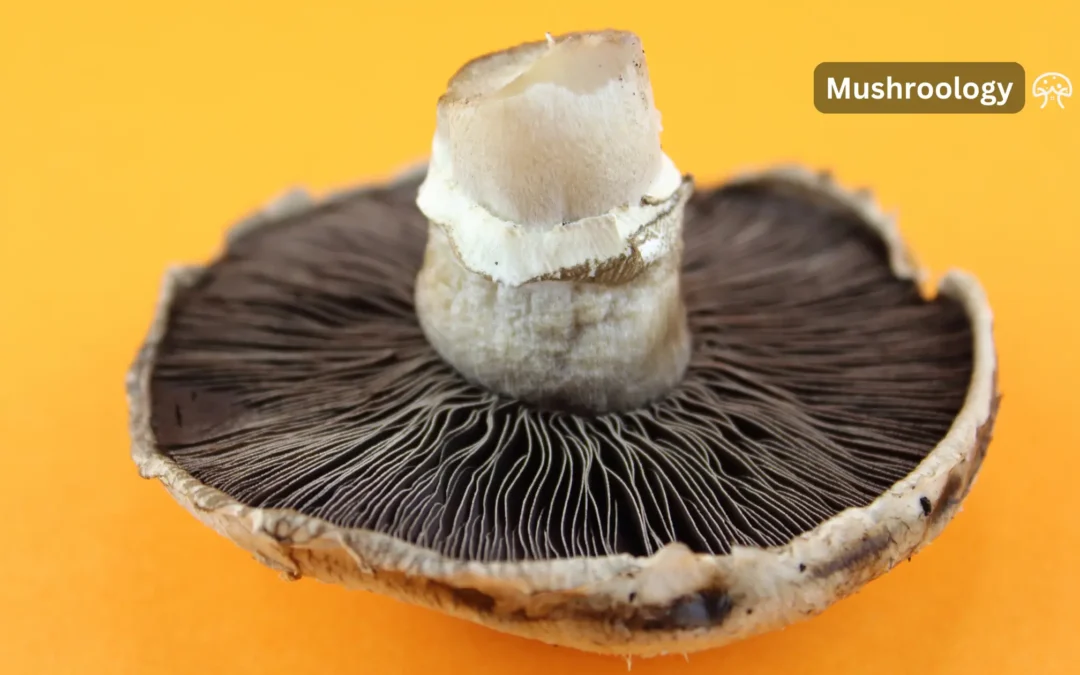
Button mushroom gills: Completely hidden by the velum (veil). If you cut a button mushroom in half, you’ll see pink gills tightly enclosed.
Growing tip: Button mushrooms double in size every 24 hours at this stage!
Stage 2: Cremini mushrooms (baby bella mushrooms)
Timeline: 17-21 days from pinning Cap size: 30-40mm (1.5-2 inches) Velum: Starting to tear, partially revealing gills Color: Light to medium brown Texture: Firmer than buttons, moisture content drops to 90-92% Flavor: Noticeably earthier and richer
Are cremini mushrooms same as baby bella? Yes! These are just marketing names for the same developmental stage.
Key identifier: The veil is breaking but not completely gone – you can see some gills peeking through.
Stage 3: Cup stage (button cup mushroom)
Timeline: 19-23 days from pinning Cap size: 30-50mm (2-3 inches) Velum: Mostly torn away Cap shape: Cup-like, beginning to flatten Gills: Clearly visible, turning from pink to light brown
This intermediate stage is rarely sold commercially but represents the transition from cremini to portobello.
Timeline: 21-28 days from pinning Cap size: 40-150mm (4-6 inches typically) Cap shape: Completely flat or slightly curved upward Gills: Fully exposed, dark brown to black Texture: Dense, meaty, moisture content 88-90% Flavor: Rich, intense, umami-packed
Important: A mature button mushroom IS a portobello mushroom – they’re the same organism!
Fun Fact: Button mushrooms almost double in size every 24 hours during this early stage. They are popular for their subtle taste and can easily absorb spices and sauces.
Chemical and nutritional changes through maturity
1. Dry matter and water content progression
Stage
Water Content
Dry Matter
Result
Button
92-94%
6-8%
Soft, delicate
Cremini
90-92%
8-10%
Firmer bite
Portobello
88-90%
10-12%
Dense, meaty
2. Protein and carbohydrate shifts
Protein changes:
Button: 2.5g per 100g fresh weight
Cremini: 2.7g per 100g
Portobello: 3.1g per 100g
The protein concentration increases as water content decreases.
3. Chitin and texture development
What makes portobellos meaty?
Chitin content increases 40% from button to portobello stage
Cell walls thicken and strengthen
Fiber content rises from 0.9g to 1.3g per 100g
4. Flavor compound intensification
Umami development:
Glutamate levels increase 300% from button to portobello
5′-nucleotides double in concentration
Volatile aroma compounds multiply by factor of 5
How to cook button mushrooms at each stage
Button mushrooms: mild versatility
Raw applications:
Thinly slice for salads (2-3mm thick)
Whole in crudité platters
Quick pickle in vinegar for 30 minutes
Cooked methods:
Sauté 5-7 minutes until golden
Add to soups in final 10 minutes
Stuff whole buttons with cheese mixture
Pro tip: Don’t wash button mushrooms – wipe with damp paper towel to preserve texture.
Cremini mushrooms (baby bella): balanced flavor
Best uses:
Pasta sauces (slice 5mm thick)
Risotto (quarter or halve)
Pizza toppings (slice thin)
Cooking technique: Sauté on high heat to evaporate moisture first (3-4 minutes), then reduce heat and add seasonings.
Days 1-14: Substrate preparation and pasteurization
Days 15-25: Spawn inoculation and colonization
Days 26-30: Casing layer application
Days 31-35: Pinning initiation
Days 36-42: Button stage (harvest here for buttons)
Days 43-47: Cremini stage (harvest for baby bellas)
Days 48-56: Portobello stage (harvest for full size)
Frequently asked questions
Are portobello and button mushrooms the same? Yes! They’re the exact same species (Agaricus bisporus) at different maturity stages. Button mushrooms are harvested at 2-3 weeks, portobellos at 4-5 weeks.
What’s the difference between baby bella vs button mushrooms? Baby bella (cremini) mushrooms are 3-7 days older than button mushrooms. They’re browner, slightly larger, and have a deeper flavor.
Can you see button mushroom gills? No, button mushroom gills are completely covered by the velum (veil). Once this veil breaks, it becomes a cremini.
How long does it take to grow portobello mushrooms? From spore to portobello takes 45-60 days total. From pinning to portobello-ready is about 21-28 days.
Are button cremini portobello all the same mushroom? Absolutely yes – all three are Agaricus bisporus at different ages: button (youngest), cremini (middle), portobello (mature).
What does mature button mushroom look like? A mature button mushroom IS a portobello – flat cap, exposed dark gills, 4-6 inches diameter.
Ready to explore mushroom development?
Now that you understand how button mushrooms transform into portobellos, you can make more informed choices at the grocery store or even try growing your own. Remember – whether you prefer delicate buttons, earthy creminis, or meaty portobellos, you’re enjoying the same amazing species at different points in its fascinating lifecycle.
Want to see this transformation yourself? Consider starting a mushroom growing kit and harvest at different stages to taste the evolution of flavor firsthand!
If you’re searching for tremella mushroom benefits, you’ve probably heard it called “the beauty mushroom” or “nature’s hyaluronic acid.” But does it actually work? I’ve spent months researching tremella fuciformis, and I’m going to tell you exactly what the science says – including the stuff beauty brands don’t want you to know.
What is tremella mushroom?
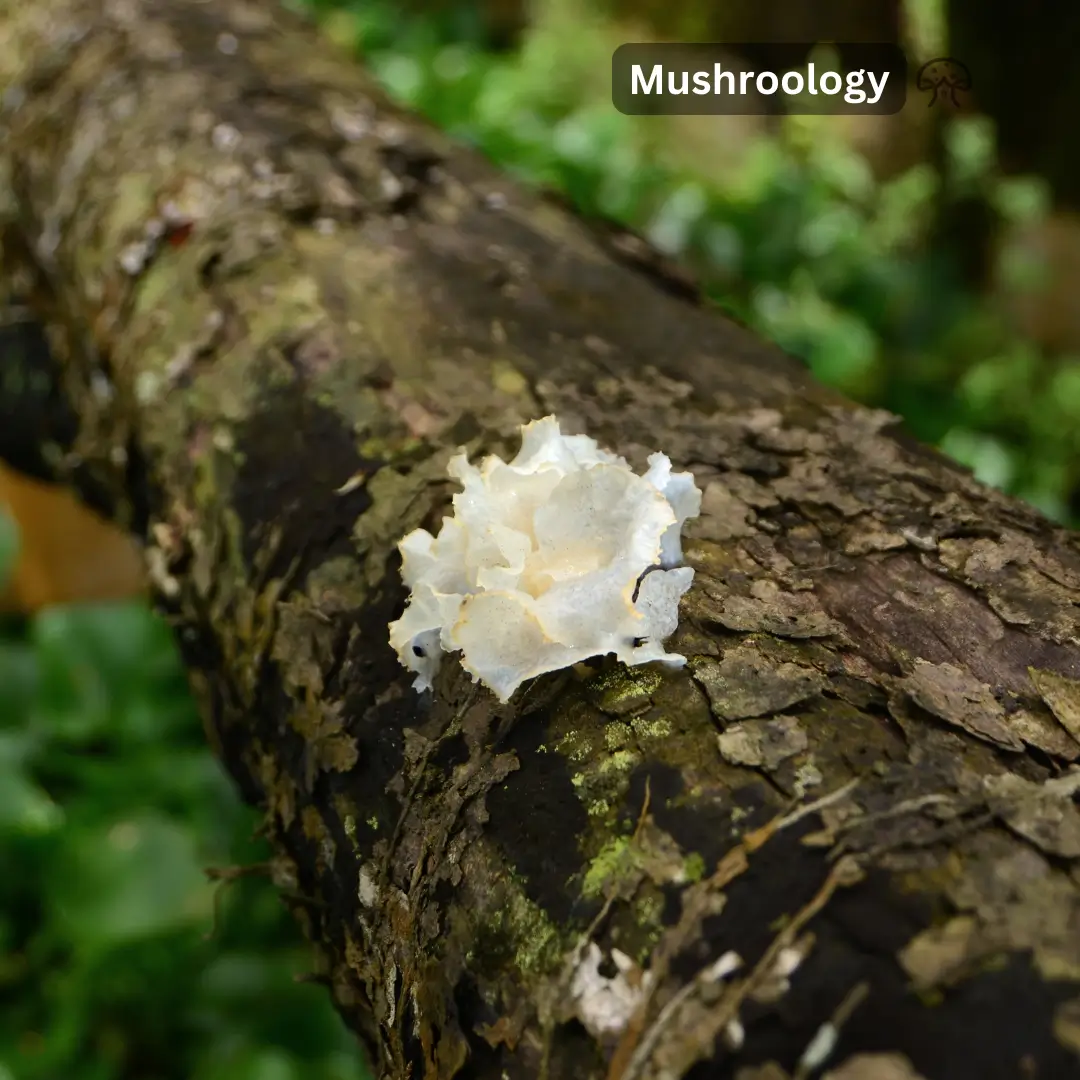
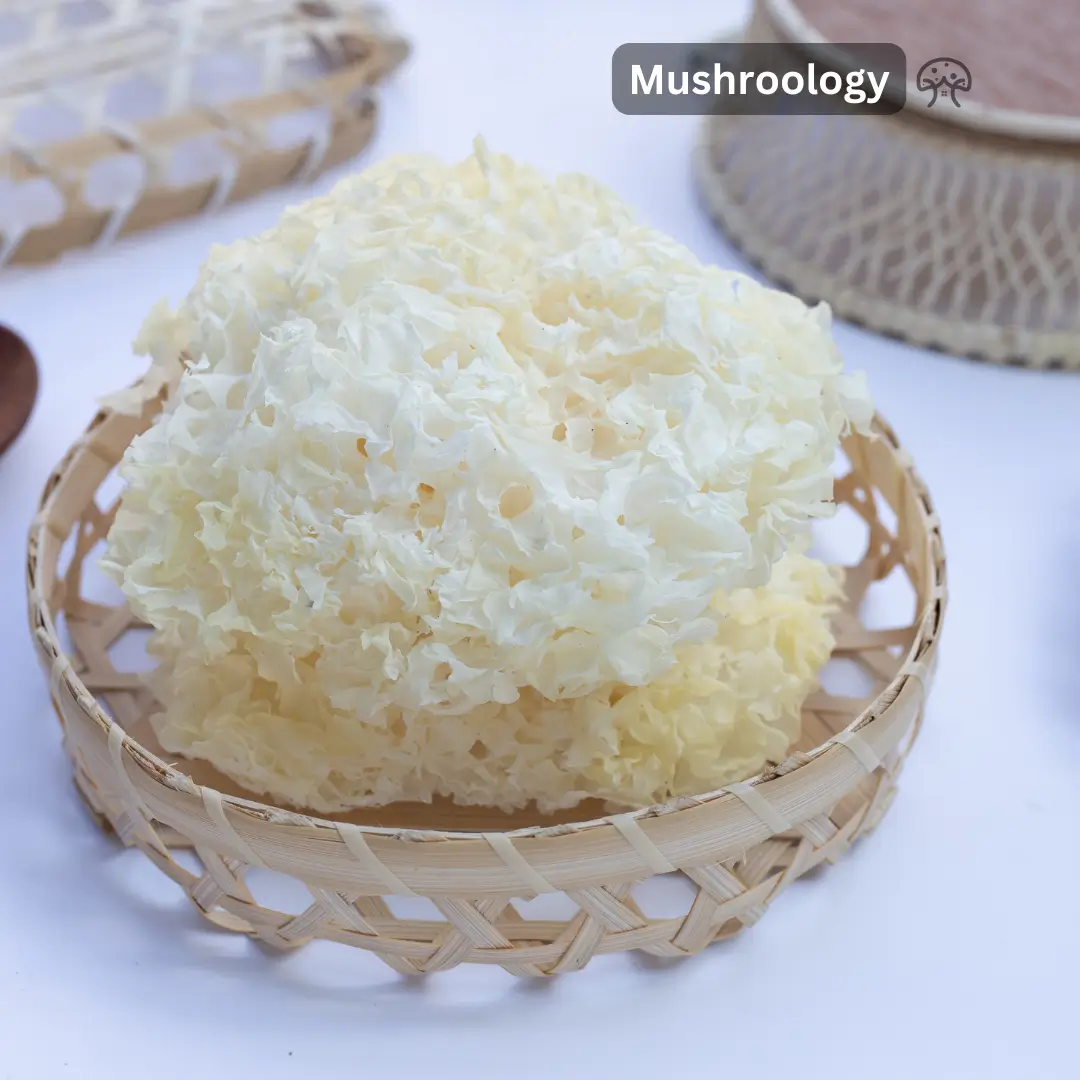
Tremella fuciformis (also called snow mushroom, silver ear mushroom, or white jelly mushroom) is a translucent, jelly-like fungus that looks like a underwater coral. It grows on dead hardwood branches in tropical and subtropical regions, particularly in Asia.
Key facts about tremella mushroom:
Contains up to 70% polysaccharides (mainly glucuronoxylomannan)
Can hold up to 500 times its weight in water
Used in Chinese medicine for over 2,000 years
Now popular in skincare products worldwide
Tremella mushroom benefits for skin (what actually works)
Let’s address what everyone’s really here for – does tremella mushroom actually improve your skin? Here’s what the research shows:
Tremella mushroom skin benefits backed by science
1. Superior hydration to hyaluronic acid A 2016 study found tremella’s polysaccharides create a moisture-retaining film on skin that’s actually more effective than hyaluronic acid. The particles are smaller (0.5 million Daltons vs 1.5 million), so they penetrate better.
Reduced MMP-1 (the enzyme that breaks down collagen) by 30%
Improved skin elasticity in 88% of participants
3. Skin whitening and brightening Studies show tremella can:
Reduce melanin production by inhibiting tyrosinase activity
Fade dark spots and hyperpigmentation
Even out skin tone over 8-12 weeks of use
Tremella mushroom before and after – realistic expectations
People searching for “tremella mushroom before and after” should know:
Week 1-2: Increased hydration, skin feels softer
Week 4-6: Fine lines may appear reduced, skin looks plumper
Week 8-12: Potential improvement in dark spots and overall radiance
3+ months: Maximum benefits for collagen production
Important: Results vary significantly based on age, skin type, and whether you’re using it topically or internally.
Tremella mushroom health benefits beyond beauty
Immune system support
Tremella contains beta-glucans that can:
Stimulate macrophage activity (your immune system’s first responders)
Increase production of immune cells
Potentially reduce frequency of colds and infections
A 2015 study showed participants taking tremella extract had 35% fewer upper respiratory infections.
Brain health and cognitive function
Recent research (2019-2021) suggests tremella may:
Protect neurons from oxidative damage
Improve memory and learning in animal studies
Potentially slow cognitive decline
Note: Human studies are still limited in this area.
Blood sugar and cholesterol management
Studies indicate tremella mushroom can:
Reduce post-meal blood sugar spikes by up to 20%
Lower LDL cholesterol by 10-15% over 8 weeks
Improve insulin sensitivity
Tremella mushroom side effects and safety concerns
Let’s be honest about potential side effects – this is what many of you are worried about:
Common tremella mushroom side effects
Generally mild and rare:
Digestive upset (if taking large doses)
Mild allergic reactions (itching, rash)
Temporary bloating
Serious side effects: None reported in clinical studies at normal doses.
Tremella mushroom pregnancy and breastfeeding safety
The honest answer: There are NO safety studies on tremella during pregnancy or breastfeeding. Most healthcare providers recommend avoiding it during these times. If you’re pregnant and considering tremella, talk to your doctor first.
Who should avoid tremella mushroom?
People with mushroom allergies
Those on immunosuppressant drugs (tremella boosts immune function)
Anyone scheduled for surgery (stop 2 weeks before)
How to use tremella mushroom (dosage and methods)
Tremella mushroom supplements dosage
Standard dosing based on research:
Powder: 1-3 grams daily
Extract (10:1): 500-1000mg daily
Fresh/dried mushroom: 5-10 grams daily
For skin benefits specifically: Most studies showing skin improvements used 1000-2000mg of extract daily for 8-12 weeks.
Best ways to take tremella mushroom
1. Tremella mushroom tea
Soak 5g dried tremella in water for 30 minutes
Simmer for 45-60 minutes until gelatinous
Add honey or dates for sweetness
2. Tremella powder in smoothies
Start with 1/2 teaspoon daily
Blends well with fruits and doesn’t affect taste
Best absorbed with some fat (add nuts or avocado)
3. Tremella supplements
Look for standardized extracts (30-50% polysaccharides)
Bottom line: They work differently and can be used together for best results.
Tremella mushroom nutrition facts
Per 100g dried tremella:
Calories: 200
Protein: 2.6g
Carbohydrates: 67g (mostly polysaccharides)
Fat: 0.2g
Fiber: 18g
Vitamin D: 28% DV
Iron: 30% DV
Potassium: 15% DV
How to grow tremella mushroom (spoiler: it’s complicated)
Unlike oyster mushrooms, tremella is parasitic and requires a host fungus (usually Hypoxylon archeri) to grow. This makes home cultivation extremely difficult.
Why growing tremella mushroom is challenging:
Needs two different fungi to fruit
Requires precise temperature (65-75°F) and humidity (85-95%)
Takes 2-3 months from inoculation to harvest
Success rate for beginners: less than 20%
If you want to try growing mushrooms at home, start with oyster or shiitake instead.
Frequently asked questions about tremella
Is tremella safe for daily use? Yes, studies show daily use for up to 3 months is safe for most people. Some traditional users consume it regularly for years.
What does tremella taste like? Very mild, slightly sweet flavor. The texture is more notable – gelatinous and slightly crunchy when rehydrated.
Can tremella help with weight loss? No direct evidence for weight loss. However, its fiber content (18g per 100g) may help with satiety.
How long before I see skin benefits from tremella? Most people notice improved hydration within 1-2 weeks. Anti-aging benefits typically take 6-12 weeks of consistent use.
Can I use tremella with retinol or vitamin C? Yes, tremella is gentle and works well with other skincare ingredients. It may actually help reduce irritation from actives.
Is tremella fuciformis the same as snow mushroom? Yes, they’re the same species. Also called silver ear mushroom, white jelly mushroom, or snow fungus.
The bottom line on tremella mushroom benefits
Tremella mushroom offers legitimate benefits, especially for skin hydration and anti-aging. The science backs up many traditional uses, though some claims need more research. It’s generally safe, well-tolerated, and can be a valuable addition to both your skincare routine and diet.
Who should try tremella:
Anyone looking for natural skin hydration
People interested in anti-aging support
Those wanting immune system benefits
Anyone already using hyaluronic acid (they work great together)
Who should skip it:
Pregnant or breastfeeding women (insufficient safety data)
People with mushroom allergies
Those expecting overnight miracles
Start with a quality supplement or try making tremella tea. Give it at least 8 weeks to see real benefits, and remember – consistency is key.
Got questions about tremella mushroom? Leave them below. I’ve researched this stuff extensively and happy to help!
Let’s be real here – parasol mushrooms (Macrolepiota procera) are one of the trickiest mushrooms to grow at home. Unlike oyster or shiitake mushrooms that you can grow in bags, parasol mushrooms need outdoor soil and a lot of patience. But if you’re up for the challenge, I’ll show you exactly how to do it.
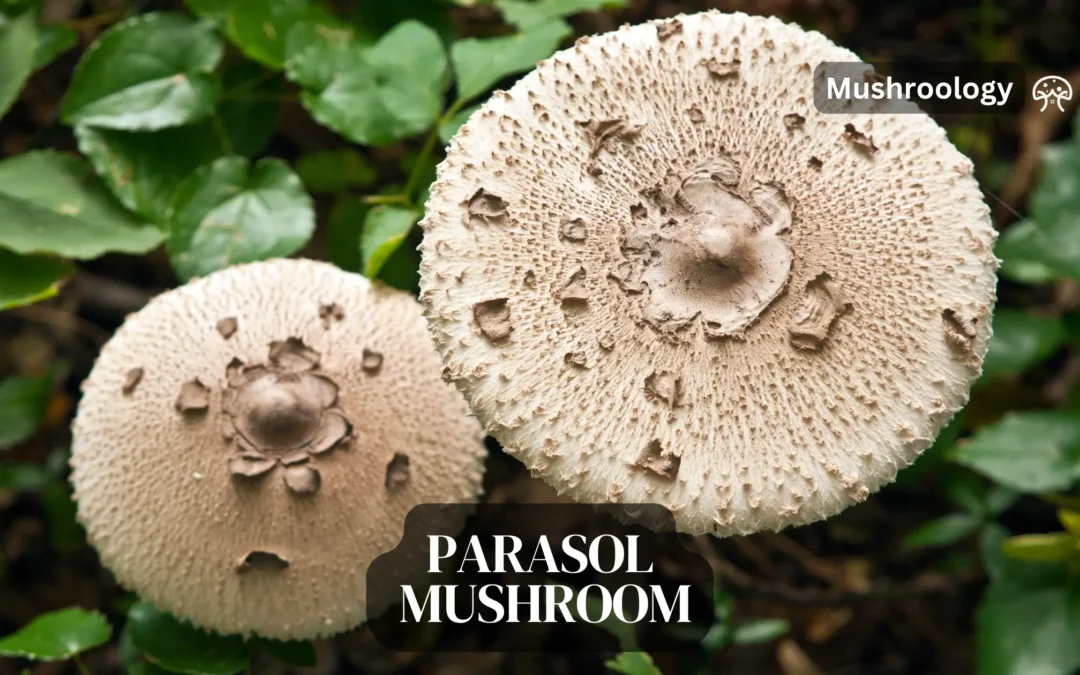
What are parasol mushrooms?
Parasol mushrooms are those huge mushrooms you see in fields that look like, well, parasols. They can grow up to 12 inches tall with caps spreading 8-10 inches wide. They’re absolutely delicious – kind of nutty and meaty – but here’s the thing: they’re mycorrhizal mushrooms, which means they need to form relationships with plant roots to grow properly.
Quick facts about parasol mushrooms:
Growing season: Early summer through late fall
Time to first harvest: 6-12 months (sometimes longer)
Growing difficulty: Advanced
Best location: Open grassy areas or meadows
Temperature range: 60-75°F (15-24°C)
Why parasol mushrooms are challenging to grow
I need to be upfront with you – parasol mushrooms aren’t like growing button mushrooms in a kit. Here’s why:
They’re mycorrhizal: They need living plant roots nearby
Long establishment time: Can take 1-2 years before you see any mushrooms
Unpredictable fruiting: Even when established, they fruit when they want to
Space requirements: Need a decent-sized outdoor area
If you’re looking for quick results, honestly, try oyster mushrooms instead. But if you’ve got patience and outdoor space, let’s do this.
This is the most reliable method for home growers:
Spread spawn: Scatter grain spawn over your prepared area (1 pound per 50 square feet)
Lightly rake in: Just barely cover the spawn with soil
Plant grass: If no grass exists, overseed with a grass mix
Water gently: Keep moist but not soggy
Wait: This is the hard part – it takes months
Method 2: Transplanting wild mycelium (advanced)
If you know where parasol mushrooms grow wild:
Get permission: Always ask before digging on someone’s property
Dig carefully: Take a shovelful of soil from near wild parasols
Transplant quickly: Move to your prepared area within hours
Water well: Keep the area moist for several weeks
Cross your fingers: Success rate is maybe 50%
The waiting game with parasol mushrooms
Here’s what happens after inoculation:
Months 1-3: You’ll see nothing. The mycelium is spreading underground.
Months 4-6: Still nothing visible. Keep the faith.
Months 6-12: You might see your first mushrooms, or you might not.
Year 2+: If established, you should get regular flushes each year.
Seasonal care for parasol mushrooms
Spring:
Check for early mushrooms
Add a thin layer of compost
Ensure good drainage after snow melt
Summer:
Water during dry spells (once a week if no rain)
Watch for mushrooms after summer rains
Don’t mow when mushrooms are present
Fall:
Peak fruiting season for parasol mushrooms
Check every few days after rain
Harvest promptly when ready
Winter:
Leave the area undisturbed
Mycelium is dormant but alive
Plan for next year
Common problems growing parasol mushrooms
“It’s been a year and no mushrooms!” This is normal. Parasol mushrooms are slow. Keep maintaining the area and be patient. Some patches take 2-3 years to establish.
“Other mushrooms are growing instead” That’s actually fine! It means your soil is healthy. Just make sure you can identify parasol mushrooms correctly before eating anything.
“My parasol mushrooms grew but fell over” They’re top-heavy by nature. Next time, harvest a bit earlier or stake them if you want perfect specimens.
When to harvest parasol mushrooms
The timing is crucial for best flavor and texture:
Cap still closed: Too early – wait a bit
Cap just opening: Perfect for grilling whole
Cap fully open but edges down: Ideal for most uses
Cap flat or edges turning up: Getting old, use quickly
How to harvest parasol mushrooms properly
Use a knife: Cut at ground level, don’t pull
Leave the base: This helps the mycelium recover
Harvest in morning: They’re freshest then
Check for bugs: Slugs love these mushrooms too
Process quickly: They don’t store well fresh
Using and storing parasol mushrooms
Cleaning parasol mushrooms
Brush off dirt with a soft brush
Don’t soak in water – they’ll get mushy
Trim the tough stem base
Check inside hollow stems for bugs
Cooking parasol mushrooms
These are seriously good eating:
Grilled whole caps: Brush with oil, season, grill like a burger
Breaded cutlets: Slice, bread, and fry like schnitzel
Stuffed caps: Fill with herbs, cheese, breadcrumbs
Dried: Intense flavor for soups and sauces
Storing your parasol mushroom harvest
Fresh storage:
Paper bag in fridge: 3-5 days max
Never in plastic – they’ll get slimy
Long-term storage:
Dehydrate: Slice and dry at 125°F
Freeze: Cook first, then freeze
Pickle: Great for preserving texture
Frequently asked questions
Can I grow parasol mushrooms indoors? No, they need outdoor soil and likely plant root associations. This isn’t like growing oyster mushrooms in a bucket.
How many parasol mushrooms will I get? Varies wildly. An established patch might produce 10-50 mushrooms per year, or just a few. Nature decides.
Are parasol mushrooms hard to identify? They’re fairly distinctive, but always verify with multiple sources or an expert before eating any wild or homegrown mushroom.
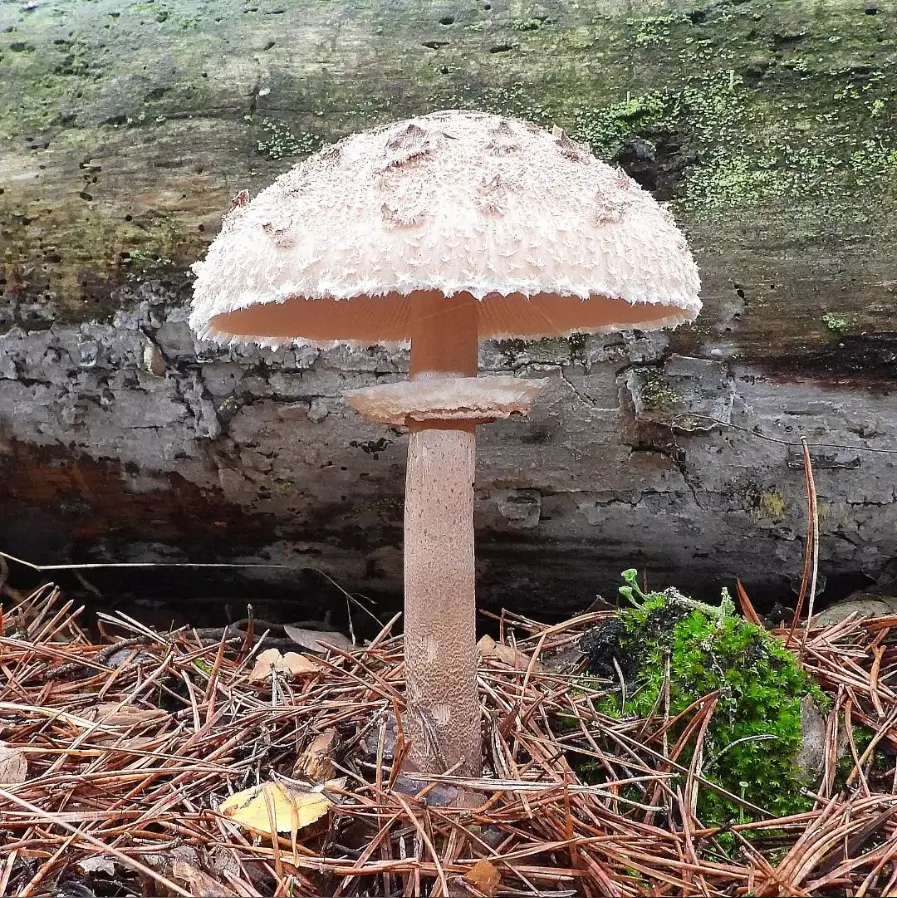
What’s the difference between parasol mushrooms and false parasols? Several look-alikes exist. True parasols have a distinctive snake-skin pattern on the stem and a moveable ring. When in doubt, don’t eat it.
Can I speed up parasol mushroom growth? Not really. They grow on their own schedule. Extra watering or fertilizer won’t make them fruit faster.
Is growing parasol mushrooms worth it?
Let’s be honest – if you want easy mushrooms, grow oyster or shiitake mushrooms instead. But if you:
Have outdoor space
Enjoy long-term garden projects
Want something unique
Have patience
Then absolutely give parasol mushrooms a try. When that first mushroom pops up after a year of waiting, it’s magical. Plus, once established, they can produce for many years.
Your next steps for growing parasol mushrooms
Ready to try? Here’s your action plan:
Find a spawn supplier (start looking in winter)
Choose your location (observe it through a season first)
Order spawn for spring delivery
Prepare your area when soil is workable
Inoculate and start your patience practice
Join mushroom forums for support during the wait
Remember, growing parasol mushrooms is a marathon, not a sprint. But hey, the best things in gardening usually are. Good luck!
Got questions about growing parasol mushrooms? Drop them below. I’ve been growing (and waiting for) these beauties for years and happy to help!
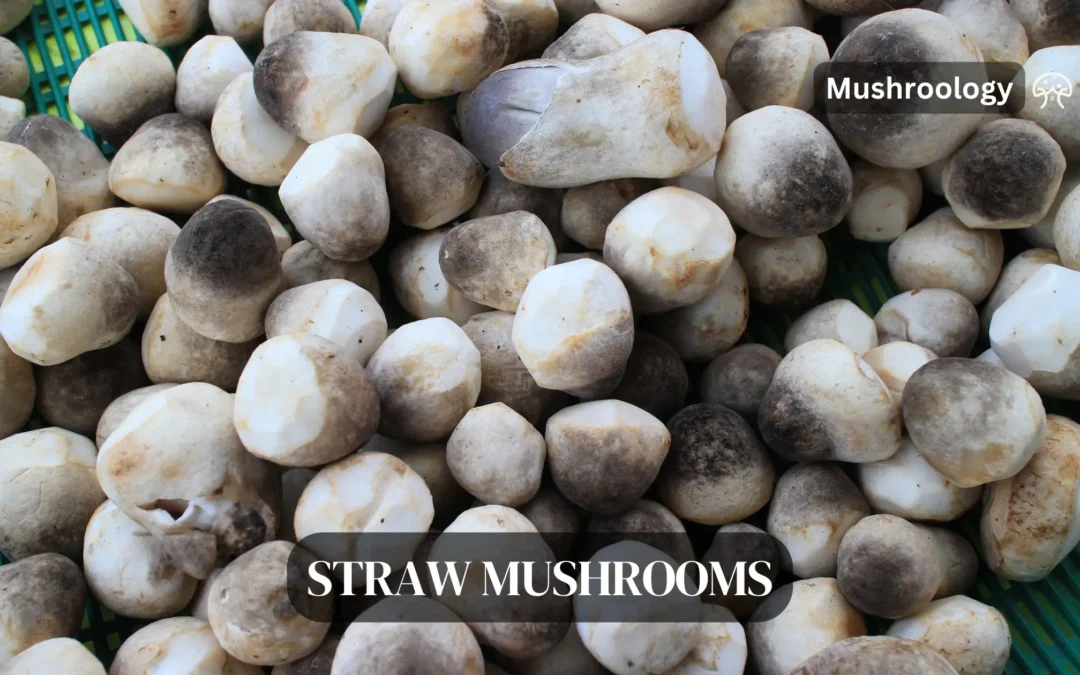
magine walking through misty rice fields at dawn in Southeast Asia. Between stacks of harvested rice straw, small egg-shaped mushrooms peek out. These are paddy straw mushrooms, also called straw mushrooms or Chinese mushrooms. With the scientific name Volvariella volvacea, these mushrooms have been grown for centuries and are treasured for their taste and quick growth.
The story of these mushrooms begins around 1822 in China. Buddhist monks at the Nanhua Temple in Guangdong province discovered they could grow these mushrooms on leftover rice straw to add flavor to their vegetarian meals. The mushrooms became so popular that they were even given as gifts to Chinese royalty!
Today, paddy straw mushrooms are grown throughout East and Southeast Asia. You can find them fresh in local markets or canned and dried in stores worldwide. They’re a key ingredient in many Asian dishes, from Chinese stir-fries to Thai tom yum soup.
Why Paddy Straw mushrooms matter?
These mushrooms are important for several reasons:
They turn farm waste (rice straw) into valuable food
They grow quickly, providing income for farmers
They’re nutritious and may have health benefits
They help reduce pollution by using straw that might otherwise be burned
China produces about 80% of the world’s paddy straw mushrooms, with thousands of tons harvested annually. But they’re also grown by small farmers across Asia who use them to earn extra money between rice seasons.
The biology of paddy straw mushrooms
Paddy straw mushrooms are saprotrophic, which means they feed on dead plant material. In nature, they break down rice straw, banana leaves, oil palm fiber, and even water hyacinth.
The mushroom’s main body is a white network called mycelium that spreads through the straw. This mycelium produces special enzymes that break down tough plant fibers, turning them into food for the fungus.
Life cycle of Paddy Straw Mushrooms
The life cycle of paddy straw mushrooms follows these steps:
Microscopic spores released from mature mushrooms land on damp straw
Spores germinate into thin mycelial threads
Mycelium grows through the straw, digesting it
Small round “buttons” form, covered by a protective veil
The veil splits open, revealing the mushroom cap and stem
Mature mushrooms release new spores, starting the cycle again
From spore to mature mushroom takes just 4-5 weeks, making them one of the fastest-growing mushrooms. Once the mycelium fills the straw, mushrooms appear within 4-5 days!
Growing conditions of Paddy Straw mushrooms
Paddy straw mushrooms love warm weather. They grow best at temperatures between 28°C and 35°C (82°F-95°F), earning them the nickname “warm mushrooms.” If temperatures drop below 20°C (68°F), growth slows down significantly.
They also need high humidity (around 80% or more) and some air circulation. While they don’t need direct sunlight, a little ambient light helps trigger mushroom formation.
Instagram @odishatourismofficial
How to Grow Paddy Straw Mushrooms: A Step-by-Step Guide
Choose clean, dry, and pesticide-free straw. Rice or wheat straw are ideal due to their readily digestible cellulose content. Other options like oat straw or barley straw can also work, but may require slightly longer soaking times.
Aim for approximately 1 kg (2.2 lbs) of straw for a single cultivation cycle. This amount can be adjusted based on the size of your container and desired yield.
2. Paddy straw mushroom spawn (mycelium):
Purchase high-quality Volvariella volvacea spawn from a reputable supplier. This ensures you’re getting the specific fungal strain suitable for growing straw mushrooms.
Spawn typically comes in various forms like grain spawn or sawdust spawn. Both options work well, but grain spawn may colonize the straw slightly faster due to its readily available nutrients.
Generally, a spawn-to-substrate ratio of 1:10 is recommended. For 1 kg (2.2 lbs) of straw, you’ll need around 100 g (3.5 oz) of spawn.
3. Container:
Choose a large container with good ventilation to allow for air circulation and prevent moisture buildup. Plastic tubs, buckets, or even large grow bags with ventilation holes can work well.
The size of the container will depend on the amount of straw you’re using. Aim for a container that can comfortably hold the straw without being crammed, allowing for some space for air circulation. A 50 L (13 gallons) container is a good starting point for 1 kg (2.2 lbs) of straw.
4. Hydrated Lime:
Adding hydrated lime (calcium hydroxide) to the soaking water helps regulate the pH level of the straw, creating a slightly alkaline environment that favors the growth of Volvariella volvacea while suppressing potential contaminants.
Use approximately 50 g (1.75 oz) of hydrated lime per liter (gallon) of water during the soaking process.
5. Spray Bottle:
A clean spray bottle filled with water will be essential for maintaining humidity inside the container throughout the growing process.
6. Thermometer:
Monitoring the temperature is crucial for optimal mushroom growth. A thermometer will help you ensure the environment stays within the ideal range for Volvariella volvacea (25-30°C / 77-86°F).
Optional Equipment:
Gloves: Wearing gloves while handling the straw and spawn can help maintain hygiene and prevent contamination.
Heat Mat: If you struggle to maintain consistent warm temperatures, a heat mat placed underneath the container can provide supplemental warmth.
Additional Considerations:
Water quality: Use clean, chlorine-free water for soaking the straw and maintaining humidity.
Lighting: Straw mushrooms do not require direct sunlight. Avoid exposing the container to bright light, as this can inhibit growth.
Step-by-Step Instructions for Growing Straw Mushrooms
Growing straw mushrooms at home involves a straightforward process, but following each step carefully is crucial for successful cultivation. Here’s a detailed guide with scientific explanations for each step:
1. Prepare the Straw:
Chopping: Cut the straw into small pieces, ideally between 3-5 cm (1-2 inches) in length. This size provides optimal surface area for efficient fungal colonization while maintaining good air circulation within the substrate.
Soaking: Submerge the chopped straw in a large container filled with lukewarm water (around 30°C / 86°F) for 24-48 hours. This process hydrates the straw, making it easier for the fungal mycelium to colonize and absorb nutrients.
Adding Hydrated Lime: During soaking, add approximately 50 g (1.75 oz) of hydrated lime per liter (gallon) of water. The slightly alkaline environment created by lime helps suppress the growth of competing bacteria and fungi while favoring the growth of Volvariella volvacea.
Draining: After the soaking period, thoroughly drain the straw using a colander or mesh sieve. Squeeze out excess water gently, aiming for the straw to be moist but not dripping. Excessive moisture can lead to contamination and hinder fungal growth.
2. Pasteurization (Optional):
Purpose: Pasteurization is an optional step that helps eliminate potential contaminants like bacteria and mold spores that may be present in the straw. While not strictly necessary for all situations, it can improve the chances of successful cultivation, especially for beginners.
Methods: There are two common methods for pasteurizing straw:
Submersion: Bring a large pot of water to a boil. Place the straw in a heat-resistant mesh bag or colander and submerge it in the boiling water for 1-2 hours. Maintain a rolling boil throughout the process.
Steaming: Spread the straw on a baking sheet and steam it for 1-2 hours using a steamer or pot with a steamer basket. Ensure adequate steam is generated and reaches all parts of the straw.
Cooling: After pasteurization, allow the straw to cool completely before proceeding to inoculation. This typically takes several hours.
3. Inoculate the Straw:
Spreading the Straw: Evenly distribute the cooled and prepped straw in the chosen container. Aim for a loose and fluffy arrangement to allow for proper air circulation and prevent compaction.
Adding Spawn: Break up the mushroom spawn into small pieces and sprinkle it evenly over the surface of the straw. Ensure good distribution throughout the substrate.
Mixing: Gently mix the top layer of straw with the spawn, incorporating it slightly without disturbing the overall structure of the substrate. This ensures close contact between the spawn and the straw, facilitating fungal colonization.
4. Create a Humid Environment:
Covering: Cover the container loosely with a plastic bag or cloth that allows for some air exchange. This helps trap moisture inside and maintain high humidity levels necessary for fungal growth.
Misting: Regularly mist the inside of the container with clean water using the spray bottle. Aim for a fine mist that creates a humid environment without saturating the straw.
5. Maintain Ideal Conditions:
Temperature: Place the container in a warm location with temperatures between 25-30°C (77-86°F). This temperature range is optimal for the growth of Volvariella volvacea. If needed, use a heat mat placed underneath the container to maintain consistent warmth.
Humidity: Monitor the humidity level inside the container and maintain it around 80-90% by misting regularly and adjusting the ventilation as needed. Too much humidity can lead to mold growth, while insufficient moisture can hinder fungal development.
Lighting: Avoid exposing the container to direct sunlight. Straw mushrooms do not require light for growth and may even be inhibited by excessive light exposure.
6. Incubation and Fruiting:
Mycelial Colonization: Allow the container to remain undisturbed for 7-10 days. During this incubation period, the fungal mycelium will colonize the straw, spreading throughout the substrate as white threads become visible.
Fruiting Body Formation: Once the straw is fully colonized, small pinheads will begin to form on the surface, indicating the initiation of fruiting body development. This typically takes another 3-5 days.
7. Harvest and Enjoy:
Maturity: Harvest the mushrooms when the caps are fully expanded but before the veil breaks (the thin membrane connecting the cap to the stem). This ensures optimal flavor and texture.
Harvesting Technique: Gently twist the mushrooms at the base to detach them from the substrate. Avoid pulling or cutting, as this can damage
Tips for success in growing Paddy Straw Mushrooms
Following the outlined steps is crucial, but incorporating these additional tips can significantly enhance your chances of cultivating healthy and abundant straw mushrooms:
Maintaining Optimal Conditions:
Consistent Humidity: Fluctuating humidity levels can stress the mycelium and hinder fruiting. Aim for consistent moisture levels around 80-90% throughout the cultivation process. Monitor humidity regularly and adjust misting frequency or ventilation as needed.
Proper Air Circulation: While maintaining humidity is important, stagnant air can promote mold growth. Ensure the container has adequate ventilation holes to allow for some air exchange. Briefly remove the cover for a few minutes daily to refresh the air, especially during fruiting.
Temperature Control:Volvariella volvacea thrives in warm temperatures. Maintain consistent temperatures between 25-30°C (77-86°F) throughout the process. If using a heat mat, ensure it doesn’t directly touch the container to avoid overheating the substrate.
Hygiene and Sanitation:
Cleanliness: Wash your hands thoroughly before handling the straw, spawn, and mushrooms. This helps prevent contamination from introducing unwanted bacteria or fungi.
Sterilization: Consider sterilizing the container and tools used in the process with a diluted bleach solution or rubbing alcohol before use. This further minimizes the risk of contamination.
Additional Tips:
Spawn Quality: Choose high-quality, fresh spawn from a reputable supplier. This ensures the viability of the fungal spores and increases the chances of successful colonization.
Avoiding Direct Sunlight: While light is not necessary for growth, Volvariella volvacea can be sensitive to direct sunlight. Keep the container in a shaded location or covered to prevent potential negative effects.
Monitoring and Observation: Regularly check the container for signs of mold growth, which appears as fuzzy patches of different colors. If mold is present, isolate and discard the contaminated material immediately to prevent further spread.
Multiple Flushes: After the initial harvest, the straw may produce additional flushes of mushrooms over a period of several weeks. Continue maintaining optimal conditions and harvesting as new mushrooms appear.
Spent Substrate: Once fruiting has ceased, discard the spent straw and thoroughly clean the container before starting a new cultivation cycle.
By following these tips and paying close attention to the details throughout the process, you can create a favorable environment for your straw mushrooms to thrive and enjoy a rewarding harvest of delicious and nutritious homegrown fungi.
Common challenges and solutions
Contamination
Problem: Other fungi or molds invade the straw bed.
Solution: Use clean straw and work in a clean area. Keep the temperature high (around 35°C/95°F) during incubation to suppress molds. If you see unwanted mold patches, remove that part of the bed.
Pests
Problem: Insects or mites attack the mushrooms.
Solution: Cover the growing area with mesh screens. Keep the area clean by removing old mushrooms and debris. Some growers create light smoke from burning organic material to keep insects away.
Climate issues
Problem: Temperature gets too low or rain soaks the bed.
Solution: In cool weather, insulate the bed or move it to a warm place. In rainy conditions, provide drainage and cover the bed with a roof or tarp.
Nutritional Benefits of Paddy Straw Mushrooms
Paddy straw mushrooms are packed with nutrients while being low in calories and fat. Here’s what makes them nutritious:
Protein Powerhouse
A cup of straw mushrooms (about 150 grams) contains 6-7 grams of protein. When dried, they’re 20-30% protein by weight—similar to soybeans or meat! They contain all the essential amino acids humans need.
Vitamins and Minerals
These mushrooms provide:
B vitamins (folate, riboflavin, niacin)
Selenium (a powerful antioxidant)
Potassium (for heart and muscle function)
Phosphorus
Iron (for red blood cell production)
Zinc
A 100-gram serving provides about half the recommended daily selenium intake.
Heart-Healthy Profile
Paddy straw mushrooms are low in sodium and contain no cholesterol. The small amount of fat they do have is mostly unsaturated fatty acids, which are good for heart health.
Health benefits and medicinal properties of paddy straw mushrooms
Beyond basic nutrition, paddy straw mushrooms contain compounds with potential health benefits:
Antioxidant Effects
The mushrooms contain substances that help neutralize harmful free radicals in the body. This may help protect cells from damage.
Some compounds in these mushrooms appear to reduce inflammation.
Potential Anti-cancer Effects
Laboratory studies suggest that certain mushroom extracts may have anti-tumor activity, though more research is needed.
Blood Pressure Benefits
Early research indicates that some compounds in paddy straw mushrooms may help lower blood pressure.
While most of these findings come from lab studies, they support the traditional belief that mushrooms are “health foods” with benefits beyond basic nutrition.
FAQs about Growing Straw Mushrooms:
1. What type of straw is best for growing straw mushrooms?
Answer: Rice straw or wheat straw are ideal choices due to their readily digestible cellulose content. Other options like oat straw or barley straw can also work, but may require slightly longer soaking times.
2. Where can I buy mushroom spawn for growing straw mushrooms?
Answer: You can purchase high-quality Volvariella volvacea spawn from reputable online mushroom suppliers or specialty gardening stores.
3. What is the ideal temperature for growing straw mushrooms?
Answer: The optimal temperature range for Volvariella volvacea is between 25-30°C (77-86°F). If needed, use a heat mat to maintain consistent warmth.
4. How often should I mist the container during cultivation?
Answer: Misting frequency depends on humidity levels. Aim to maintain consistent moisture around 80-90%. Mist regularly as needed to create a humid environment without saturating the straw.
5. How long does it take for straw mushrooms to grow?
Answer: It typically takes around 7-10 days for the mycelium to colonize the straw, followed by another 3-5 days for fruiting bodies to form. The entire process from inoculation to harvest can take 2-3 weeks.
6. How many flushes of mushrooms can I expect from one batch of straw?
Answer: Under optimal conditions, you can typically harvest multiple flushes of mushrooms over a period of several weeks. The number of flushes can vary depending on various factors like spawn quality and environmental conditions.
7. What do I do with the spent straw after harvesting?
Answer: Once fruiting has ceased, discard the spent straw and thoroughly clean the container before starting a new cultivation cycle. You can compost the spent straw as it can still contain some nutrients beneficial for plants.
8. Can I eat straw mushrooms raw?
Answer: It’s generally not recommended to eat straw mushrooms raw. Cooking helps ensure their safety and digestibility. They can be enjoyed in various cooked dishes like stir-fries, soups, or omelets.
9. What are the health benefits of straw mushrooms?
Answer: Straw mushrooms are low in calories and fat and a good source of protein, dietary fiber, vitamins, and minerals. They also contain unique bioactive compounds with potential anti-inflammatory and antioxidant properties.
10. Is growing straw mushrooms difficult?
Answer: Growing straw mushrooms is considered a relatively easy and beginner-friendly option compared to other mushroom varieties. By following proper procedures and maintaining suitable conditions, you can successfully cultivate these delicious fungi at home.
Mushrooms and Brain Health: Nature’s Cognitive Enhancers
In our quest for better brain health, the answer might be growing quietly in forests and labs around the world. Mushrooms, those fascinating fungi that have been part of traditional medicine for centuries, are now revealing their brain-boosting secrets through modern science.
Recent research shows that certain mushrooms contain powerful compounds that can enhance memory, protect brain cells, and potentially slow cognitive decline. As our population ages and brain health concerns become more common, these natural cognitive enhancers offer an exciting approach to keeping our minds sharp.
This article explores the fascinating relationship between mushrooms and brain health, revealing which varieties offer the biggest benefits and how you can add them to your daily routine.
Why brain health matters now more than ever
Our brains face more challenges than ever before. From constant digital stimulation to longer lifespans, our cognitive health deserves serious attention. By 2020, approximately 42 million people worldwide were living with dementia and Alzheimer’s disease, and these numbers continue to rise.
Despite advances in medicine, effective treatments for neurodegenerative conditions remain limited. This reality has sparked interest in preventative approaches – ways we can protect our brain health before problems develop.
Mushrooms offer a natural solution with scientific backing. Unlike many medications that target single pathways, mushrooms contain complex mixtures of compounds that support brain health through multiple mechanisms simultaneously. This comprehensive approach makes them particularly valuable for addressing the complex nature of cognitive health.
How mushrooms work their magic on your brain
The brain-boosting effects of mushrooms come from several key mechanisms that work together to enhance cognitive function and protect neural health. Let’s break down exactly how these fungi support your brain:
Fighting oxidative damage
Your brain uses more oxygen than any other organ, making it especially vulnerable to oxidative stress – damage caused by free radicals that can harm brain cells and contribute to cognitive decline.
Many medicinal mushrooms, particularly oyster varieties, contain powerful antioxidants that neutralize these harmful free radicals. Research shows mushroom extracts can combat various types of free radicals, including DPPH, superoxide, nitric oxide, and hydroxyl radicals.
Even more impressive, mushrooms boost your body’s own antioxidant defenses by increasing the activity of protective enzymes like superoxide dismutase, catalase, and glutathione peroxidase. This two-pronged approach – directly fighting free radicals while enhancing your natural defenses – makes mushrooms particularly effective brain protectors.
Calming brain inflammation
Chronic inflammation in the brain is increasingly recognized as a key factor in cognitive decline and neurodegenerative diseases. Think of it as a slow-burning fire that gradually damages brain tissue over time.
Medicinal mushrooms contain anti-inflammatory compounds that help reduce this harmful inflammation. Studies show certain mushroom extracts can decrease the production of inflammatory molecules while increasing anti-inflammatory responses in the brain. This creates a healthier environment where brain cells can function optimally and form new connections.
By dampening chronic inflammation, mushrooms may help slow the progression of inflammatory processes that contribute to conditions like Alzheimer’s disease.
Stimulating new neural growth
Perhaps the most exciting way mushrooms support brain health is by stimulating the production of special proteins called neurotrophins. These include Nerve Growth Factor (NGF) and Brain-Derived Neurotrophic Factor (BDNF), which are essential for growing and maintaining healthy neurons.
Lion’s Mane mushroom (Hericium erinaceus) stands out for its remarkable ability to stimulate NGF production. The compounds responsible, called hericenones and erinacines, can cross the blood-brain barrier and encourage the growth of new neural connections. In laboratory studies, Lion’s Mane extract increased NGF production and promoted neurite outgrowth – the process by which neurons form new projections to connect with other cells.
This ability to stimulate neural growth and repair makes mushrooms like Lion’s Mane particularly promising for supporting cognitive function and potentially addressing conditions where nerve cell loss is a central feature.
Supporting Mood and Mental Wellbeing
The connection between brain health and mental wellbeing runs deep, and certain mushrooms appear to support both. According to population studies, researchers found that regular mushroom consumption is associated with lower rates of depression.
This benefit likely comes from multiple mechanisms, including the anti-inflammatory effects of mushrooms, their ability to influence neurotransmitter systems, and their overall support of brain health. By addressing both cognitive function and mood regulation, mushrooms offer a holistic approach to mental wellbeing.
The Best Mushrooms for Brain Health
While many mushrooms offer health benefits, certain species stand out for their specific effects on brain health and cognitive function. Let’s explore the most powerful brain-boosting fungi:
Lion’s Mane: The Nerve Growth Superstar
Lion’s Manestands out as the most well-researched mushroom for brain health. This unique-looking mushroom, with its cascading white spines resembling a lion’s mane, contains compounds that have remarkable effects on brain function.
What makes Lion’s Mane special is its ability to stimulate the production of Nerve Growth Factor (NGF), which is essential for the growth, maintenance, and survival of neurons, particularly those involved in memory and learning. Studies show that Lion’s Mane extract can increase NGF production and promote neurite outgrowth – the process by which neurons form new connections.
In one study, the combination of Lion’s Mane extract with nerve growth factor produced a remarkable 60.6% increase in neurite outgrowth compared to controls. This suggests that Lion’s Mane not only stimulates NGF production but also enhances its effects, creating compounded benefits for neural growth.
A systematic review published in 2024 investigated the neuroprotective pathways impacted by Lion’s Mane and found multiple mechanisms through which it may help prevent and slow the progression of Alzheimer’s disease. The review identified various bioactive compounds in Lion’s Mane that contribute to these effects, highlighting the complexity and power of this medicinal mushroom.
Research suggests Lion’s Mane may help:
Improve memory and cognitive function
Protect against neurodegenerative diseases
Support recovery from nerve damage
Reduce symptoms of anxiety and depression
Reishi: The Stress-Fighting Brain Protector
Reishi has been used in traditional Chinese medicine for thousands of years and is known as the “mushroom of immortality.” While it’s often associated with immune support and stress reduction, research shows it also offers significant benefits for brain health.
Studies have identified Reishi as effective for supporting neurite outgrowth and overall neuronal health. Its compounds help protect brain cells while also providing adaptogenic effects that help your body respond better to stress.
The adaptogenic properties of Reishi may be particularly important for brain health, as chronic stress is a significant factor in cognitive decline. By helping your body adapt to stressors more effectively, Reishi indirectly protects brain function while also providing direct neuroprotective effects.
Maitake: The Immune-Cognitive Connector
Maitake, also known as “Hen of the Woods,” is a delicious culinary mushroom that also offers significant brain health benefits. It contains unique polysaccharides, particularly beta-glucans, that support both immune function and neuronal health.
Research has shown Maitake promotes neurite outgrowth and neuronal health benefits, similar to Reishi. This dual action on both immune function and neural health makes Maitake particularly valuable, as the connection between immune health and brain function is becoming increasingly clear.
The immune system plays a crucial role in brain health, with immune dysfunction contributing to neuroinflammation and potentially to neurodegenerative diseases. By supporting healthy immune function while also directly benefiting neurons, Maitake offers a comprehensive approach to brain health.
Oyster Mushrooms: The Antioxidant Powerhouses
Oyster mushrooms are among the most commonly cultivated mushrooms worldwide and are prized for both their culinary value and health benefits. Research has revealed that these mushrooms have exceptional antioxidant properties that may benefit brain health.
Studies show that oyster mushrooms extract scavenged free radicals and prevented oxidative stress both in laboratory settings and in living organisms. Their ability to combat oxidative stress is particularly relevant for brain health, as the brain is highly susceptible to oxidative damage.
Oyster mushrooms boost multiple antioxidant defense systems, including both enzymatic defenses (like superoxide dismutase and catalase) and non-enzymatic antioxidants (like glutathione). This comprehensive approach to antioxidant protection makes them valuable allies in maintaining brain health, particularly as we age and oxidative stress increases.
Other Promising Mushrooms for Brain Health
Several other mushrooms show promise for brain health, though they may be less well-studied than those mentioned above:
Tremella (Snow Fungus): Contains an extracellular polysaccharide called glucuronoxylomannan with neuroprotective properties. Research indicates it may protect against radiation damage to the brain and has anti-inflammatory and antioxidant effects that benefit neural health.
Cordyceps: While best known for its energy and performance benefits, Cordyceps also shows neuroprotective properties and may help protect brain cells from various forms of damage.
Shiitake: A popular culinary mushroom that contains compounds that may help reduce inflammation and protect brain cells from oxidative damage.
What Science Says About Mushrooms and Brain Health
The potential brain benefits of mushrooms aren’t just theoretical—there’s growing scientific evidence supporting their cognitive effects:
Population Studies Show Real-World Benefits
A significant study from the European Investigation of Cancer—Norfolk Cohort analyzed the relationship between mushroom intake and cognitive performance over an 18-year period. The findings revealed that mushroom consumers displayed better cognitive performance than non-consumers across multiple cognitive domains.
Most importantly, this relationship was dose-dependent, with those consuming one or more portions of mushrooms per week showing the highest cognitive scores. The study also noted a significant reduction in mushroom intake over time, with 4.12% of the cohort giving up mushrooms after previously consuming them, suggesting potential opportunities for dietary interventions.
These findings align with other population studies that have found associations between mushroom consumption and reduced risk of cognitive decline, suggesting that regular incorporation of mushrooms into the diet may support cognitive health during aging.
Laboratory and clinical evidence
Numerous laboratory studies have demonstrated the neurotropic and neuroprotective effects of mushroom extracts. For example, research on Lion’s Mane has shown it can induce NGF synthesis in nerve cells and promote neurite outgrowth in neuroblastoma-glioma cells.
A review of medicinal mushrooms for brain cancer therapies highlighted their potential in integrative approaches, noting that they contain polysaccharides (mainly β-glucans) and polysaccharide-protein complexes with various immunological properties. While focused on cancer applications, this research underscores the broad neurological benefits these fungi may offer.
Research on edible mushrooms as “brain food” for mitigating neurodegenerative diseases found that many contain rare and exotic compounds that exhibit positive effects on brain cells both in laboratory settings and in living organisms. The study summarized the scientific information on edible and culinary mushrooms with regard to their antidementia/Alzheimer’s disease active compounds and pharmacological test results.
While more clinical trials are needed to fully understand the potential of medicinal mushrooms for brain health, the existing evidence provides a solid foundation for their continued investigation and use as part of a brain-healthy lifestyle.
How to Add Brain-Boosting Mushrooms to Your Life
If you’re interested in experiencing the brain-boosting benefits of mushrooms, there are several ways to incorporate them into your daily routine:
Add mushrooms to your meals
Many medicinal mushrooms can be included in your regular diet. Here are some approaches:
Lion’s Mane: This distinctive mushroom has a seafood-like flavor that some compare to lobster or crab. It can be sliced and sautéed, used in stir-fries, or made into a “mushroom steak.” When cooked properly, it develops a meaty texture that makes it satisfying as a main dish.
Oyster Mushrooms: With their mild, slightly sweet flavor, oyster mushrooms are versatile in the kitchen. They can be added to stir-fries, pasta dishes, soups, or simply roasted with a little olive oil and salt for a delicious side dish. Their quick cooking time makes them convenient for weeknight meals.
Maitake: This “hen of the woods” mushroom has a rich, earthy flavor that intensifies when cooked. It can be roasted, grilled, or added to soups and grain dishes. Its complex flavor profile makes it particularly good for dishes where mushrooms are the star ingredient.
Shiitake: Though not specifically highlighted in our brain health discussion, shiitake mushrooms are widely available and do offer some brain benefits. They add a rich, umami flavor to soups, stir-fries, and rice dishes. Dried shiitakes can be reconstituted and added to broths for extra flavor.
Cooking these mushrooms properly is important to break down their cell walls and make their beneficial compounds more bioavailable. In general, a light sauté in a little oil until the mushrooms release their moisture and begin to brown will enhance both flavor and nutrient availability.
Try adding mushrooms to:
Breakfast scrambles and omelets
Lunchtime salads and sandwiches
Dinner stir-fries, pasta dishes, and soups
Side dishes and grain bowls
Mushroom supplements
For those who want a more concentrated and consistent dose of mushroom compounds, supplements are available in various forms:
Powders: These can be added to smoothies, coffee, tea, or other beverages. Mushroom powders offer flexibility in dosing and can be easily incorporated into your daily routine. Some people find the taste of certain mushroom powders strong, so blending them into flavored beverages can make them more palatable.
Capsules: These provide a convenient way to take a consistent amount daily without having to taste the mushrooms. They’re portable and easy to include in your supplement routine.
Tinctures: These liquid extracts can be added to water or taken directly. They often absorb quickly and can be a good option for those who have trouble swallowing pills.
Dual-extracted products: These combine both water and alcohol extraction methods to capture the full spectrum of beneficial compounds. While typically more expensive, they may offer more comprehensive benefits since some mushroom compounds are water-soluble while others are alcohol-soluble.
When choosing supplements, it’s important to look for products from reputable companies that specify which part of the mushroom is used (fruiting body vs. mycelium), the extraction method, and whether the product is standardized for specific beneficial compounds. Third-party testing for quality and purity is also valuable.
Mushroom Coffee and Tea
Mushroom coffees and teas have become increasingly popular as a way to incorporate the benefits of medicinal mushrooms into daily routines. These products typically combine coffee or tea with extracts of mushrooms like Lion’s Mane, Reishi, or Chaga.
This approach offers the cognitive benefits of caffeine combined with the neuroprotective effects of mushrooms. Many people find that mushroom coffee provides a smoother energy boost with less jitteriness and crash compared to regular coffee, possibly due to the adaptogenic properties of the mushrooms balancing the stimulating effects of caffeine.
Add mushroom extract powders to your regular coffee or tea
Try ready-to-drink mushroom beverages for on-the-go convenience
Important Considerations Before Starting
While medicinal mushrooms are generally considered safe for most people, there are some important considerations:
Quality and sourcing
The quality of mushroom products varies widely. Look for reputable companies that provide information about their sourcing, growing methods, and testing practices. Mushrooms can absorb toxins from their growing environment, so organic or carefully tested products are preferable.
Some products may contain primarily the mycelium (the root-like structure) grown on grain rather than the fruiting body (the part we typically think of as the mushroom). While both contain beneficial compounds, their profiles differ. Many experts prefer supplements made from the fruiting body, as these more closely resemble the traditional mushrooms used in historical medicinal practices.
Potential Allergies and Sensitivities
Some people may be allergic or sensitive to certain mushroom species. If you’re trying a mushroom for the first time, start with a small amount and watch for any adverse reactions. Allergic reactions to mushrooms can range from mild digestive discomfort to more severe symptoms.
Medication Interactions
Some medicinal mushrooms may interact with medications, particularly those that affect blood clotting, blood sugar, or immune function. For example, Reishi has mild anticoagulant properties and may enhance the effects of blood-thinning medications. If you’re taking medications, it’s wise to consult with a healthcare provider before adding medicinal mushrooms to your routine.
Medical Supervision
While mushrooms can support brain health, they should not replace medical treatment for neurological conditions. If you have a diagnosed condition like Alzheimer’s disease, Parkinson’s disease, or clinical depression, work with your healthcare provider to determine how mushrooms might complement your treatment plan.
Exciting Future Directions in Mushroom Research
The field of medicinal mushroom research for brain health is rapidly evolving, with several promising areas of investigation on the horizon:
New Compounds Being Discovered
Scientists continue to identify new bioactive compounds in medicinal mushrooms and understand how they work. For example, recent research has identified two previously undescribed metabolites from Lion’s Mane, named erinacines Z1 and Z2, which show promise for neurotrophin-inducing effects.
This ongoing research may lead to more targeted mushroom extracts or even pharmaceutical derivatives inspired by mushroom compounds, potentially offering more potent or specific benefits for particular aspects of brain health.
Applications for Specific Brain Conditions
Researchers are investigating the potential of medicinal mushrooms for specific neurological conditions. For example, systematic reviews are examining Lion’s Mane as a possible therapeutic treatment for the prevention and delayed progression of Alzheimer’s disease.
Other areas of investigation include the potential of medicinal mushrooms for:
Parkinson’s disease
Multiple sclerosis
Traumatic brain injury
Depression and anxiety disorders
Post-stroke recovery
The anti-depressant activity of medicinal mushrooms is a particularly active area of research, with studies suggesting multiple mechanisms through which mushrooms may help alleviate depression.
Powerful Combinations
Studies are exploring how combinations of different mushroom species or mushrooms with other natural compounds might produce enhanced benefits for brain health through synergistic effects. This approach acknowledges the complex nature of brain health and the potential benefits of addressing multiple pathways simultaneously.
Embrace Fungi for a Sharper Mind
The growing body of scientific evidence suggests that certain medicinal mushrooms offer significant benefits for brain health through multiple mechanisms, including antioxidant protection, anti-inflammatory effects, and stimulation of nerve growth factors.
Lion’s Mane stands out as particularly promising for cognitive enhancement and neuroprotection, but other mushrooms like Reishi, Maitake, and oyster mushrooms also show significant potential. Population studies further support the connection between regular mushroom consumption and better cognitive performance, suggesting that incorporating mushrooms into our diets may be a simple yet effective strategy for supporting brain health.
As our population ages and neurodegenerative conditions become more prevalent, these natural cognitive enhancers offer promising complementary approaches to maintaining brain health. Whether incorporated into your diet, taken as supplements, or enjoyed in mushroom coffee or tea, these fascinating fungi offer a unique contribution to cognitive wellness.
While mushrooms should not replace medical treatment for neurological conditions, they may serve as a valuable complement to conventional approaches and as part of a preventative strategy for maintaining optimal brain health throughout life. The ancient wisdom surrounding medicinal mushrooms is increasingly validated by modern science, offering new hope for those seeking to preserve and enhance their cognitive function as they age.
The future of mushroom research for brain health is bright, with ongoing investigations likely to uncover even more benefits and applications for these remarkable natural remedies. As this research continues to evolve, medicinal mushrooms may become increasingly important tools in our collective effort to address the growing burden of neurodegenerative diseases and support cognitive health across the lifespan.
So next time you’re at the grocery store or health food shop, consider adding some of these brain-boosting fungi to your cart. Your brain might thank you for years to come.
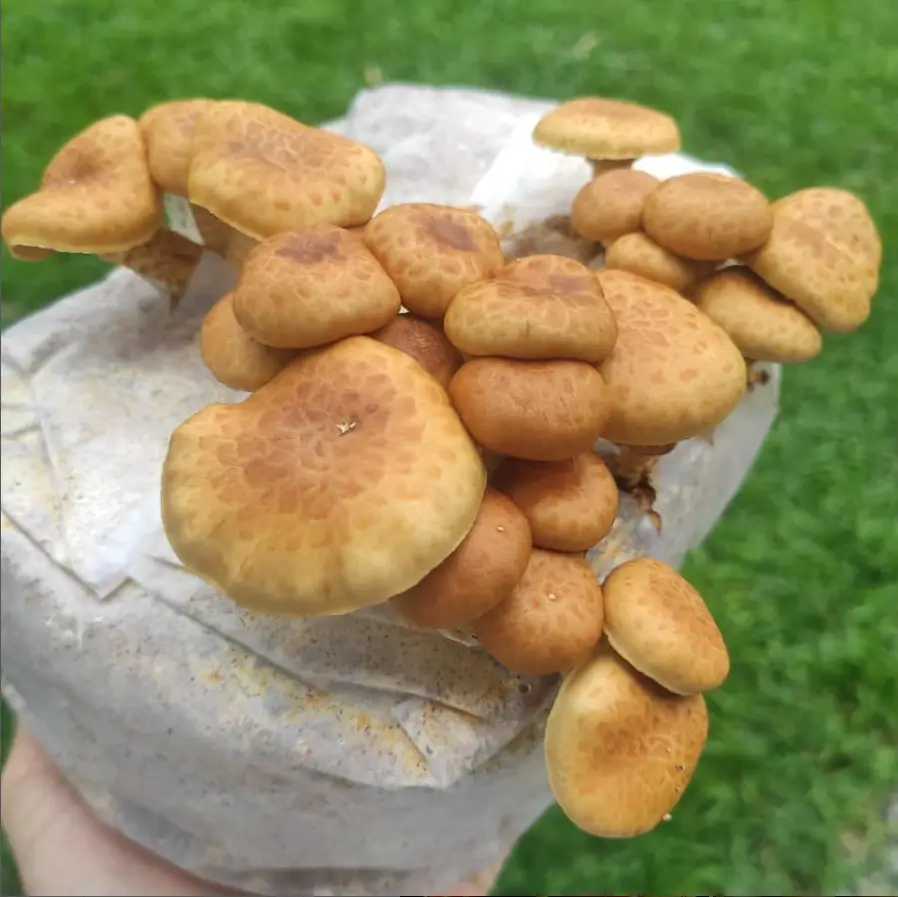
For enthusiasts and cultivators alike, nameko mushrooms(Pholiota nameko), a treasured ingredient in traditional Miso soup, offer a delightful venture into mycoculture. These uniquely textured fungi have gained popularity beyond their native East Asia, becoming prized additions to home cultivation projects.
What is Nameko mushroom?
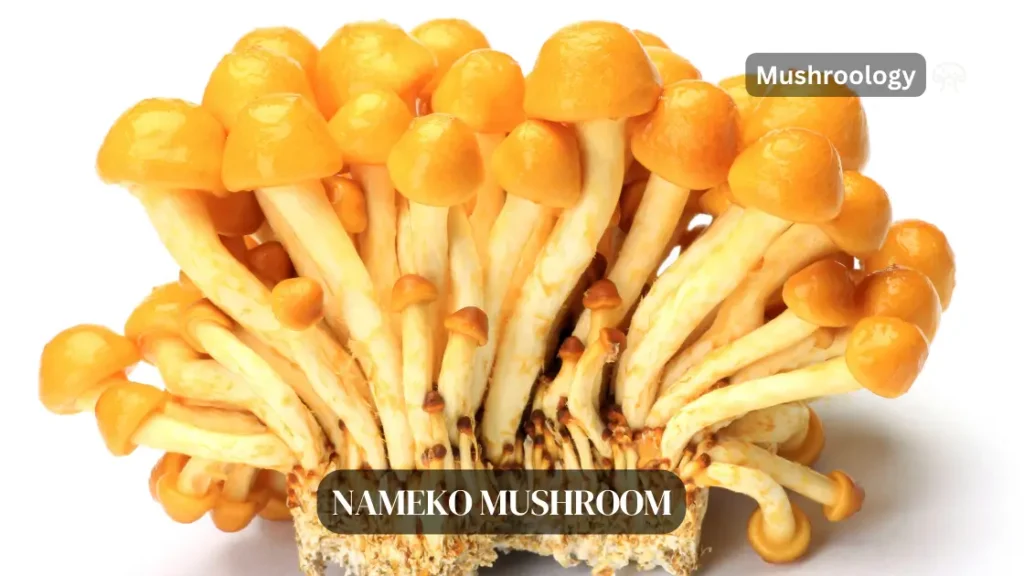
Nameko mushrooms (Pholiota microspora, synonym Pholiota nameko) are small to medium-sized mushrooms characterized by their amber-brown to orange caps covered with a distinctive gelatinous coating.
The name “Nameko” derives from the Japanese word “Numerikko,” meaning “slimy mushrooms,” which was eventually shortened to its current form. In Western markets, they’re sometimes marketed as “Butterscotch mushrooms” due to their sweet, candy-like aroma.
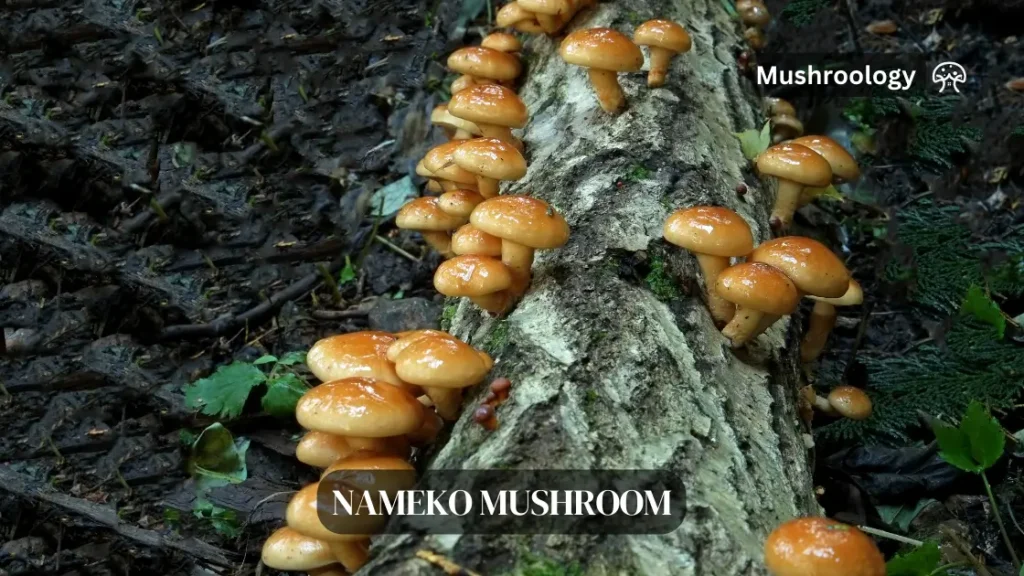
Native to the forests of East Asia, particularly Japan, China, and Taiwan, nameko mushrooms naturally grow on dead or decaying hardwood trees. They belong to the Strophariaceae family and are white-rot fungi that decompose wood.
According to historical records, nameko mushrooms were first artificially cultivated on logs in 1921 in the Tohoku region of northeastern Japan, where they were traditionally consumed as a wild-foraged delicacy. Modern commercial cultivation methods developed in the 1930s through the pioneering work of Hikosaburo Morimoto, who established sawdust-based cultivation techniques.
Perhaps most interestingly, genetic research has revealed that virtually all commercially produced nameko mushrooms in Japan descended from a single wild strain collected from Fukushima, Japan in 1962. This severe genetic bottleneck stands in stark contrast to the diversity found in wild populations. Sawdust cultivation now accounts for approximately 99.7% of nameko production in Japan, with China emerging as the world’s largest producer since the mid-1970s when cultivation techniques spread beyond Japan.
Getting started with Nameko cultivation
Before beginning your nameko mushroom growing journey, it’s essential to understand the two primary cultivation methods: log cultivation and sawdust/block cultivation. Each has distinct advantages and considerations.
Log cultivation represents the traditional approach to growing nameko mushrooms. This method involves inoculating hardwood logs with nameko spawn, mimicking the mushroom’s natural growing conditions. While requiring more patience with longer incubation periods, log cultivation can produce mushrooms for several years and generally requires less technical expertise than indoor methods.
Alternatively, sawdust or block cultivation offers faster results and can be conducted indoors year-round with proper environmental controls. This method has become the commercial standard, accounting for over 99% of nameko production in Japan. Block cultivation typically involves preparing a sterilized substrate of hardwood sawdust, sometimes supplemented with bran or other additives, before inoculating with nameko spawn.
For beginners, determining which approach best suits your circumstances depends on several factors. Those with access to suitable hardwood logs and outdoor space might prefer log cultivation for its simplicity and natural process. Urban growers or those seeking faster results might opt for indoor block cultivation, though this requires more specialized equipment for sterilization and environmental control.
Essential materials for getting started include nameko mushroom spawn (available as plug spawn for logs or sawdust spawn for block cultivation), a drill with appropriate-sized bit for log inoculation or pressure cooker for substrate sterilization, food-grade wax for sealing inoculation points on logs, and basic monitoring tools like a thermometer and hygrometer.
Optimal growing conditions for Nameko Mushrooms
Here is a detailed overview of the optimal growing conditions for nameko mushrooms:
Temperature
Nameko mushrooms thrive in cooler temperatures compared to many other cultivated mushroom species. The ideal temperature range for nameko growth and fruiting is between 45-65°F (7-18°C).
More specifically:
Mycelium growth occurs between 39-90°F (4-32°C) with an optimal range of 77-79°F (25-26°C)
Primordia (pin) formation is triggered when temperatures drop to 50-60°F (10-15°C)
Fruiting occurs between 55-65°F (13-18°C)
Temperatures above 68°F (20°C) will result in smaller mushrooms with thin stems and caps that open prematurely.
Sustained temperatures below 41°F (5°C) will slow growth significantly but not cause the mycelium to die.
Humidity
Nameko mushrooms require very high humidity levels, especially during the pinning and fruiting stages:
Primordia formation: 98-100% relative humidity
Fruiting: 88-95% relative humidity
Insufficient humidity will inhibit pin formation, cause mushrooms to abort, and result in deformed, shriveled fruiting bodies lacking their characteristic gelatinous coating. Frequent misting (2-4 times daily) is recommended to maintain surface moisture on the substrate. Care must be taken to avoid over-watering which can lead to bacterial contamination.
Light
While not as crucial as temperature and humidity, nameko mushrooms require some light to develop proper fruiting bodies, typically between 500-1000 lux. Indirect, ambient lighting is sufficient. Avoid prolonged exposure to direct sunlight which can overheat and dry out the substrate.
CO2 & Fresh Air Exchange
Nameko mycelium is sensitive to carbon dioxide levels, especially during the pinning stage. CO2 concentrations should be maintained between:
Primordia formation: 500-1000 ppm
Fruiting: <1000 ppm
Proper ventilation is necessary to prevent CO2 buildup. Fresh air exchanges of 4-8 per hour are recommended during fruiting.
Fruiting season for nameko mushrooms
In nature, nameko mushrooms typically fruit in the fall when temperatures first drop below 50°F (10°C), especially after heavy rainfall. Growers can simulate these conditions indoors by initiating fruiting in late autumn and utilizing cold shock techniques like refrigeration to stimulate pinning.
By carefully monitoring and maintaining these parameters, cultivators can achieve bountiful nameko harvests with multiple flushes over the course of a growing season. The key is providing consistently cool temperatures, high humidity, gentle indirect light, and adequate fresh air exchange.
Instagram @fungi.vale
How to grow Nameko Mushrooms on logs at home
Benefits of growing Nameko Mushrooms on logs
Sustainable and eco-friendly method of mushroom cultivation
Produces high-quality, flavorful mushrooms with a firm texture
Logs can produce multiple flushes over several years
Low-maintenance once logs are inoculated and established
Selecting the right logs for Nameko growing
Nameko mushrooms grow best on hardwood logs, particularly:
Cherry
Alder
Beech
Oak
Birch
Poplar
Choose logs that are 3-8 inches (7.6-20.3 cm) in diameter and 36-40 inches (91-102 cm) long. Freshly cut logs should be used within 4 weeks of felling to minimize competition from other fungi.
1. Drill holes in the logs to a depth of 1 inch (2.5 cm), following a diamond pattern with approximately 50 holes per log.
2. Insert plug spawn or sawdust spawn into the drilled holes.
3. Seal the inoculated holes with melted wax using an applicator.
4. Label the logs with the date and type of mushroom inoculated.
Incubation and fruiting conditions of nameko mushrooms
Incubation
Place inoculated logs directly on the ground in a shaded area, protected from sun and wind.
Maintain moisture by ensuring logs receive 1 inch (2.5 cm) of rain per week or irrigate if needed.
Incubation time ranges from 2-6 months, depending on the time of year logs are inoculated.
Fruiting
Nameko mushrooms fruit in the fall when temperatures drop below 50°F (10°C) for the first time, especially after heavy rainfall.
Ideal fruiting conditions:
Temperature: 45-65°F (7-18°C)
Humidity: 90-95%
Light: 500-1000 lux indirect light
Typically produces 2 flushes a few weeks apart in the fall.
How to harvest and store nameko mushrooms
Harvest nameko mushrooms when the caps are fully developed but before they begin to flatten or turn up at the edges. Gently twist and pull the clusters from the log, taking care not to damage the bark.
Store harvested nameko mushrooms in a refrigerator at 36-40°F (2-4°C) for up to 2 weeks in a paper bag or container that allows for air circulation.
By following these step-by-step instructions and providing the ideal growing conditions, you can successfully cultivate flavorful and nutritious nameko mushrooms on logs at home. With proper care, your nameko logs can produce multiple flushes over several years, providing a sustainable and rewarding source of gourmet mushrooms.
How to Grow Nameko Mushrooms on Substrate at Home
Substrate Preparation
Nameko mushrooms grow best on a hardwood sawdust-based substrate supplemented with a nitrogen-rich additive like wheat bran. A typical nameko substrate recipe consists of:
80% hardwood sawdust (preferably oak, beech, or maple)
10-20% wheat bran
1-5% corn flour, rice bran, or millet
1-2% calcium carbonate (agricultural lime) or gypsum
These ingredients provide the necessary nutrients and structure for optimal mycelium growth and fruiting. The sawdust serves as the primary carbon source, while wheat bran provides nitrogen and other essential nutrients. Corn flour or rice bran acts as a secondary nutrient source and helps improve substrate water retention. Calcium carbonate or gypsum is added to buffer the substrate pH and prevent compaction.
Mixing and Sterilization
To prepare the substrate, thoroughly mix the dry ingredients until evenly distributed. Slowly add water while mixing until the desired moisture content is reached (around 60-65% by weight). The substrate should feel slightly moist but not wet, and no water should squeeze out when a handful is compressed.
Next, fill the moistened substrate into heat-resistant grow bags, typically polypropylene or high-density polyethylene, leaving enough headspace for mycelium growth. Seal the bags with a filter patch or microporous tape to allow for gas exchange while preventing contaminants from entering.
Sterilize the filled bags in an autoclave or pressure cooker at 15 psi (121°C) for 2-3 hours to eliminate any competing microorganisms. Allow the bags to cool to room temperature before inoculation.
Water Content Adjustment
Proper substrate moisture content is crucial for nameko mycelium growth and fruiting. The ideal water content for nameko substrate is between 60-65% by weight. To adjust the moisture level:
Weigh a sample of the mixed substrate before adding water.
Slowly add water while mixing until the substrate feels slightly moist but not wet.
Weigh the moistened substrate sample again.
Calculate the moisture content using the formula: (Wet Weight – Dry Weight) / Wet Weight x 100.
Adjust by adding more water or dry ingredients as needed.
Maintaining consistent moisture content across batches ensures reliable and predictable growth and yields.
Substrate Filling and Bag Sealing
Once the substrate is mixed and moistened, it’s time to fill the grow bags. Use heat-resistant polypropylene or high-density polyethylene bags with a filter patch or microporous tape for gas exchange. Fill each bag with 2-5 lbs (0.9-2.3 kg) of substrate, compacting it gently to remove air pockets. Leave 2-4 inches (5-10 cm) of headspace at the top of the bag for mycelium growth.
Seal the bags securely using an impulse sealer or by tying them tightly with string or zip ties. If using filter patch bags, ensure the patch is not obstructed. For bags without filter patches, cover any holes or punctures with microporous tape to allow for gas exchange while keeping out contaminants.
Incubation Period and Conditions
After sterilization, allow the substrate bags to cool to room temperature before inoculating with nameko liquid culture or grain spawn. Inoculate each bag with 1-2 oz (30-60 ml) of liquid culture or 1-2 cups (100-200 g) of grain spawn. Seal the inoculation points with microporous tape.
Incubate the inoculated bags at 70-75°F (21-24°C) for 15-30 days until fully colonized. Maintain a relative humidity of 60-70% during incubation. Keep the bags in a dark, clean environment with good air circulation to prevent CO2 buildup and contamination.
The mycelium will gradually colonize the substrate, appearing as a white, fuzzy growth. Once the substrate is fully colonized, the bags are ready for fruiting induction.
By carefully preparing and inoculating a nutritious, well-balanced substrate, nameko growers can ensure a strong foundation for a successful and bountiful mushroom harvest.
Inoculation
Inoculation is the process of introducing nameko mycelium to the sterilized substrate. The two most common inoculation methods are liquid culture and grain spawn.
Liquid Culture Inoculation
Liquid culture is a sterile, liquid nutrient medium that contains pure nameko mycelium. To inoculate with liquid culture:
1. Shake the liquid culture well to evenly distribute the mycelium.
2. Using a sterile syringe, inject 1-2 oz (30-60 ml) of liquid culture into each substrate bag through a self-healing injection port or by making a small hole in the bag and covering it with microporous tape.
3. Distribute the liquid culture evenly throughout the bag by gently massaging the substrate.
Grain Spawn Inoculation
Grain spawn consists of sterilized grains, such as rye or millet, fully colonized with nameko mycelium. To inoculate with grain spawn:
Cut a small opening in the substrate bag using a sterile scalpel or scissors.
Pour 1-2 cups (100-200 g) of grain spawn into the bag, distributing it evenly across the top of the substrate.
Seal the opening with microporous tape to maintain a sterile environment while allowing for gas exchange.
After inoculation, gently mix the spawn or liquid culture into the substrate by massaging the bag. This helps distribute the mycelium evenly and speeds up colonization.
Incubation
Based on the information provided in the search results, the incubation period for nameko mushrooms can vary depending on the inoculation time and substrate used:
If inoculated in late winter or early spring on sawdust substrate, the spawn run can take about 6 months until it finishes in August.
If inoculated in September on sawdust substrate, the spawn run takes 70-80 days (about 2-3 months).
On sterilized grain spawn, the incubation period at 75-85°F (24-29°C) lasts about 2 weeks.
In general, the colonization period on supplemented sawdust substrate takes 2-4 weeks at 68-77°F (20-24°C), followed by a resting period of 4-6 weeks.
So in summary, the typical incubation times are:
Grain spawn: 2 weeks at 75-85°F (24-29°C)
Sawdust spawn: 2-3 months at 68-77°F (20-24°C)
Late winter/spring inoculation on sawdust: up to 6 months
The main work during the spawn run is managing temperature and moisture. After the incubation period, the fully colonized substrate is ready for fruiting induction
Temperature and Humidity
Incubate the inoculated substrate bags at 70-75°F (21-24°C) for 15-30 days until fully colonized. Maintain a relative humidity of 60-70% during incubation. Higher temperatures can lead to faster colonization but may also increase the risk of contamination.
Light and Air Exchange
Keep the bags in a dark, clean environment during incubation, as light is not necessary for mycelium growth. Ensure good air circulation around the bags to prevent CO2 buildup, which can inhibit growth. If using bags without filter patches, open them briefly every few days to allow for fresh air exchange.
Monitoring Progress
Monitor the bags regularly for signs of contamination, such as green, blue, or black mold, or uneven, splotchy growth. Remove any contaminated bags immediately to prevent the spread to other bags. Healthy nameko mycelium should appear white, dense, and evenly distributed throughout the substrate.
Fruiting
Once the substrate is fully colonized, it’s time to initiate the fruiting stage. Fruiting is triggered by changes in temperature, humidity, light, and air exchange.
Fruiting Induction
To induce fruiting, cut or punch holes in the substrate bags to expose the colonized substrate to fresh air. Place the bags in a fruiting chamber or room with the following conditions:
Temperature: 55-65°F (13-18°C)
Humidity: 90-95% relative humidity
Light: 500-1000 lux of indirect, ambient light for 12 hours per day
Fresh Air Exchange: 4-8 air exchanges per hour
Maintain high humidity by misting the bags and the surrounding environment 2-4 times daily. Avoid direct misting of the substrate surface, as this can cause damage and contamination.
Pinning and Fruiting
Nameko pins, or primordia, typically form 7-14 days after fruiting induction. Pins appear as small, white, or light brown bumps on the surface of the substrate. Maintain optimal fruiting conditions to encourage pin development and growth.
Mushrooms will mature 7-10 days after pinning, reaching a size of 1-2 inches (2.5-5 cm) in diameter. Nameko mushrooms are ready to harvest when the caps are fully developed but before they begin to flatten or turn up at the edges.
Multiple Flushes
After the first flush of mushrooms is harvested, the substrate can be re-soaked in cold water for 12-24 hours to rehydrate it and stimulate additional flushes. Drain the excess water and return the bags to the fruiting chamber, maintaining optimal conditions. Nameko substrate typically produces 2-3 flushes over 6-8 weeks before it is exhausted.
By carefully managing the inoculation, incubation, and fruiting stages, nameko growers can maximize yields and produce high-quality mushrooms consistently. Attention to detail, cleanliness, and maintaining optimal environmental conditions are key to success.
Harvest and Storage
Harvest nameko mushrooms when young, just as the cap begins to detach from the stem. Gently twist and pull to remove without damaging the substrate. Nameko can be stored in the refrigerator at 36-40°F (2-4°C) for up to 2 weeks.
With patience and by maintaining optimal conditions, it’s possible to grow bountiful nameko mushrooms at home. The key factors are cool temperatures, high humidity, and proper light during fruiting. By following this guide, you’ll be well on your way to enjoying homegrown nameko in soups, stir-fries, and more.
Tantalizing Recipes and Uses for Your Home-Grown Nameko
After cultivating your own nameko mushrooms, you’ll undoubtedly be eager to showcase their nutty, delicate flavor in the kitchen. I love incorporating these mushrooms into my cooking, particularly because they retain a pleasant firmness even after being cooked.
One of my personal favorite ways to enjoy them is in a traditional Miso soup; their gelatinous coating adds a luxurious mouthfeel to the broth. But beyond Miso soup, these mushrooms are versatile; think of sautéed nameko as a side dish with garlic and herbs, or toss them into a stir-fry for that extra crunch.
Another recipe where my home-grown nameko shines is in a rich, creamy risotto. Their texture stands out against the soft rice, and the umami depth they provide can really take this Italian classic to new heights.
Just be sure to add them towards the end of the cooking process to maintain their unique textural integrity. Or, if you’re in the mood for something simpler, a nameko omelette can make a fulfilling breakfast with minimal effort. The key is always to keep the seasoning balanced to allow the mushrooms’ natural flavors to be the star.
I also find that nameko mushrooms make fantastic pickles. Pickling them with a blend of soy sauce, vinegar, and a dash of sugar—plus a sprinkle of chili flakes for heat—produces a delectable condiment that can pep up sandwiches or salads.
And let’s not forget about vegan cuisine; nameko can be a worthy ingredient in plant-based dishes, providing texture and flavor to typically meatless meals. No matter how you choose to prepare them, your home-grown namekos are sure to impress. Their unique character and the story of how you grew them makes every dish not just a meal, but an experience.
Nameko mushrooms FAQs
What are the nutritional benefits of nameko mushrooms?
Nameko mushrooms are low in calories and fat but provide a good source of important nutrients. They are rich in dietary fiber, proteins, vitamins (such as B vitamins), minerals (including potassium, phosphorus, and copper), and antioxidants. Nameko contains a water-soluble dietary fiber called mucin, which enhances protein absorption, protects the stomach wall, and may help prevent osteoporosis.
What are the culinary uses of nameko mushrooms?
Nameko mushrooms are popular in Japanese cuisine, often used in miso soups, soba noodles, and dishes with grated daikon. Their gelatinous coating acts as a natural thickener for soups, stews, and sauces. Nameko can also be sautéed, stir-fried, grilled, or added to pasta, noodle dishes, pizza, and crostini. They pair well with lighter red wines, dark green vegetables, red meats, shallots, game, and fowl.
What are the ideal growing conditions for nameko mushrooms?
Nameko mushrooms prefer cooler temperatures between 45-65°F (7-18°C) and high humidity levels of 90-95%. They typically fruit in the fall when temperatures drop below 50°F (10°C), especially after heavy rainfall. Nameko grows well on hardwood logs like beech, oak, birch, and cherry. The ideal logs have a diameter of 3-8 inches and a length of 36-40 inches.
How do nameko mushrooms differ from other varieties?
Nameko mushrooms are known for their unique gelatinous coating, which gives them a slippery texture and appearance. This sets them apart from other common varieties like shiitake, enoki, and maitake. Nameko has a mild, slightly nutty flavor with earthy and butterscotch notes. They are smaller in size compared to many other cultivated mushrooms, with caps typically reaching 5-8 cm in diameter.
What are the potential health benefits of nameko mushrooms?
Studies suggest that nameko mushrooms may have anti-inflammatory, antioxidant, anti-hyperlipidemic, and antitumor properties. A controlled study found that consuming nameko more than once a week was associated with a nearly 50% reduction in stomach cancer risk compared to those who ate no mushrooms. Nameko polysaccharides have shown promise in promoting cell proliferation, reducing oxidative stress, and facilitating wound healing.
How should nameko mushrooms be stored to maximize shelf life?
Fresh nameko mushrooms are highly perishable and typically last only 2-4 days due to their moist, sticky nature. To extend their shelf life, store nameko in the refrigerator at around 36-40°F (2-4°C) in an open paper bag or unsealed container to allow air circulation. Avoid washing the mushrooms until ready to use, as excess moisture can accelerate spoilage. Properly stored, nameko can last up to 2 weeks in the refrigerator.
How can you identify nameko mushrooms?
Nameko mushrooms have distinct physical characteristics that set them apart. They have small to medium-sized caps with a convex shape when young, becoming flatter with age. The caps are amber or light brown in color with a glossy, slimy appearance due to their gelatinous coating. Nameko grows in clusters on dead hardwood trees and has white or light yellow, slender stems. In the wild, they are typically found in the fall on beech, oak, and cherry trees.