Here are 43 mushroom varieties you can cultivate at home! From the Shiitake’s nutritional powerhouse to the Enoki’s delicate texture, this guide unlocks the secrets to growing your own gourmet fungi. Whether you’re looking to enhance your meals with rich, umami flavours or explore the medicinal benefits of these natural wonders, prepare to transform your culinary experience with the earthy delights of home-grown mushrooms.
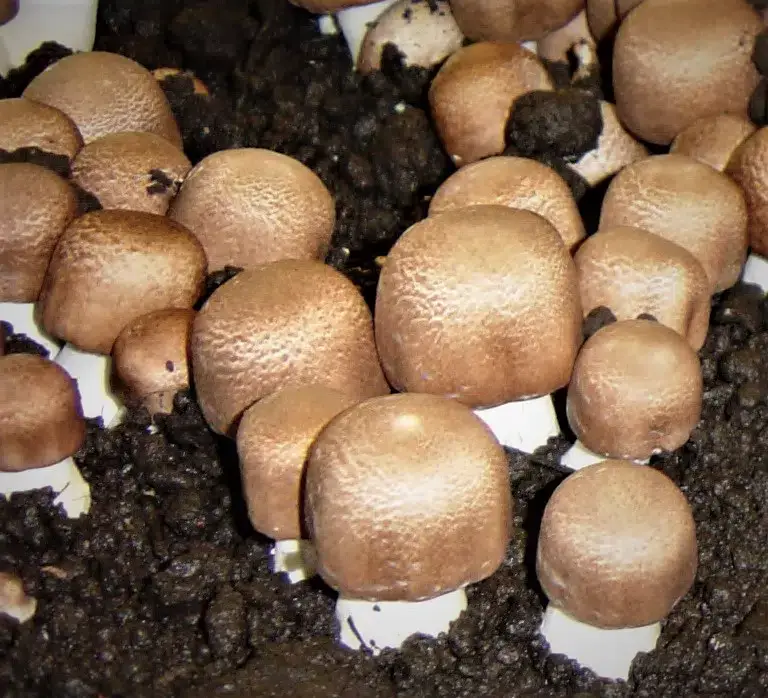
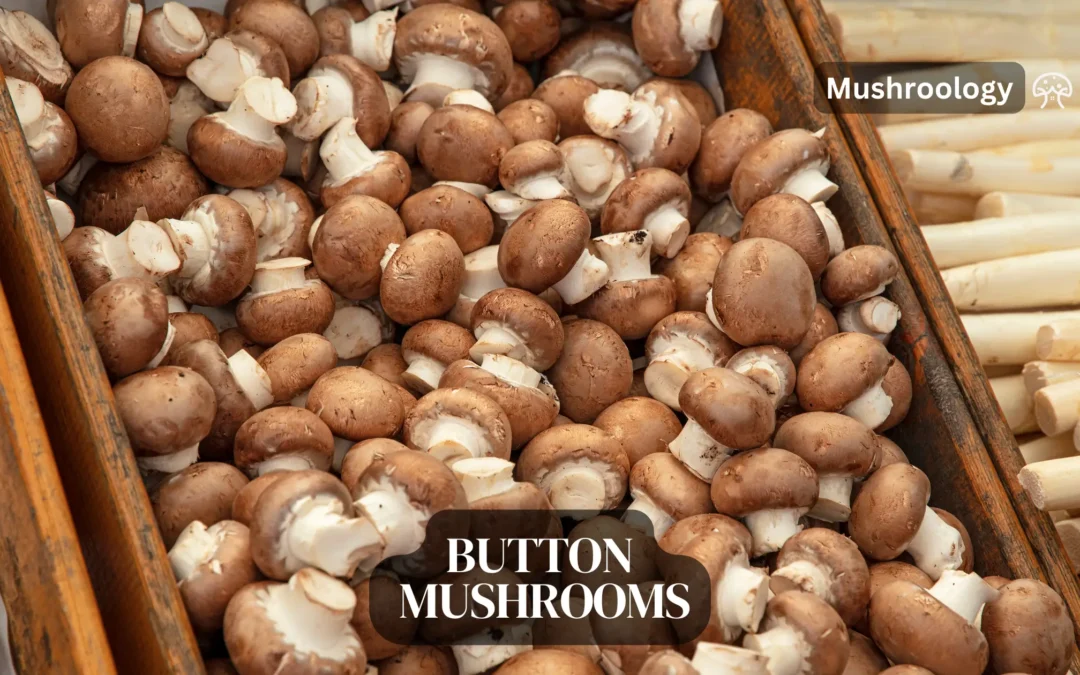
Agaricus bisporus, widely known as the Button Mushroom, is celebrated for its versatile culinary applications and nutritional value. It flourishes in controlled, cool, and humid conditions, making it a prime candidate for commercial and home cultivation. Recognized by its smooth, white cap that expands with maturity, it transitions from a compact button to a more open, flat cap as it ages.
Requires cool, humid environments for optimal growth, mirroring its natural woodland habitats.
Cultivated widely, it’s a fundamental ingredient in cuisines around the globe, offering a subtle, earthy flavour.
It is rich in nutrients, including protein, vitamins B and D, minerals, and antioxidants, contributing to a healthy diet.
Its growth from button to Portobello mushroom stages provides a range of textures and flavours for various dishes.
2. Agaricus bitorquis – the Pavement Mushroom
Agaricus bitorquis, often called the Pavement Mushroom, is distinguished by its robust nature and ability to thrive in urban environments, pushing through asphalt and along roadsides. This hardy species enjoys temperate climates and is found in habitats disturbed by human activity, showcasing its adaptability.
Prefers temperate climates, often found in urban areas, parks, and garden paths, illustrating its versatility.
It offers a slightly denser and firmer texture than its cousin, Agaricus bisporus, making it well-suited for various culinary uses.
Features a creamy white to light brown cap and a flavour profile that is rich and earthy
It is a good source of protein, vitamins, minerals, and dietary fiber, contributing to a balanced diet.
Agaricus subrufescens, commonly known as the Almond Mushroom or Brazilian Blazei, is celebrated for its medicinal properties and distinctly nutty flavour that resembles almonds. Originally discovered in Brazil, this mushroom thrives in warmer climates and requires a specific combination of humidity and temperature to flourish.
It prefers warmer climates and specifically needs controlled humidity and temperature, mimicking its natural habitat in Brazilian rainforests.
Recognized for its potential immune-boosting properties, Agaricus blazei is a subject of interest in the field of medicinal mushrooms.
Contains high levels of beta-glucans, polysaccharides known for supporting immune system function.
Often consumed in the form of supplements, extracts, or directly in culinary preparations, offering versatility in usage.
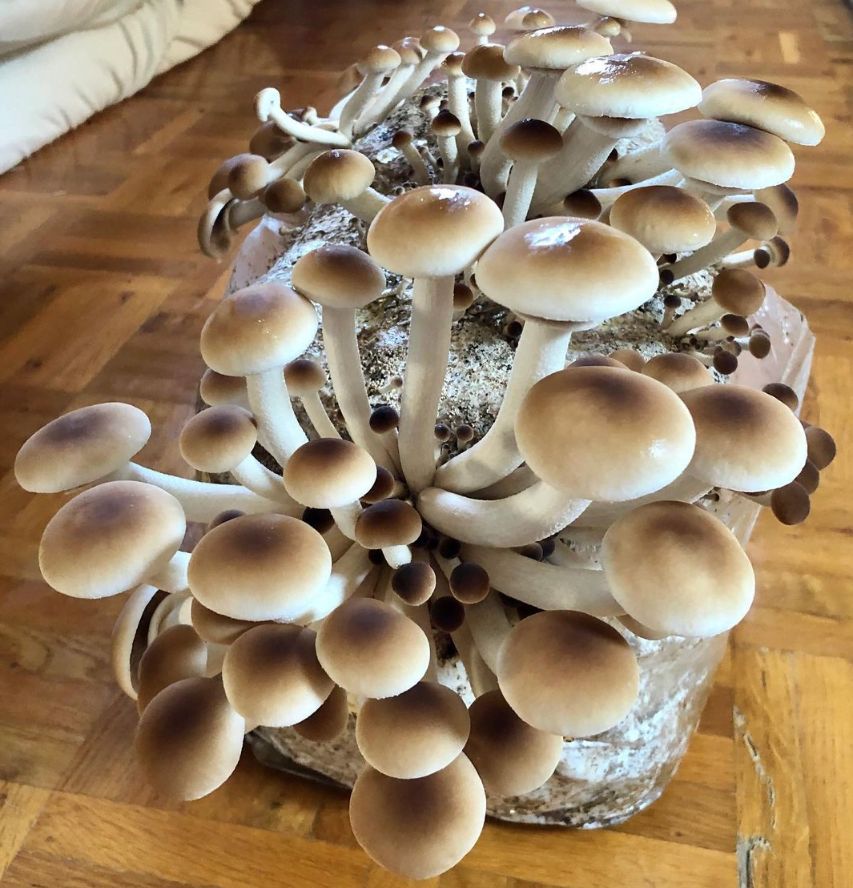
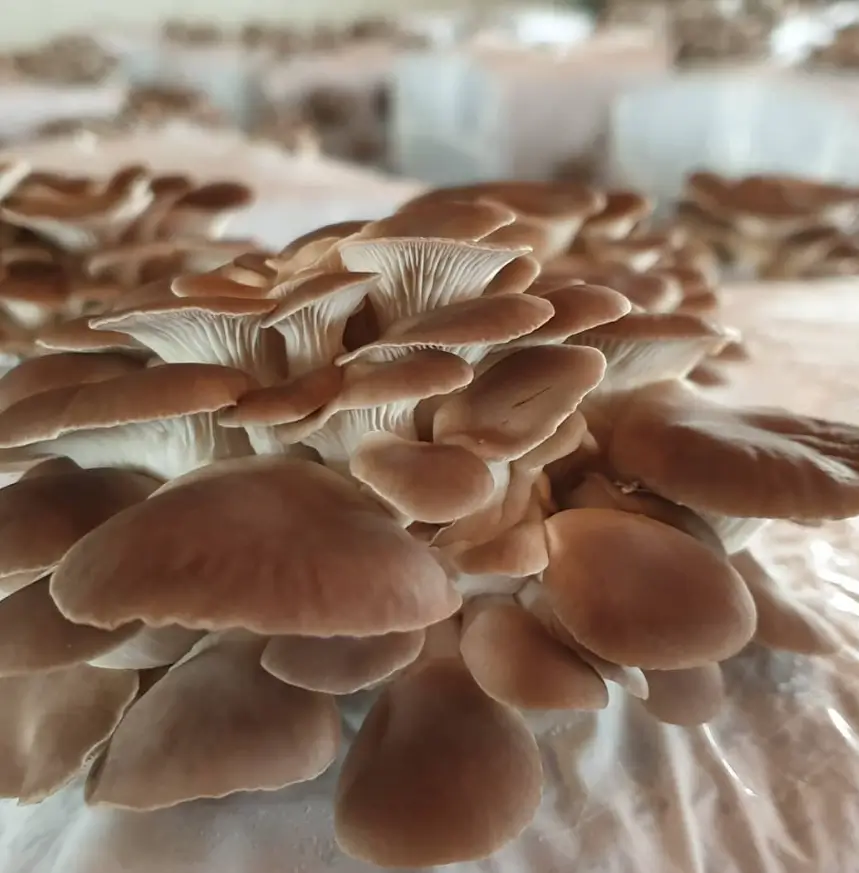
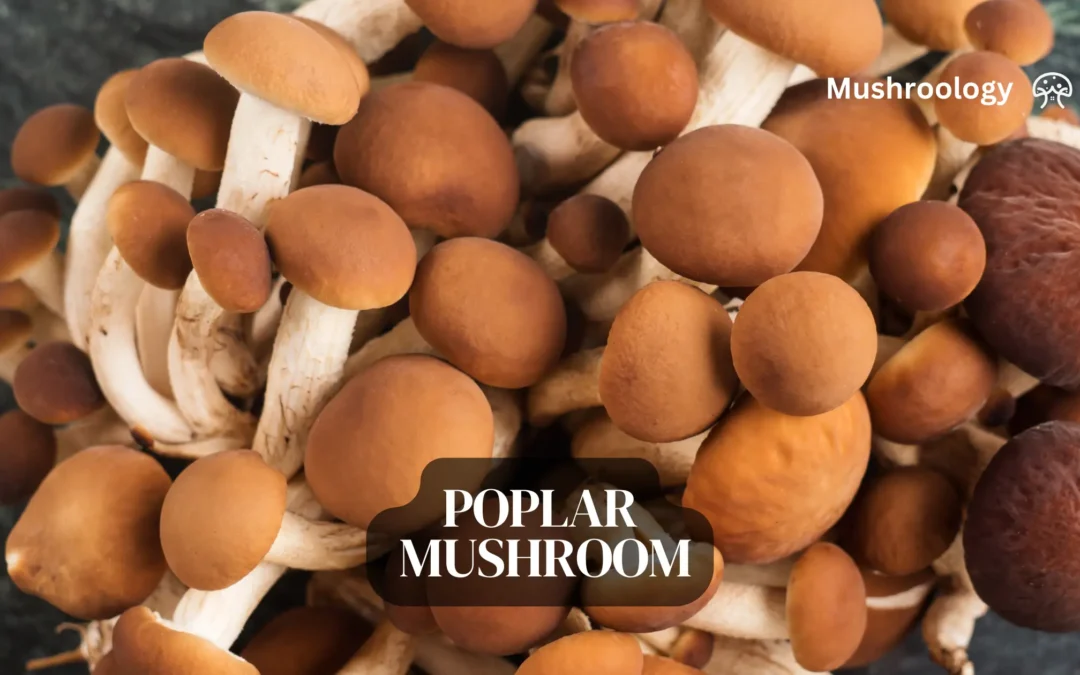
Agrocybe aegerita, known as the Black Poplar Mushroom or Velvet Pioppini, is prized for its robust, earthy flavour and firm texture, making it a favourite in gourmet cooking. This species typically grows in association with the roots of hardwood trees, especially poplars, thriving in temperate climates across Europe, Asia, and North America.
Exhibits a preference for growing in clusters on the wood of living or dead hardwood trees, particularly poplars and willows.
Enjoys temperate climates, flourishing in the spring and early summer months, showcasing its adaptability to seasonal changes.
It offers a distinctive, meaty texture and a rich, nutty flavour, which enhances various dishes, from stir-fries to risottos.
Cultivation mimics its natural woodland habitat, requiring substrates rich in hardwood content to achieve optimal growth.
5. Agrocybe chaxinggu – the Tea Tree Mushroom
Agrocybe chaxinggu, also known as the Tea Tree Mushroom, is a delicacy in Asian cuisine, renowned for its firm texture and subtle, slightly sweet flavor. This mushroom naturally grows on the wood of broadleaf trees, including species within tea plantations, hence its name. It thrives in warm, moist climates typical of East Asia, where it is most commonly found and cultivated.
They are cultivated primarily on the decaying wood of broadleaf trees, often within the ecosystems of tea plantations, which contributes to their unique flavour profile.
Prefers warm, humid environments, aligning with its native and most prolific habitats in East Asia.
Nutritionally rich, providing a source of protein, dietary fiber, and various vitamins and minerals, enhancing its appeal as a healthful food choice.
Appreciated in various culinary traditions for its ability to absorb flavors while contributing its own delicate taste, making it a popular choice for soups, stir-fries, and traditional dishes.
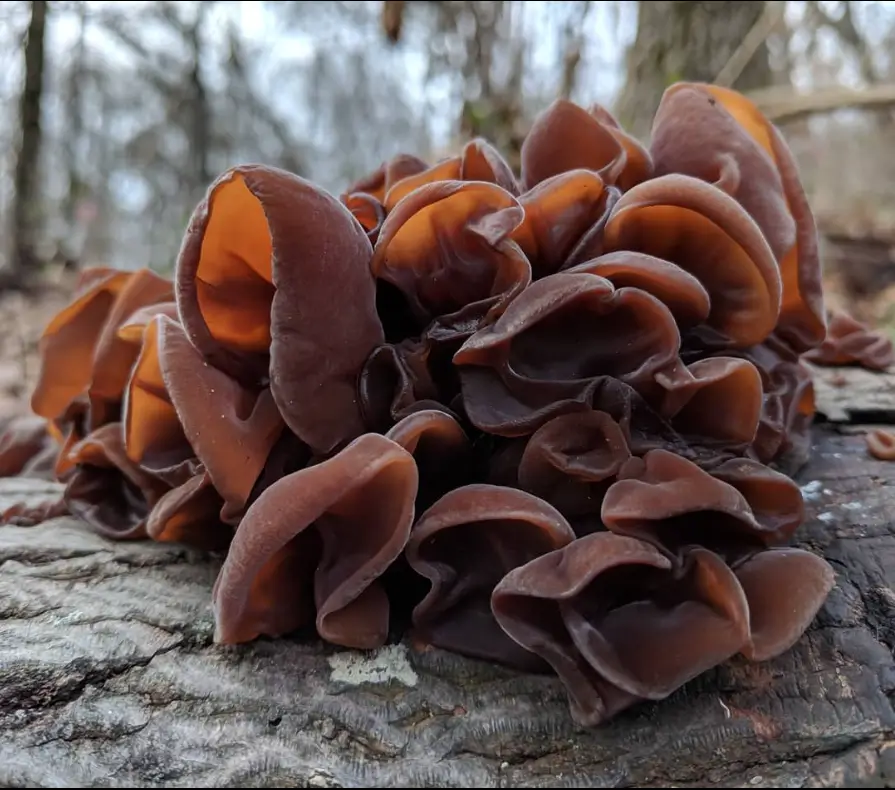
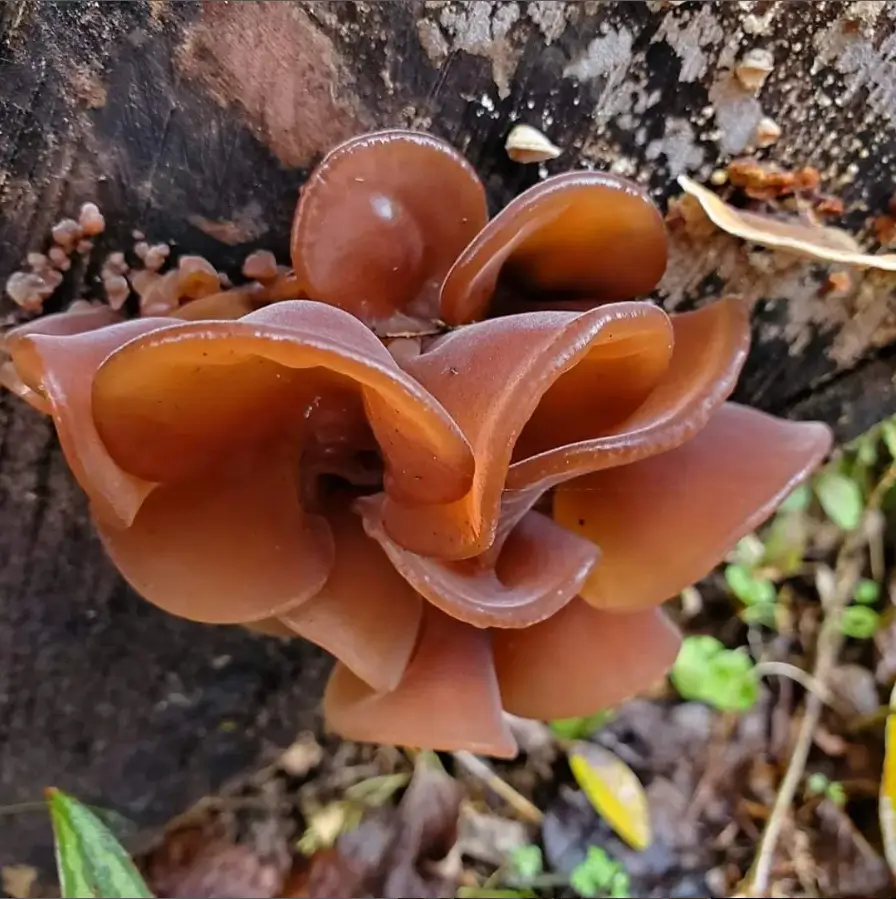
Auricularia auricula, commonly known as the Wood Ear Mushroom or Judas’s Ear, is celebrated for its distinctive gelatinous texture and ability to absorb flavors from soups and stir-fries. This mushroom is typically found on elder trees and other hardwoods, thriving in moist, shaded environments. It is especially popular in Asian cuisine for both its culinary and medicinal properties.
Grows predominantly on elder trees and other hardwood species, favouring the damp, shaded conditions of woodland environments.
Highly valued in Asian cuisine for its capacity to soak up flavours, making it a staple in broths, soups, and stir-fry dishes.
Contains several health-promoting compounds, including polysaccharides, which are believed to support immune system function and improve overall health.
Due to its distinctive texture and health benefits, it is also used in traditional medicine, particularly in Chinese herbal practices.
7. Auricularia delicata
Auricularia delicata, known for its delicate texture and nutritional benefits, is a lesser-known cousin of the more widely recognized Wood Ear Mushroom (Auricularia auricula). This fungus shares similar environmental preferences, thriving on decaying wood in moist, shaded forests, yet it distinguishes itself through its more subtle, tender gelatinous structure and milder flavor.
It prefers growing on decaying wood and is often found in temperate forests’ moist, shaded conditions, showcasing its ecological niche.
Features a delicate, tender texture that sets it apart from its more common relative, Auricularia auricula, offering a unique culinary experience.
Its subtle flavour makes it an excellent ingredient for absorbing the surrounding tastes in soups, salads, and stir-fries while adding a gentle, gelatinous mouthfeel.
Rich in dietary fiber, minerals, and bioactive compounds, it contributes to digestive health, immune system support, and overall wellness.
8. Auricularia fuscosuccinea – the Brown Wood Ear Mushroom
Instgram @alabamamushroomsociety
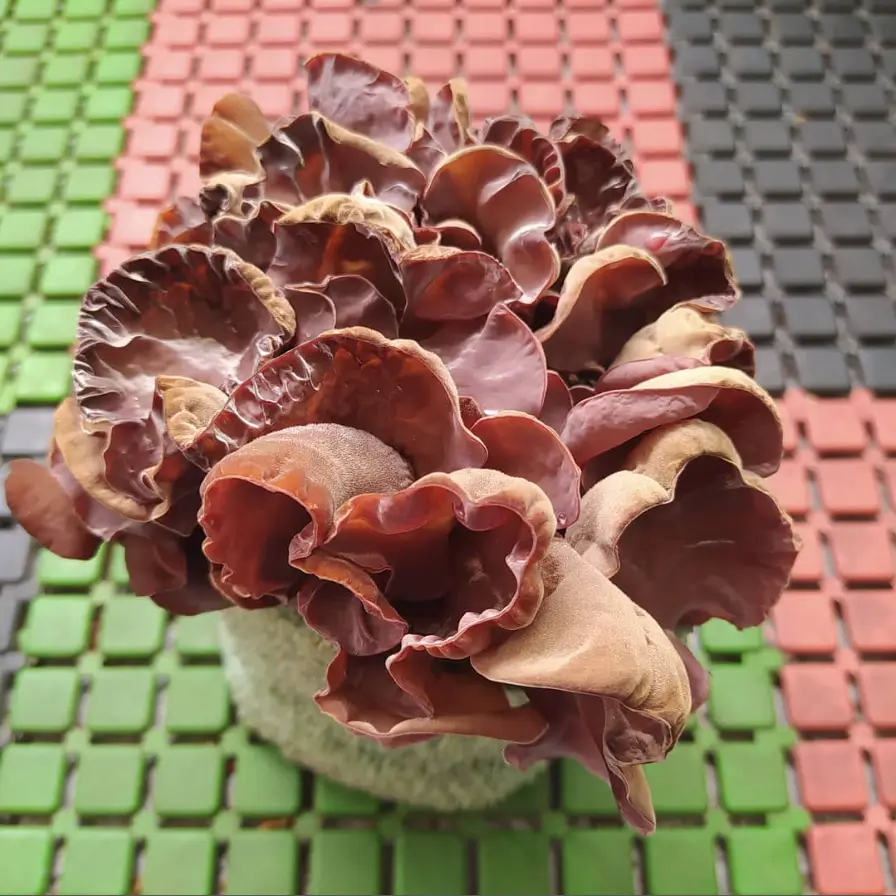
Auricularia fuscosuccinea, often referred to as the Brown Wood Ear Mushroom, is a unique variety of the wood ear mushrooms, distinguished by its darker, brownish hue and slightly firmer texture. Like its relatives, it thrives on the wood of broadleaf trees in moist, shaded environments, commonly found in forested areas that offer the damp conditions it prefers.
Characterized by a darker brown colour and a texture that is somewhat firmer than the more common Auricularia auricula, offering a different culinary experience.
Nutritionally, Auricularia fuscosuccinea is rich in dietary fibers, antioxidants, and compounds that are thought to support cardiovascular health and boost the immune system.
Not as widely known or used as some other wood ear mushrooms, it still holds a place in traditional medicine and gourmet cooking for its health benefits and unique properties.
Cultivation efforts aim to replicate the natural moist and shaded conditions it thrives in, allowing for sustainable harvesting and increased availability for culinary use.
9. Auricularia polytricha – the Cloud Ear Mushroom or Hairy Wood Ear Mushroom
Instagram @mycotropical
Auricularia polytricha, commonly known as the Cloud Ear Mushroom or Hairy Wood Ear Mushroom, is a distinct variant within the wood ear mushroom family, celebrated for its unique texture and health benefits. This species prefers to grow on dead or decaying wood in warm, humid climates, often found in wooded areas across Asia. It is a staple in Asian cuisine, particularly in Chinese dishes, where it is valued for its crunchy texture and ability to absorb flavors.
Prefers the dead or decaying wood of broadleaf trees, thriving in the warm, humid environments typical of many Asian forests.
Distinguished by its slightly rough, “hairy” surface, Auricularia polytricha offers a more pronounced texture compared to the smoother varieties of wood ear mushrooms.
Contains high levels of dietary fiber, antioxidants, and several compounds known to contribute to cardiovascular health, blood circulation, and immune system support.
In traditional Chinese medicine, it is often used for its purported health benefits, including improving circulation and reducing cholesterol.
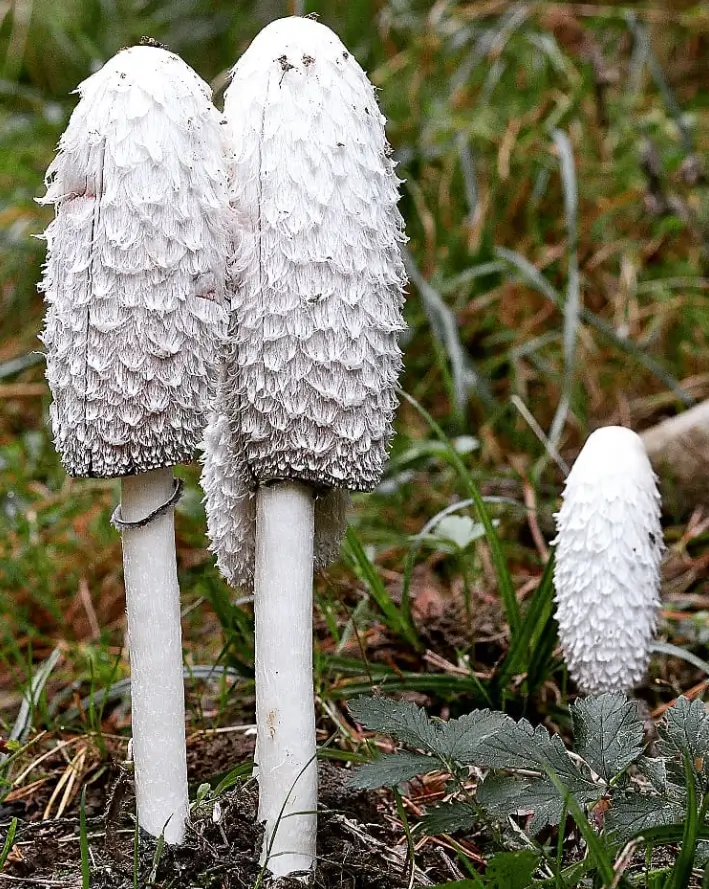
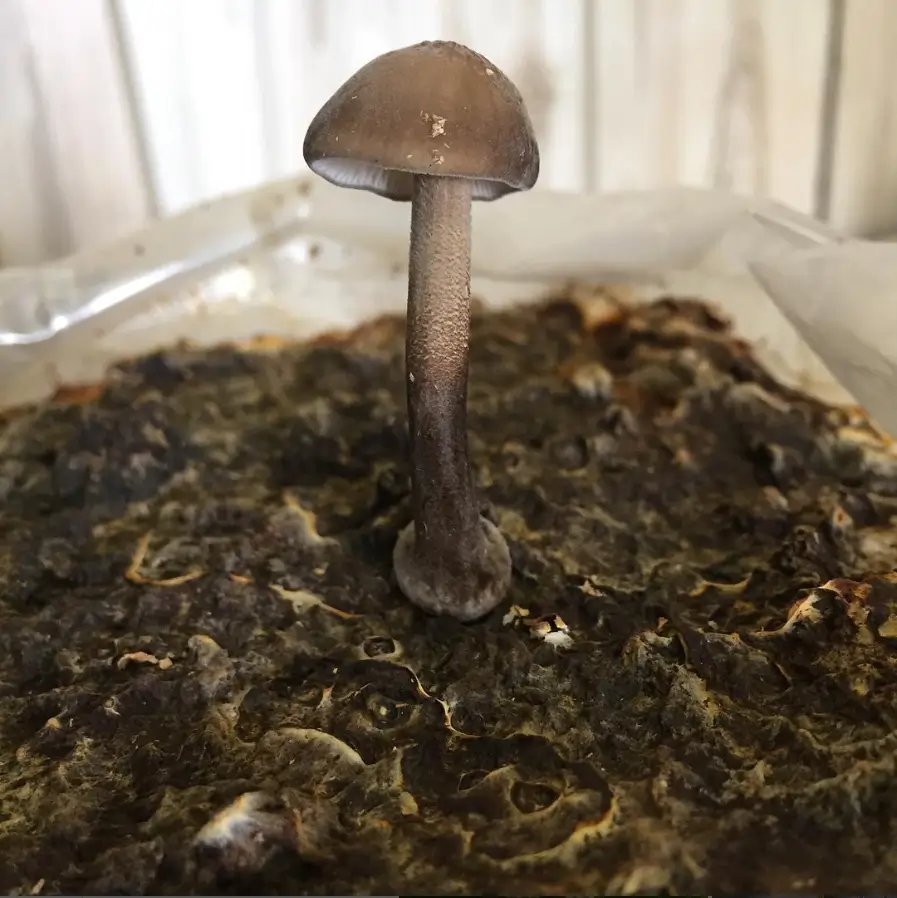
Coprinus comatus, commonly known as the Shaggy Mane or Lawyer’s Wig, is a distinctive mushroom and a good candidate for ‘second division’ edible species. This delicacy emerges in grassy areas, roadsides, and meadows, often after rain. It is widely appreciated for its ephemeral nature; the mushroom quickly matures and dissolves into a black, inky substance, adding to its intrigue and culinary urgency.
It thrives in open, grassy areas, including roadsides, lawns, and meadows, preferring moist soils. This makes it a common sight in urban and suburban settings as well as in the wild.
It is characterized by its tall, cylindrical cap covered in white to cream shaggy scales, giving it the appearance of a lawyer’s wig, which quickly turns to liquid as the mushroom matures.
The mushroom’s delicate, slightly sweet flavour and tender texture are best enjoyed when it’s young before the liquefaction process begins.
Its unique auto-digestion process, where the cap dissolves into a black ink, is an adaptation for spore dispersal, but it also means the mushroom must be consumed soon after picking.
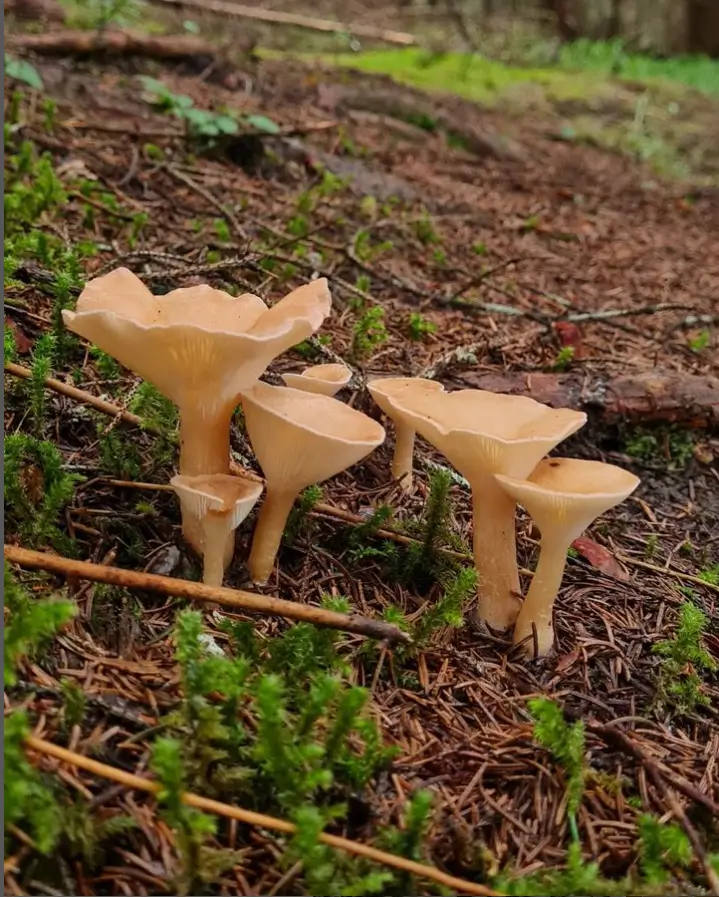
Clitocybe geotropa, commonly known as the Giant Funnel, is a remarkable mushroom known for its large, impressive size and funnel-shaped cap. It is also known as Big Cup mushroom (Dabeixun), Pig Stomach mushroom (Zhudugu) or Big Cup Umbrella (Dabeisan) in China. This species is found in wooded areas, forming rings or arcs in the soil, often around decaying organic matter. It thrives in damp, shaded environments and is a sight to behold when fully grown, with some specimens reaching substantial diameters.
Recognized by its large, funnel-shaped cap, which can span significant diameters, making it one of the larger mushroom species encountered in the wild.
The cap’s colour ranges from pale to a more pronounced brown, with the size and shape contributing to its common name and making it easily identifiable.
While it is edible, Clitocybe maximarequires careful identification due to the presence of look-alikes that may be toxic; thus, knowledge and caution are advised when foraging.
The formation of fairy rings or arcs in forested areas creates a magical landscape appearance and indicates the ecological role of Clitocybe maxima in decomposing organic matter and contributing to soil health.
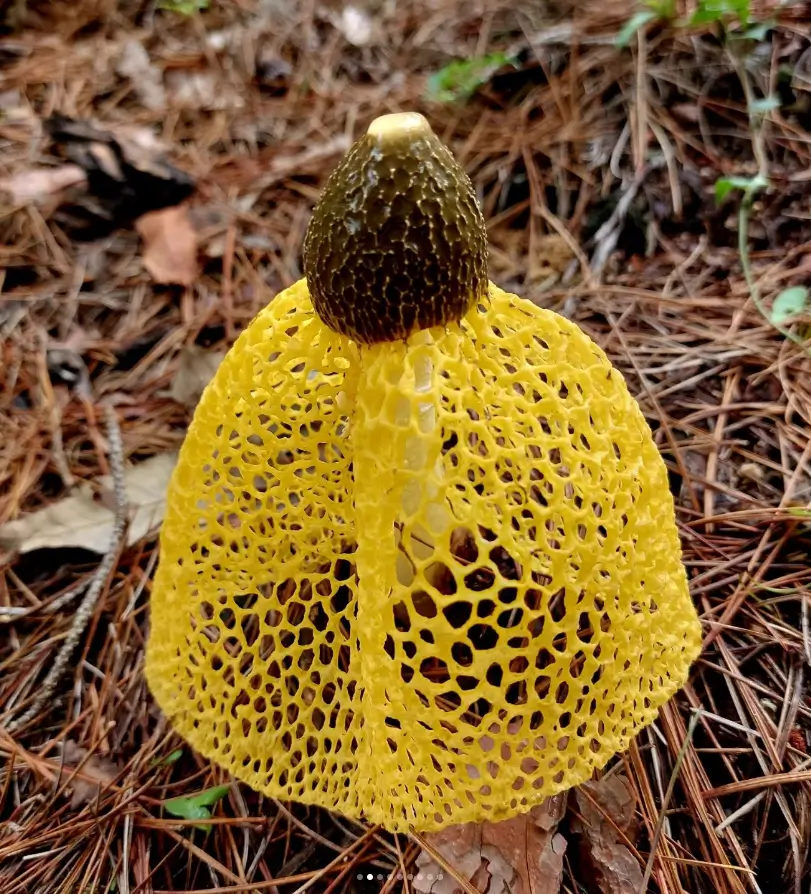
Dictyophora indusiata, commonly known as the Bamboo Fungus, Veiled Lady, or Phallus indusiatus, is a notable species within the stinkhorn mushroom family. It is renowned for its striking appearance, featuring a white, net-like skirt (or indusium) that hangs beneath the cap, resembling a delicate, lacy veil. This mushroom is predominantly found in tropical and subtropical regions, flourishing in rich, moist soils within woodlands and forests.
Prefers the warmth and humidity of tropical and subtropical environments, where it grows in rich, moist soils, often in woodlands and bamboo forests.
Has a prominent, egg-like base from which the stalk extends, capped with a slimy, spore-laden head. The indusium that hangs below the cap is its most distinctive feature
The mushroom emits a distinct odor designed to attract insects, aiding in the dispersal of its spores, a fascinating adaptation that ensures its reproduction and spread within its habitat.
Dictyophora indusiata is also appreciated for its culinary and medicinal value, especially in Asian cultures.
It is considered a delicacy in Chinese cuisine, often used in soups and stir-fries, and is believed to have various health benefits, including immune system enhancement.
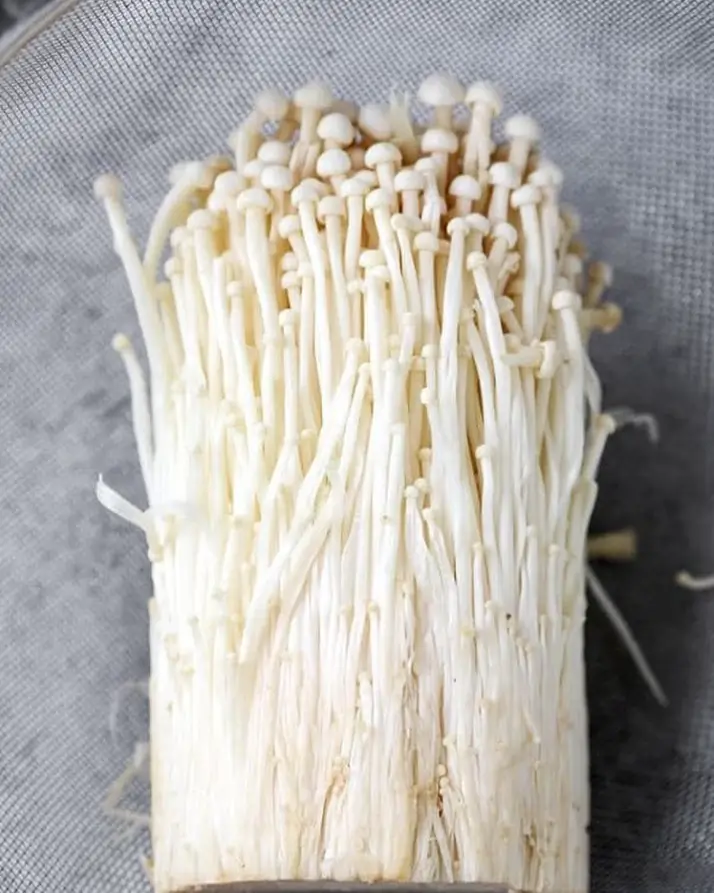
Flammulina velutipes, commonly known as the Enoki Mushroom or Winter Mushroom, have delicate, slender stems and small, white caps. This mushroom is a popular ingredient in Asian cuisine, known for its crisp texture and mild, slightly sweet flavour. It thrives in cool temperatures, so it naturally grows on the wood of deciduous trees, such as elms and willows, during the colder months.
Enoki mushrooms are valued not only for their flavor and texture but also for their nutritional benefits, including high levels of vitamins, minerals, and dietary fiber, contributing to their appeal as a healthy food choice.
Commonly used in soups, salads, and stir-fries, enoki mushrooms add a crunchy texture and a subtle, sweet flavor that complements a wide range of dishes.
The cultivation of Flammulina velutipes has become sophisticated, allowing for year-round availability, making enoki mushrooms a staple ingredient in kitchens worldwide, far beyond their native Asian forests.
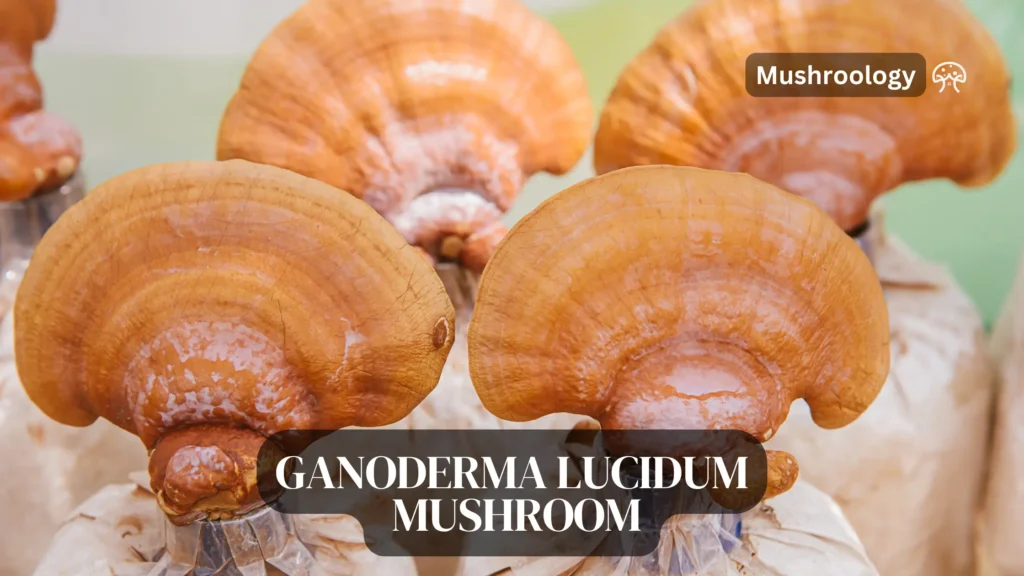
Ganoderma lucidum, a mushroom with a rich history of medicinal use, is known by various names across different cultures. In Japan, it’s referred to as Reishi or Mannentake, meaning the “10,000 Year Mushroom,” while in China and Korea, it’s called Ling Chi, Ling Chih, or Ling Zhi, translating to the “Mushroom (Herb) of Immortality.”
This mushroom is celebrated for its health-boosting properties and is a common motif in ancient art across Chinese, Korean, and Japanese cultures. It symbolizes royalty, health, longevity, wisdom, and happiness, often appearing alongside esteemed sages in royal tapestries. There were beliefs in China that it could even resurrect the dead when used in a specific tincture.
Ganoderma lucidum, the central species of its genus, primarily grows on hardwoods like oak. It has close relatives, G. tsugae and G. oregonense, which prefer conifers, with G. tsugae commonly found on hemlocks and G. oregonense on a variety of conifers. These mushrooms can adapt their growth, particularly the formation of their stalks, to different environmental conditions and substrates, including a mix of conifer and hardwood sawdust, making their specific habitat-based classification somewhat challenging.
Description and Distribution
The mushroom, which can range from 5-20 cm in diameter, has a woody texture, a shiny lacquered appearance when wet, and comes in colors from dull red to nearly black. Its underside features white pores that brown upon touch, with new growth areas starting whitish and darkening with age. Spores released from the underside give the cap a powdery brown look when dry. The stem, which can be white to yellow, darkening over time, is eccentrically or laterally attached, often sinuous, and varies in size.
Ganoderma lucidum is found worldwide, from the Amazon and southern North America to much of Asia, thriving less in temperate and more in subtropical regions.
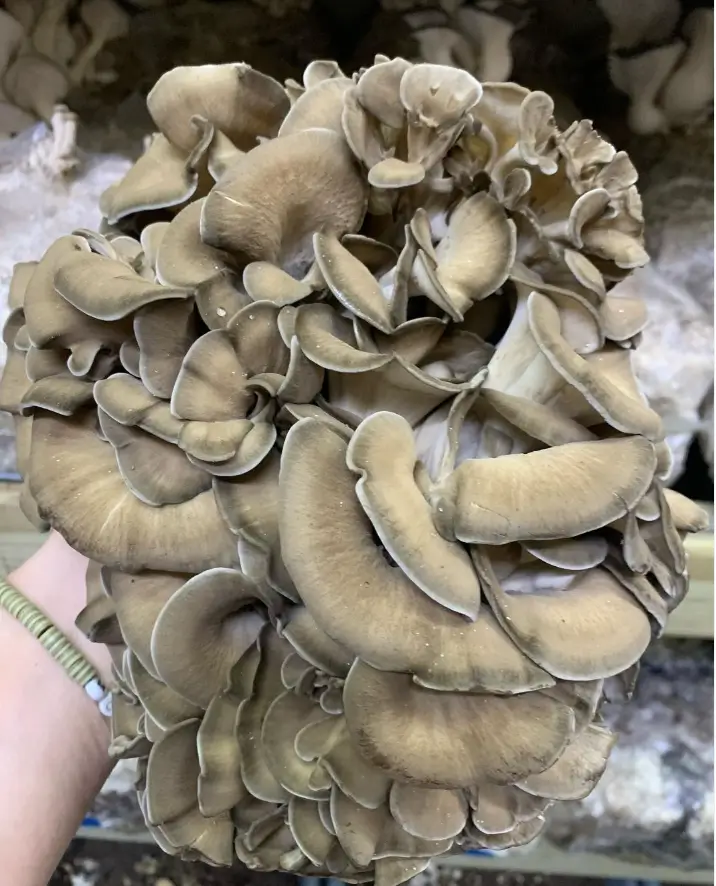
Grifola frondosa, widely known as Hen of the Woods or Maitake, is a prized mushroom for both its culinary appeal and medicinal properties. This fungus grows in large, overlapping clusters at the base of trees, particularly oaks, in temperate forests. Its appearance resembles the ruffled feathers of a hen, which is how it earned its common name.
Characterized by its large, leaf-like fronds that cluster together to form a mass that can weigh several pounds, offering a rich, earthy flavor and a firm, chewy texture.
Renowned for its health benefits, including support for the immune system and potential to regulate blood sugar levels, Grifola frondosa has been the subject of numerous studies exploring its medicinal qualities.
Contains beta-glucans, antioxidants, and other bioactive compounds that contribute to its status as a functional food, believed to offer protective effects against certain diseases.
The cultivation of Maitake has been optimized to allow for year-round production, making it more accessible for its nutritional and culinary applications and enhancing its popularity beyond traditional foraging.
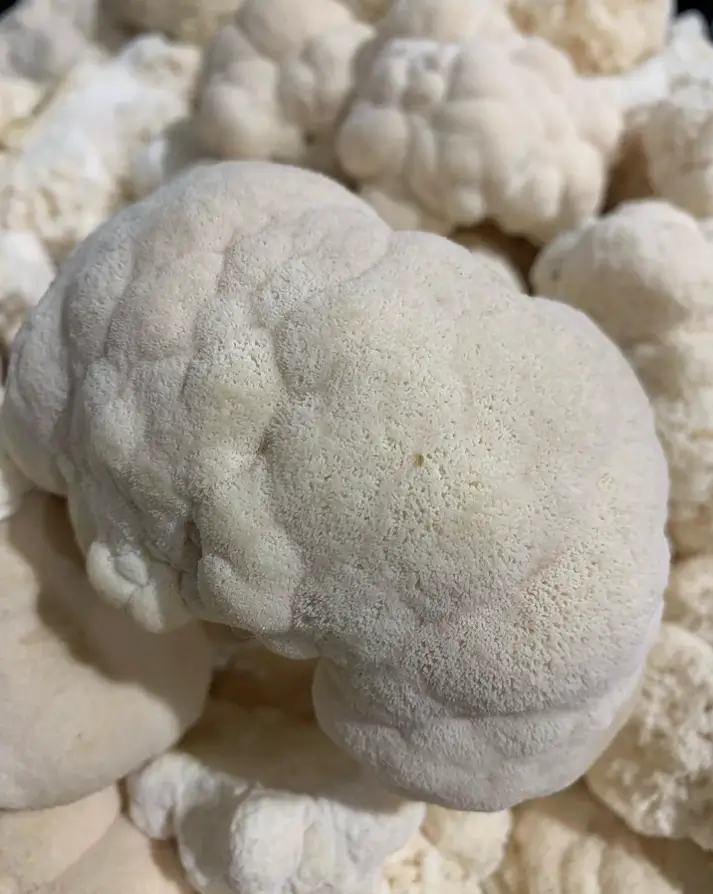
Hericium erinaceus, commonly known as Lion’s Mane Mushroom, is renowned for its unique appearance and remarkable health benefits. This mushroom grows on hardwood trees, particularly beech, in temperate forests around the world. Its distinctive look, resembling a white, shaggy mane of a lion or a cascade of small, icicle-like spines, makes it easily identifiable.
Prefers the trunks of dead or dying hardwood trees, such as beech, where it plays a crucial role in the ecosystem by breaking down the wood and recycling nutrients.
Known for its mild, sweet flavor, reminiscent of seafood, Lion’s Mane is versatile in the kitchen, used in dishes ranging from soups and sauces to seafood substitutes in vegetarian cuisine.
Beyond its culinary appeal, Hericium erinaceus is celebrated for its potential neuroprotective properties, with research suggesting it may support brain health, enhance cognitive function, and offer mood-stabilizing benefits.
Contains bioactive compounds such as hericenones and erinacines, which are believed to stimulate the growth of brain cells and have been linked to potential benefits in the treatment of neurodegenerative diseases.
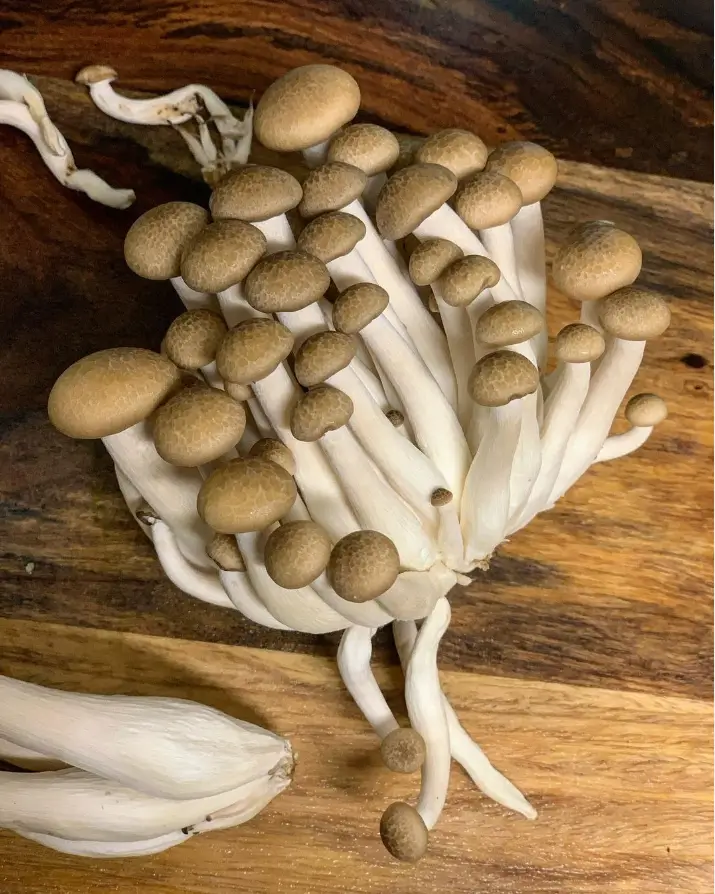
Hypsizygus marmoreus, commonly known as the Beech Mushroom or Buna-shimeji, is a culinary favourite in Asian cuisine, known for its small, round caps and elongated, slender stems. This mushroom naturally grows on beech trees and other hardwoods, thriving in cool climates that simulate its native forest environments. It is particularly appreciated for its firm texture and slightly nutty, sweet flavor, making it a versatile ingredient in various dishes.
Typically found growing in clusters on living or dead hardwood trees, such as beech, where it contributes to the decomposition of wood and the recycling of nutrients within forest ecosystems.
Its small, ivory-to-brown caps and long, cream-coloured stems are distinctive, offering a visually appealing addition to culinary presentations.
It contains nutritional benefits, including high levels of protein, fibre, vitamins, and minerals, making it a tasty and healthful choice for inclusion in meals.
In culinary use, Hypsizygus marmoreus is often cooked to enhance its flavor and texture, as it can be slightly bitter when raw. Cooking transforms it into a delicious, savory component of any dish.
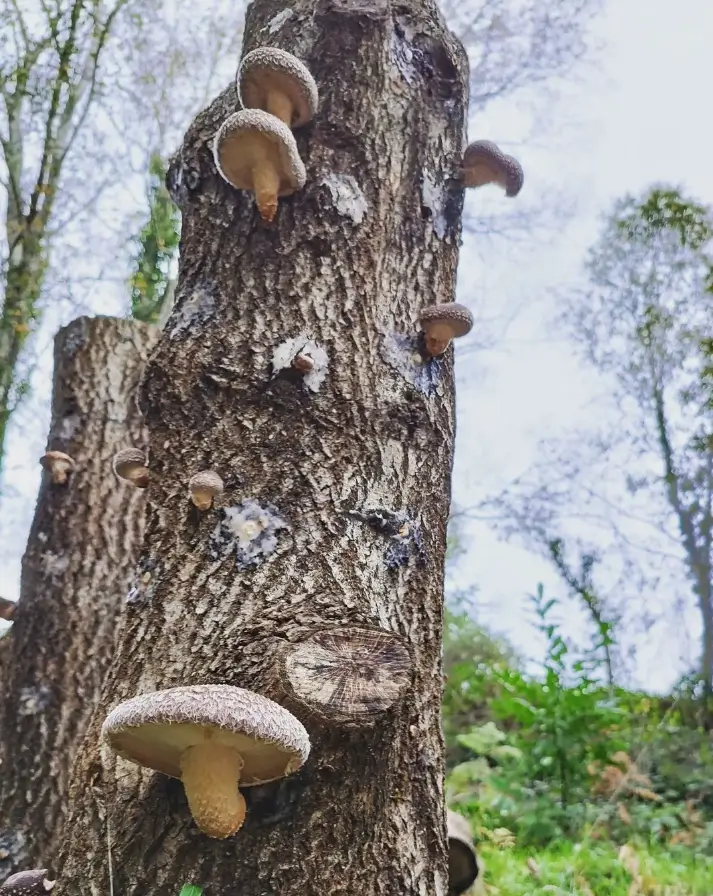
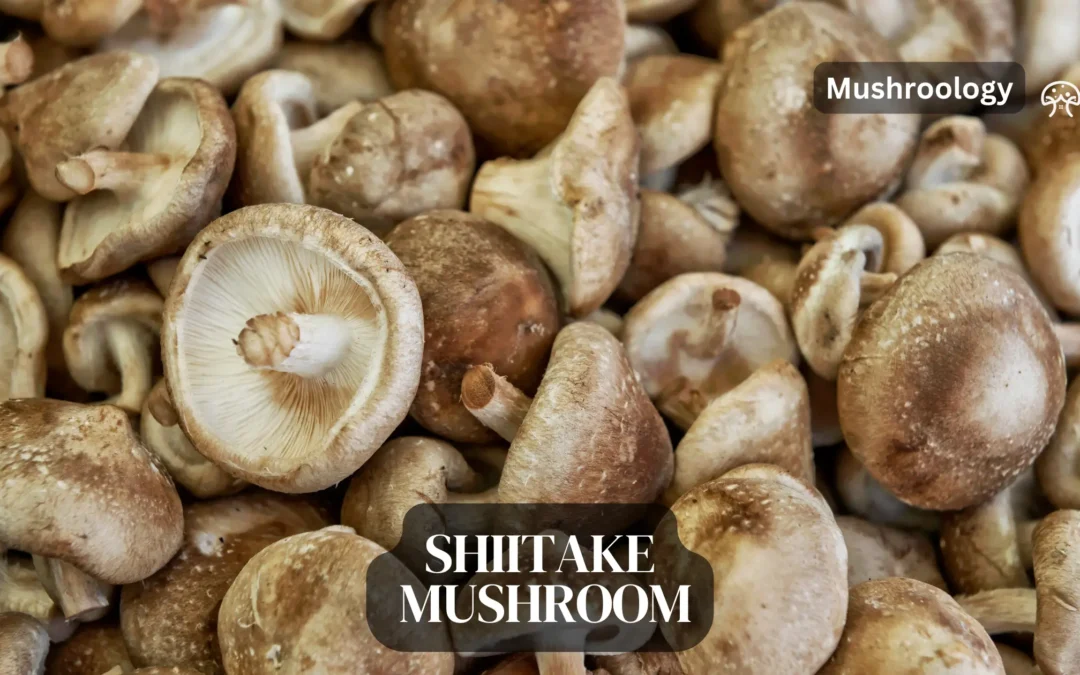
Lentinula edodes, widely known as Shiitake Mushroom, is one of the world’s most popular and cultivated mushrooms, revered not only for its rich, umami flavor but also for its numerous health benefits.
Thrives on decaying hardwood, especially oak, where it forms a symbiotic relationship with the tree, contributing to the decomposition process and nutrient cycling in forest ecosystems.
Recognized by its distinctive brown cap, which can vary in color from light tan to dark brown, and its white to cream gills, the Shiitake mushroom is notable for its meaty texture and robust flavor, enhancing a wide range of dishes from soups and stir-fries to grilled and roasted preparations.
Renowned for their deep, savoury umami taste, Shiitake mushrooms add a rich flavour depth to culinary creations, making them a staple in Asian cuisine and a beloved ingredient worldwide.
Packed with vitamins, minerals, and bioactive compounds such as lentinan, Shiitake mushrooms have been studied for their potential to boost the immune system, support heart health, and even possess anti-cancer properties.
19. Lentinula giganteus
Lentinula giganteus, commonly known as the giant oyster mushroom or shiitake mushroom, is a highly prized edible fungus belonging to the Polyporaceae family. It is renowned for its culinary versatility, medicinal properties, and ease of cultivation.
L. giganteus possesses a large, fleshy cap that can grow up to 12 inches in diameter, with a smooth, velvety surface and a distinctive brown or tan colour.
It is typically found growing on dead or decaying hardwood logs in forests worldwide.
L. giganteus contains polysaccharides that have been shown to enhance immune function and protect against infections.
Studies suggest that consuming L. giganteus may help lower cholesterol levels.
Lepista nuda, commonly known as the Wood Blewit, is a distinctive mushroom with a beautiful lilac to purple colouring and its robust, earthy flavour. It naturally occurs in deciduous and coniferous forests, thriving in leaf litter and composting wood, making it a late autumn to winter find for foragers.
Characterized by its striking lilac to purple cap and gills, which set it apart from other mushrooms in the forest
While delicious, it requires careful identification and cooking, as consuming it raw or undercooked can lead to digestive discomfort for some individuals. Proper preparation is key to enjoying its unique taste and texture.
Beyond its culinary use, Lepista nuda is also noted for its ecological role in decomposing organic material, aiding in soil health and forest regeneration.
The cultivation of Wood Blewits is not as common as other mushrooms, but it has gained popularity among mycophiles and gourmet chefs for its unique flavor profile and nutritional benefits, including high levels of protein and vitamins.
21. Lyophyllum ulmarium
Lyophyllum ulmarium, commonly known as the elm oyster mushroom or velvet foot, is an edible fungus belonging to the Lyophyllaceae family. It is prized for its culinary versatility, unique flavor, and ease of cultivation.
L. ulmarium possesses a convex cap that ranges from 2 to 6 inches in diameter, with a smooth, velvety surface and a white or cream color
It typically grows on dead or decaying elm trees, but can also be found on other hardwood species.
L. ulmarium has a mild, slightly nutty flavor with a firm, meaty texture 1
L. ulmarium is commercially cultivated on a small scale due to its unique flavor and increasing demand
22. Macrolepiota procera – the Parasol Mushroom
Instagram @fungilogist
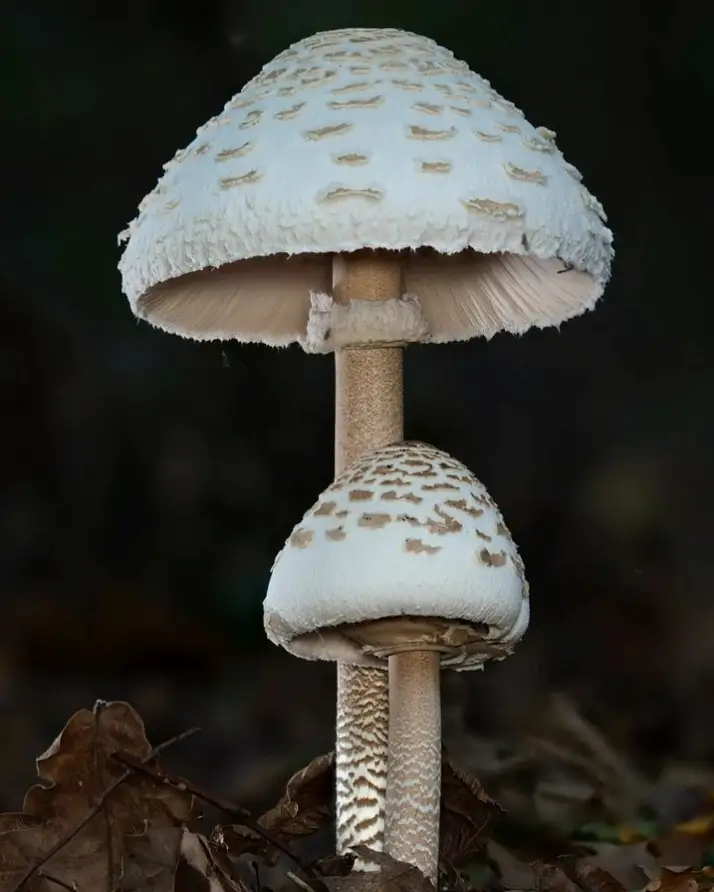
Macrolepiota procera, widely known as the Parasol Mushroom, is a distinctive and highly regarded edible mushroom celebrated for its large size, impressive appearance, and delicious flavour. This species is found in grassy areas such as meadows and pastures and along woodland edges, thriving in well-drained soils rich in organic matter.
The Parasol Mushroom is easily recognizable by its large, umbrella-like cap, which can reach up to 30 cm (12 inches) in diameter, and its tall, slender stem.
It prefers open, grassy areas such as meadows, pastures, and woodland edges, where it grows solitarily or in small groups, often in well-drained soils rich in organic matter.
The stem is tall and slender, with a characteristic ring (or annulus) that can slide up and down, and a bulbous base that is sometimes encased in a loose, sack-like volva.
It is essential to properly identify Macrolepiota procera due to the presence of look-alike species that may be poisonous. Only the cap is typically consumed, as the stem can be tough and fibrous.
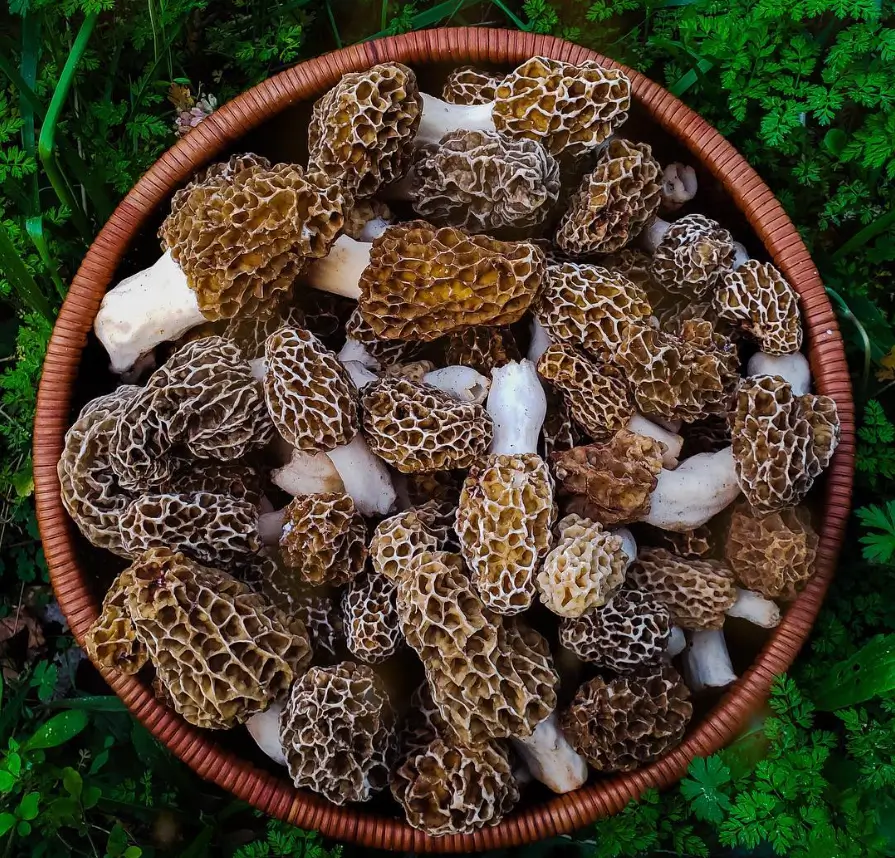
Morel mushrooms, known scientifically as Morchella, are a genus of edible sac fungi that have captivated the culinary world and foragers alike. In North America, the diversity of morels is particularly rich, with a variety of species that can be categorized into distinct groups. Let’s explore the scientific details of these groups and their unique characteristics.
Black Morels: The Early Risers
Black morels, which include Morchella angusticeps, Morchella elata, and Morchella conica, are known for their early appearance in the morel season. These fungi are part of the elata clade and are often associated with burn sites, hence the nickname “burn morels.” They typically have caps with off-white to grey to charcoal-black ridges and can range in size from 1 inch up to 4 inches, with some species like the spike morel reaching up to 6 inches.
Yellow Morels
Yellow morels, including Morchella deliciosa and Morchella esculenta, are the most common and largest morels found, with sizes ranging from 1 inch up to a remarkable 12 inches. These mid-season mushrooms are part of the esculentoid clade and are often found in wooded areas near trees’ drip lines or where wooded areas meet open fields.
White Morels
The white morel, a unique species found on the West Coast, breaks the typical morel association with trees. It is known to grow in disturbed ground such as landscaping sites, gardens, and woodchip beds. This species has a striking visual contrast with vertically aligned white ridges when young, turning yellowish-brown as it matures.
Half-free Morels
Half-free morels, such as Morchella semilibera, have caps that hang partially free over the sides of the stipe. While their unique morphology often sets them apart, DNA evidence situates them within the elata clade. These morels are considered edible, though they are not as highly regarded in terms of taste as other morel species.
Burn Morels
Burn morels, which include species like Morchella tomentosa, are known for their pyrophilic behavior, flourishing in forests that have recently experienced wildfires. These morels are highly sought after due to their tendency to appear in abundance after such events.
Key Characteristics:
Grow abundantly in recently burned forests
Associated with higher alkaline soil conditions
Highly prized by commercial pickers
24. Oudemansiella radicata
Instagram @branden_mcm
Oudemansiella radicata, commonly known as the deep root mushroom, beech rooter, or rooting shank, is a species of mushroom that stands out for its preference for growing on the decaying wood of broadleaf trees, often appearing to emerge directly from the soil due to its long, rooting stem.
Typically grows on decaying wood of broadleaf trees, with a long, slender stem that appears to root into the ground, giving the mushroom its common name, Rooting Shank.
Prefers moist, shaded environments found in forests, parks, and wooded areas, where it contributes to the decomposition process and nutrient cycling within these ecosystems.
Characterized by a slim, elegant stem and a cap that ranges from creamy white to light brown, often with a smooth, glossy surface that can become sticky in wet conditions.
The flesh of the Rooting Shank is generally considered tough and not particularly flavorful, making it less sought after for cooking compared to other mushroom species.
25. Pholiota nameko – the Nameko Mushroom
Instagram @the_wild_room
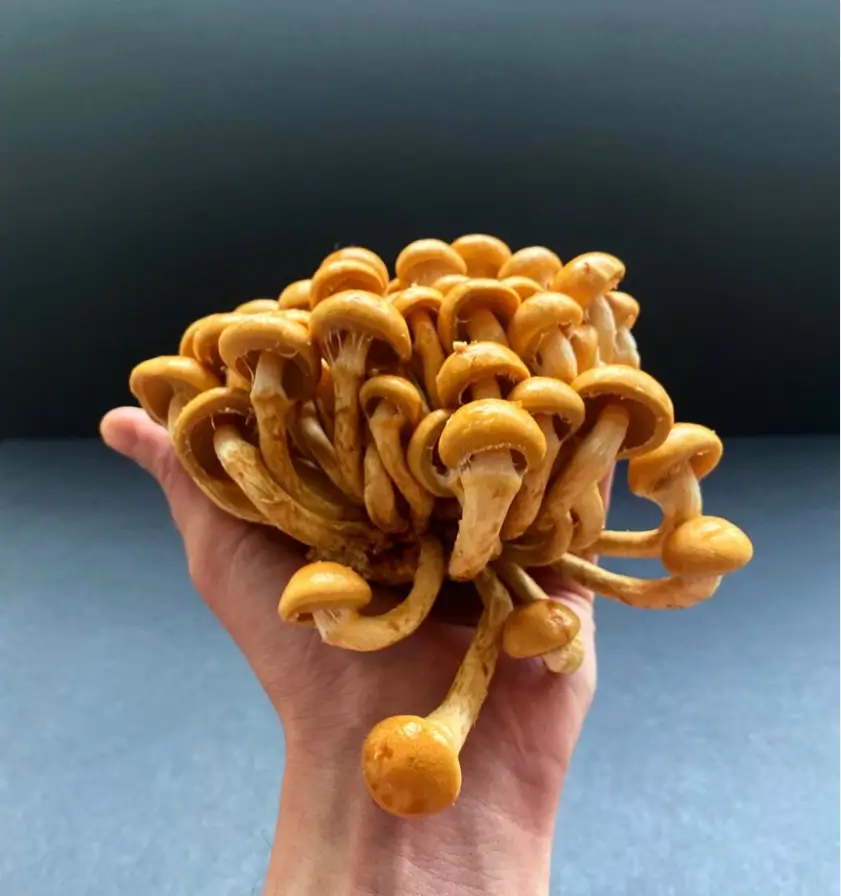
Pholiota nameko, commonly known as the Nameko Mushroom, is a small, amber-brown mushroom prized in Japanese cuisine for its unique gelatinous coating and rich, earthy flavor. This mushroom typically grows in clusters on the stumps or trunks of deciduous trees, particularly beech and oak, thriving in cool, moist environments.
Characterized by its small, convex cap that ranges in color from amber to orange-brown, coated with a distinctive gelatinous layer that adds a unique texture to dishes.
The gelatinous coating not only contributes to the mushroom’s culinary appeal but also helps in retaining moisture, making the Nameko an excellent ingredient for soups and broths where it can impart a silky texture.
Nutritionally, Nameko mushrooms are a good source of vitamins, minerals, and antioxidants, adding to their value as a healthful addition to the diet.
The Nameko Mushroom’s unique texture and flavor profile have made it a beloved ingredient in Japanese cuisine, and its cultivation has allowed food enthusiasts around the world to enjoy this special fungus.
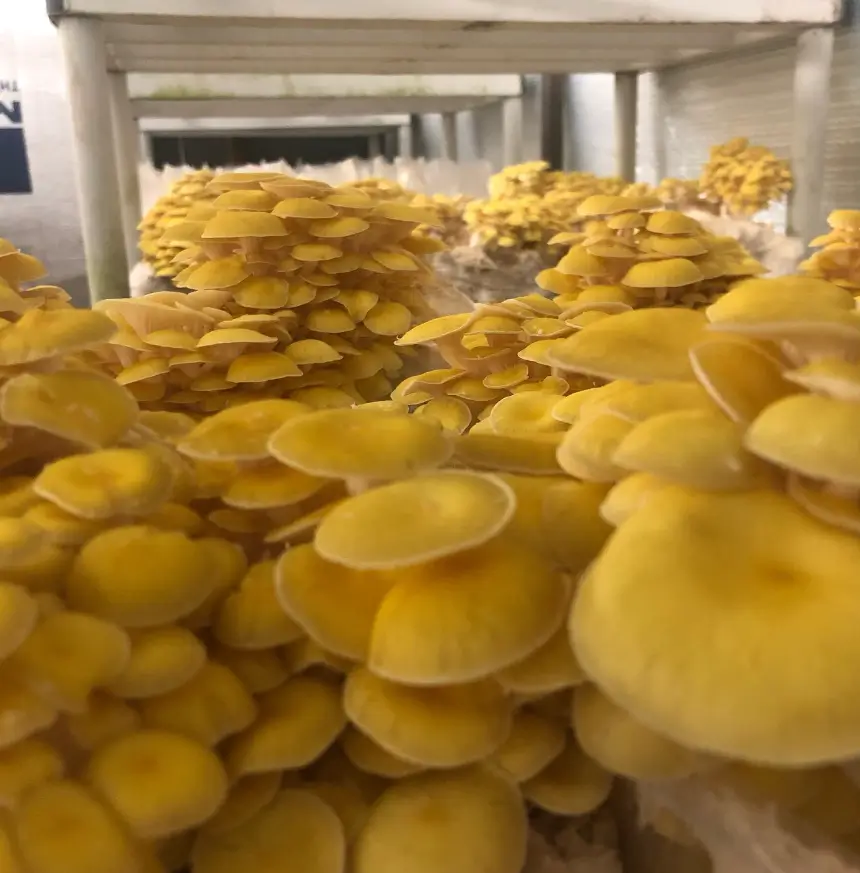
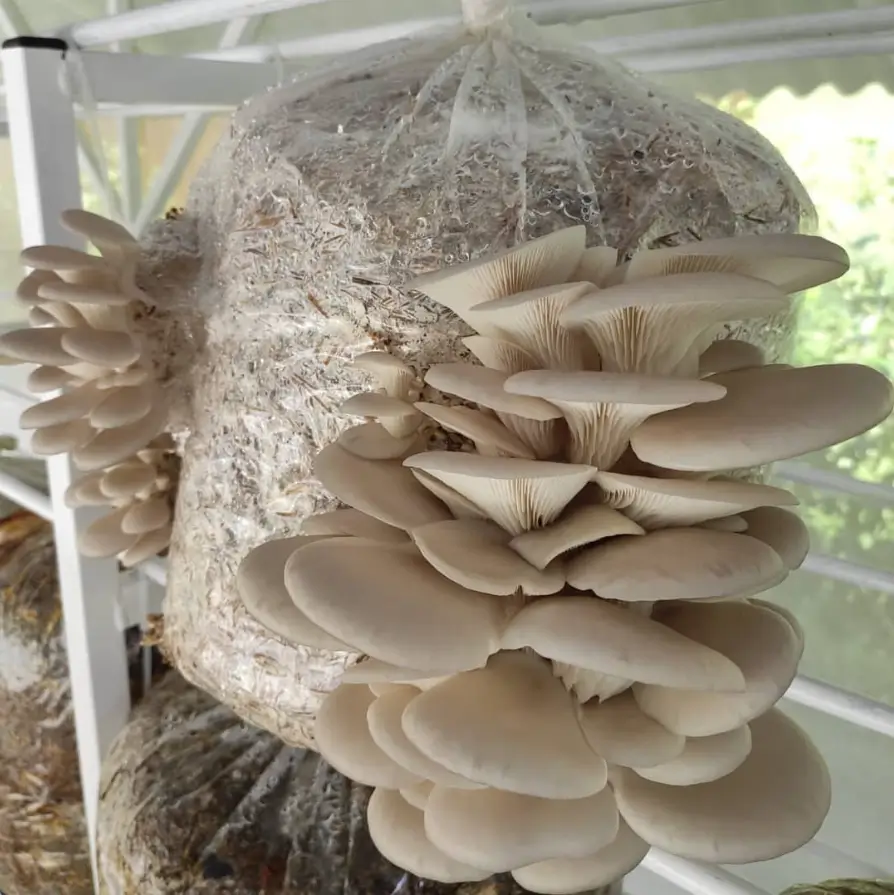
Pleurotus citrinopileatus, commonly known as the Golden Oyster Mushroom, is a member of the oyster mushroom family and is highly regarded for its visual appeal, unique flavor, and nutritional benefits. It typically grows in clusters on dead hardwoods, such as beech and aspen, and is found in a variety of forested and wooded environments.
Features vibrant yellow to golden caps, which are thin and pleated, with a white to pale stem. The striking color and delicate structure of the Golden Oyster Mushroom make it a favorite among foragers and cultivators alike.
Offers a slightly sweet and nutty flavor, less intense than some of its Pleurotus cousins, making it a versatile ingredient in culinary applications. It can be used in a wide range of dishes, from stir-fries and soups to gourmet preparations.
Cultivation of the Golden Oyster Mushroom has become popular due to its rapid growth, ease of cultivation, and high yield.
It can be grown on a variety of organic substrates, including straw and sawdust, making it accessible for both commercial producers and home cultivators.
27. Pleurotus cornucopiae – the Branched Oyster Mushroom
Instagram @dvorakovskiimaksim
Pleurotus cornucopiae, commonly known as the Branched Oyster Mushroom, is a species of edible fungus that belongs to the Pleurotus genus, sharing many of the desirable characteristics of its relatives.
Prefers dead or decaying hardwood substrates, playing a significant role in the decomposition process and contributing to the cycling of nutrients within forest ecosystems.
The mushroom is characterized by its unique growth habit, with clusters that can feature branching stems and multiple caps, distinguishing it from other oyster mushroom species that typically have a single stem and cap.
Pleurotus cornucopiae has a delicate, slightly sweet flavor similar to other oyster mushrooms.
It is rich in protein, vitamins, minerals, and antioxidants
Cultivation of the Branched Oyster Mushroom is possible on a variety of organic substrates, making it accessible for commercial cultivation and hobbyist growers alike.
28. Pleurotus cystidiosus – the Abalone Mushroom
Instagram @mushroomsnaturally
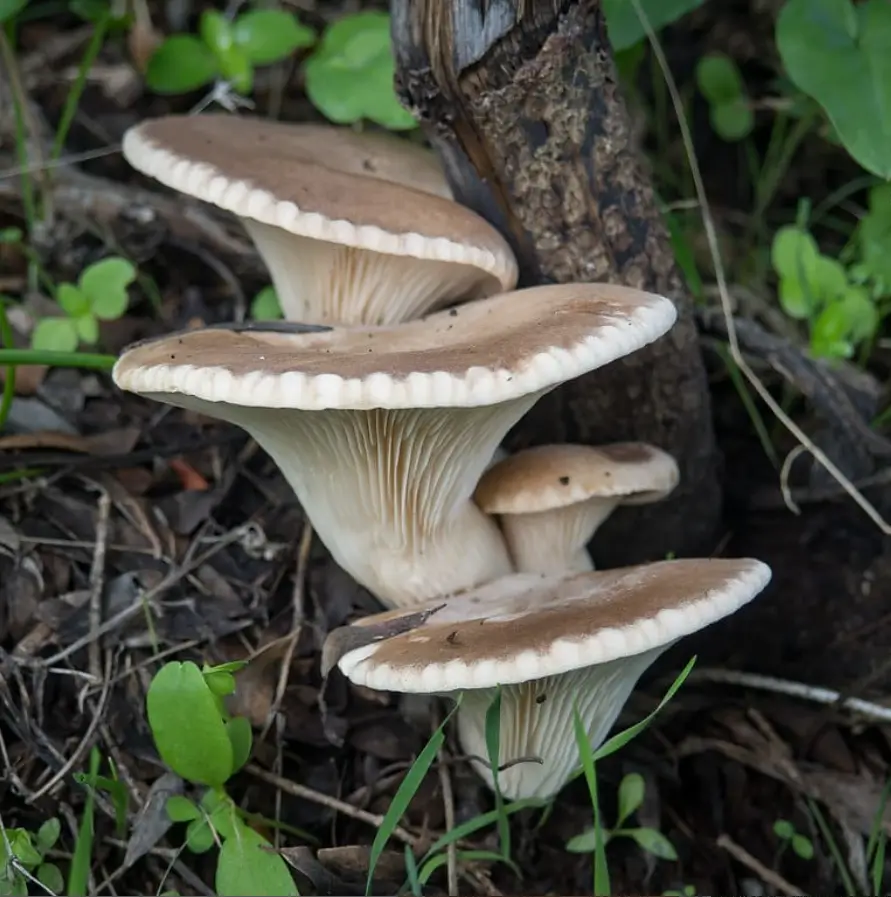
Pleurotus cystidiosus, known as the Abalone Mushroom or Oyster Mushroom, is a unique species within the Pleurotus genus, distinguished by its smooth, often iridescent, cap that resembles the inner shell of an abalone. This mushroom typically grows on hardwoods in warm, humid climates, making it a common sight in Asian forests and increasingly popular in cultivation due to its desirable culinary and nutritional properties.
Features a distinctive cap that can range in color from white to shades of gray or brown, often with a slight iridescence that makes it visually reminiscent of an abalone shell. The cap is usually smooth, with a slight depression in the center.
Pleurotus cystidiosus offers a tender texture and a subtle, slightly sweet flavor, making it a versatile ingredient in a variety of dishes, including stir-fries, soups, and as a meat substitute in vegetarian and vegan recipes.
It is rich in protein, fiber, vitamins (especially B vitamins), minerals (such as iron, selenium, and potassium), and antioxidants, contributing to its status as a functional food with potential health benefits.
Its ability to grow at relatively high temperatures makes it suitable for cultivation in a wide range of environments.
Pleurotus cystidiosus is also of interest for its potential medicinal properties, including immune system support and cholesterol-lowering effects, though more research is needed to fully understand these benefits.
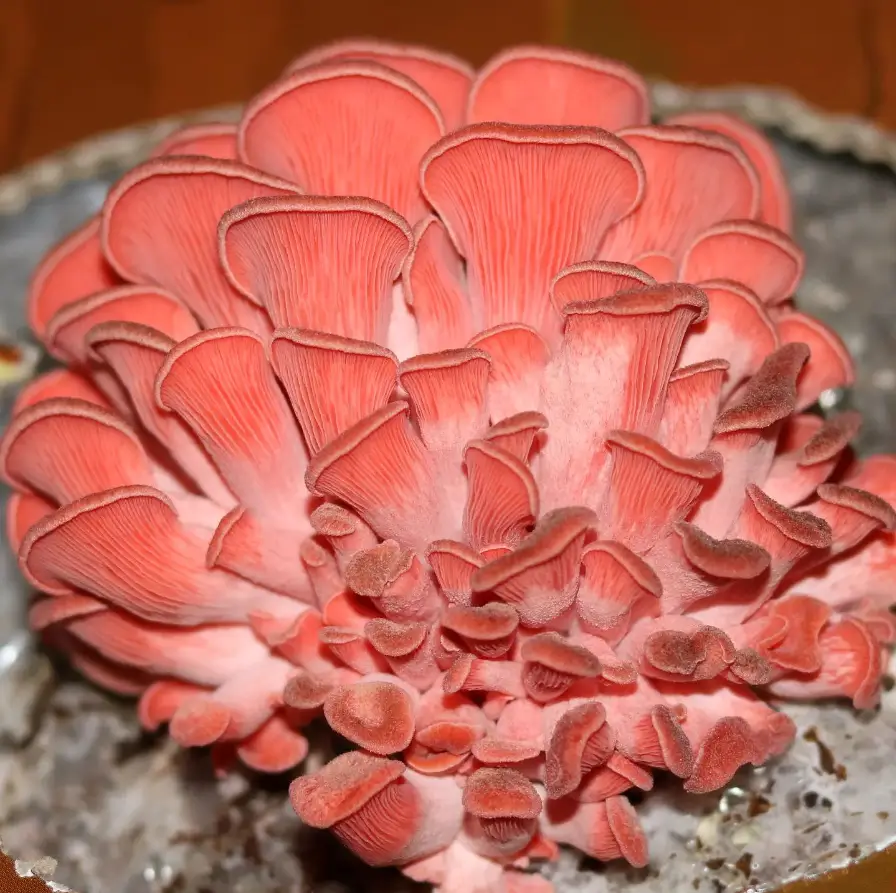
Pleurotus djamor, commonly known as the Pink Oyster Mushroom, is a visually striking species of edible fungus that belongs to the Pleurotus genus. This mushroom is notable for its vibrant pink colour, which adds a unique aesthetic appeal to dishes, although the colour may fade when cooked. Pleurotus djamor thrives in warm, humid climates and is often found growing on decaying hardwoods, making it a popular choice for cultivation in tropical and subtropical regions.
30. Pleurotus eryngii – the King Oyster Mushroom
Instagram @fungi_fae
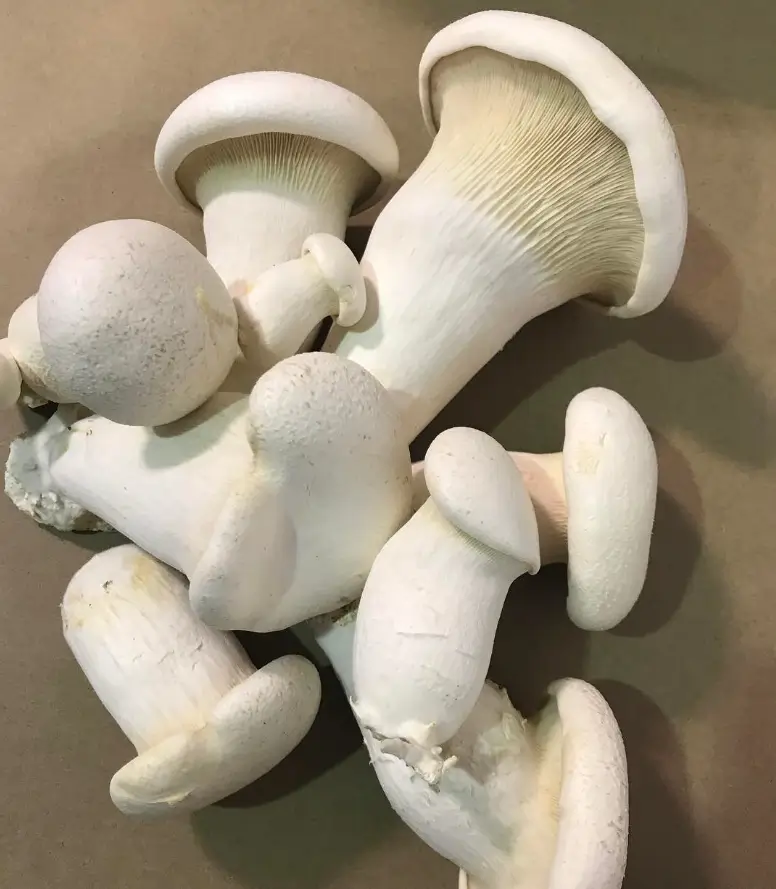
Pleurotus eryngii, commonly known as the King Oyster Mushroom, is esteemed for its substantial size, meaty texture, and savory flavor, making it a favorite in culinary circles around the world. Unlike other members of the Pleurotus genus, which typically grow on dead hardwood, Pleurotus eryngii has a unique ecological niche, preferring the roots of herbaceous plants, particularly those in the Eryngium genus, in natural settings.
Thrives in a symbiotic relationship with the roots of certain herbaceous plants, including thistles, which is a distinct ecological adaptation within the Pleurotus genus.
Its robust texture remains firm even when cooked, offering a chewiness similar to that of scallops or abalone, which is highly prized in gourmet cooking for its ability to absorb flavors while maintaining structural integrity.
Pleurotus eryngii is rich in protein, fiber, vitamins (including B vitamins and vitamin D), minerals (such as potassium, iron, and selenium), and antioxidants, contributing to its nutritional value and making it a healthy addition to any diet.
Cultivation of the King Oyster Mushroom has become increasingly popular due to its desirable culinary characteristics.
Beyond its culinary applications, Pleurotus eryngii is also of interest for its potential health benefits, including immune system support, anti-inflammatory properties, and the ability to lower cholesterol levels, though further research is needed to fully understand these effects.
31. Pleurotus ferulae – the Ferula Mushroom
Instagram @turkiye_mantar_avcilari
Pleurotus ferulae, also known as the Ferula Mushroom, is a species of edible fungus closely related to the more widely known oyster mushrooms. This mushroom is distinctive for its association with the roots of the Ferula plant, a genus of large, herbaceous perennials in the carrot family, found primarily in arid and semi-arid regions of the Mediterranean, Middle East, and Central Asia.
Grows symbiotically with the decaying roots of Ferula plants, showcasing a unique ecological niche among fungi by leveraging the specific decaying organic matter found in arid and semi-arid regions.
Characterized by its large, fleshy caps and relatively short stems, the Ferula Mushroom exhibits a creamy to pale yellow color, aligning with its desert habitat and plant associations.
Nutritionally, Pleurotus ferulae is rich in proteins, fibers, vitamins, and minerals, adding to its desirability as a healthful food source. Like other oyster mushrooms, it contains antioxidants and compounds beneficial to health, including potential cholesterol-lowering effects.
The cultivation of Pleurotus ferulae outside its natural habitat is relatively rare but possible, typically involving the replication of its specific growing conditions, including substrate composition similar to the decaying Ferula roots.
32. Pleurotus florida – the White Oyster Mushroom
Instagram@fungi.vale
Pleurotus florida, commonly referred to as the White Oyster Mushroom, is a variant of the oyster mushroom species known for its pale to white caps and preference for growing on hardwood substrates. This mushroom is cultivated and appreciated worldwide for its mild flavor, tender texture, and versatility in culinary applications. Pleurotus florida shares many characteristics with its Pleurotus cousins, making it a popular choice for both commercial cultivation and home growers.
33. Pleurotus nebrodensis – the Sicilian Mushroom or White Ferula Mushroom
Pleurotus nebrodensis, commonly known as the Sicilian Mushroom or White Ferula Mushroom, is a rare and highly prized species of oyster mushroom. This mushroom is endemic to the Mediterranean region, particularly found in the mountainous areas of Sicily, Italy, where it grows in symbiosis with the roots of Ferula plants, a genus of giant fennel. Pleurotus nebrodensis is renowned for its unique taste and texture, as well as its scarcity, which has led to it being considered a delicacy and, at times, endangered.
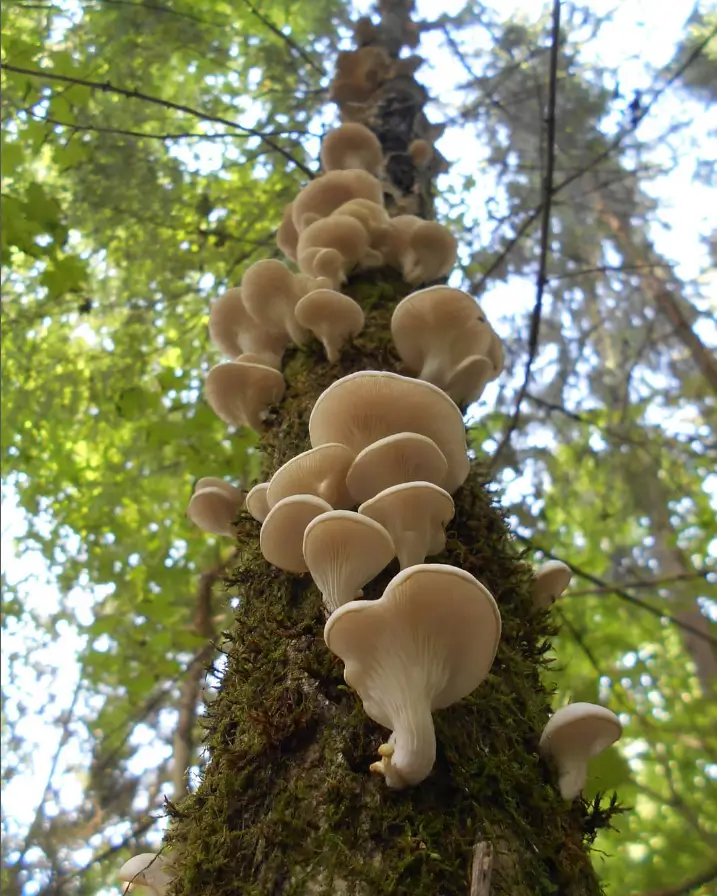
Pleurotus ostreatus, commonly known as the Oyster Mushroom, is one of the most popular and widely cultivated edible mushrooms due to its rich flavor, nutritional benefits, and ease of cultivation. This species is named for its oyster-shaped cap and typically grows in clusters on the trunks of dead hardwood trees, such as beech and oak, though it is also capable of growing on a variety of organic substrates in cultivation settings.
Features broad, fan-shaped caps that range in color from white to grey or light brown, with short, stubby stems. The caps are smooth, with a soft texture, and the edges are often slightly curled.
Known for its delicate, slightly sweet flavor and tender, meaty texture, making it a versatile ingredient in a wide range of culinary dishes, from stir-fries and soups to sauces and as a meat substitute in vegetarian and vegan recipes.
Rich in nutrients, including protein, vitamins B and D, minerals such as potassium, iron, and selenium, and dietary fibers, adding to its appeal as a healthful food choice.
Cultivation of Pleurotus ostreatus is widespread due to its adaptability to various growing mediums, including straw, sawdust, and coffee grounds, making it accessible for both commercial mushroom farms and home cultivators.
The Oyster Mushroom’s popularity is well-deserved, given its delicious taste, versatility in cooking, and the ease with which it can be grown, making it a staple in the diets of mushroom enthusiasts and gourmet chefs alike.
35. Pleurotus sajor-caju – the Grey Oyster Mushroom or the Indian Oyster Mushroom
Instagram @dirfismushrooms
Pleurotus sajor-caju, commonly known as the Grey Oyster Mushroom or the Indian Oyster Mushroom, is a versatile and widely cultivated species within the Pleurotus genus. It thrives in tropical and subtropical climates, growing on a variety of lignocellulosic materials, which makes it an important species for mushroom cultivation in warmer regions around the world.
Pleurotus sajor-caju’s adaptability to warm climates and a wide range of substrates, coupled with its nutritional and culinary qualities, make it an important species for both commercial cultivation and dietary inclusion in various cultures.
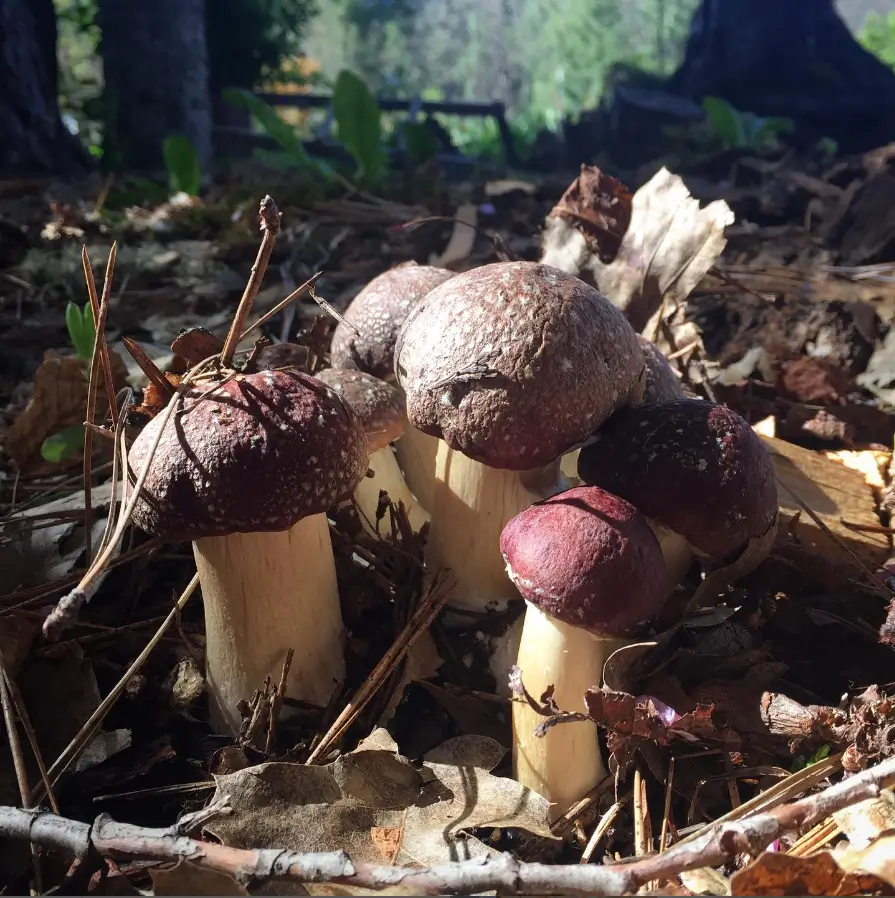
Stropharia rugoso-annulata, commonly known as the Wine Cap Mushroom or King Stropharia, is a robust and attractive edible mushroom that gardeners and mushroom cultivators appreciate for its ability to grow in mulch, wood chips, and straw. It is distinguished by its large, reddish-brown cap, white to cream gills, and stout stem, making it an impressive sight in both gardens and wild settings.
Features a large, meaty cap that can range in color from wine red to reddish-brown, with a white to cream-colored ring around its stem, which is a remnant of the partial veil that once covered the gills of the developing mushroom.
Known for its firm, savory flesh, the Wine Cap Mushroom offers a rich, earthy flavor that is often compared to potatoes or red meat, making it a versatile ingredient in a wide array of culinary dishes, from sautés and stews to grilled preparations.
Contains valuable nutrients, including proteins, vitamins, and minerals, contributing to its appeal as a nutritious food source in addition to its culinary versatility.
Cultivation is relatively straightforward, as Stropharia rugoso-annulata can be easily grown in outdoor settings by inoculating suitable substrates with spawn, making it accessible for both commercial growers and hobbyists interested in sustainable agriculture and mycology.
37. Tremella aurantialba
Instagram @detanmushroomandtruffles
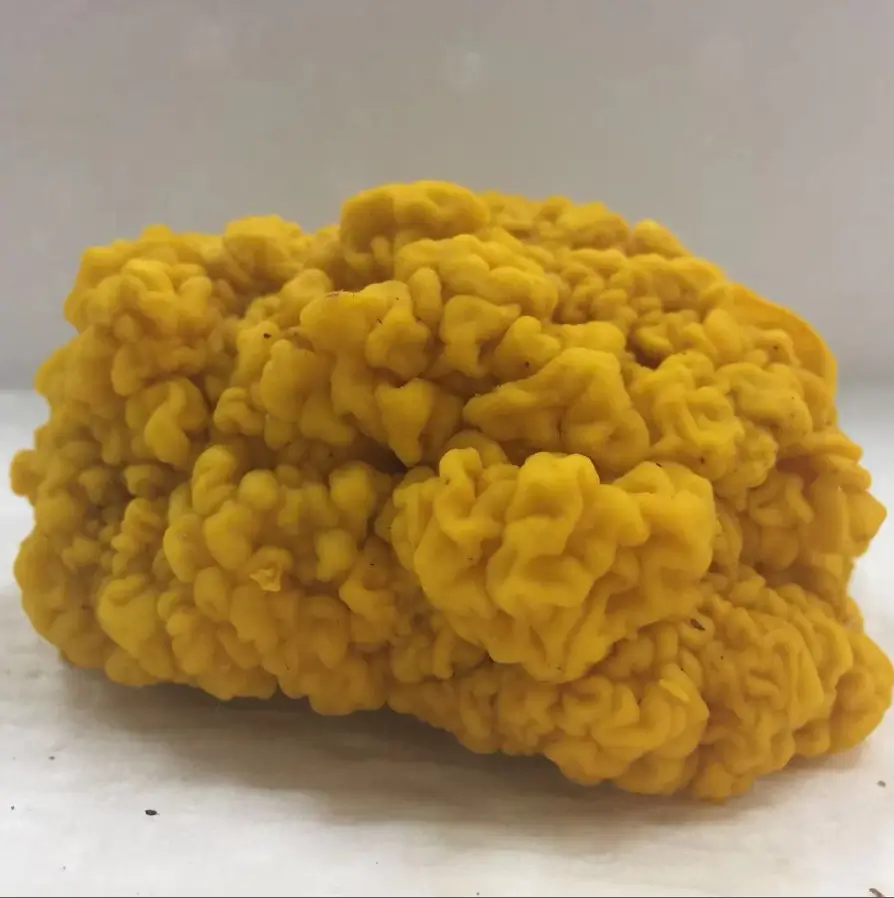
Tremella aurantialba, commonly known as the golden jelly fungus or yellow brain fungus, is a species of fungus belonging to the Tremellaceae family. It is prized for its unique texture, medicinal properties, and culinary versatility.
T. aurantialba possesses a distinctive golden-orange, gelatinous fruiting body that resembles a brain or cauliflower.
It typically grows on dead or decaying hardwood logs in forests worldwide.
T. aurantialba has a mild, slightly sweet flavor and a crunchy texture.
Studies suggest that T. aurantialba may help boost the immune system and protect against infections.
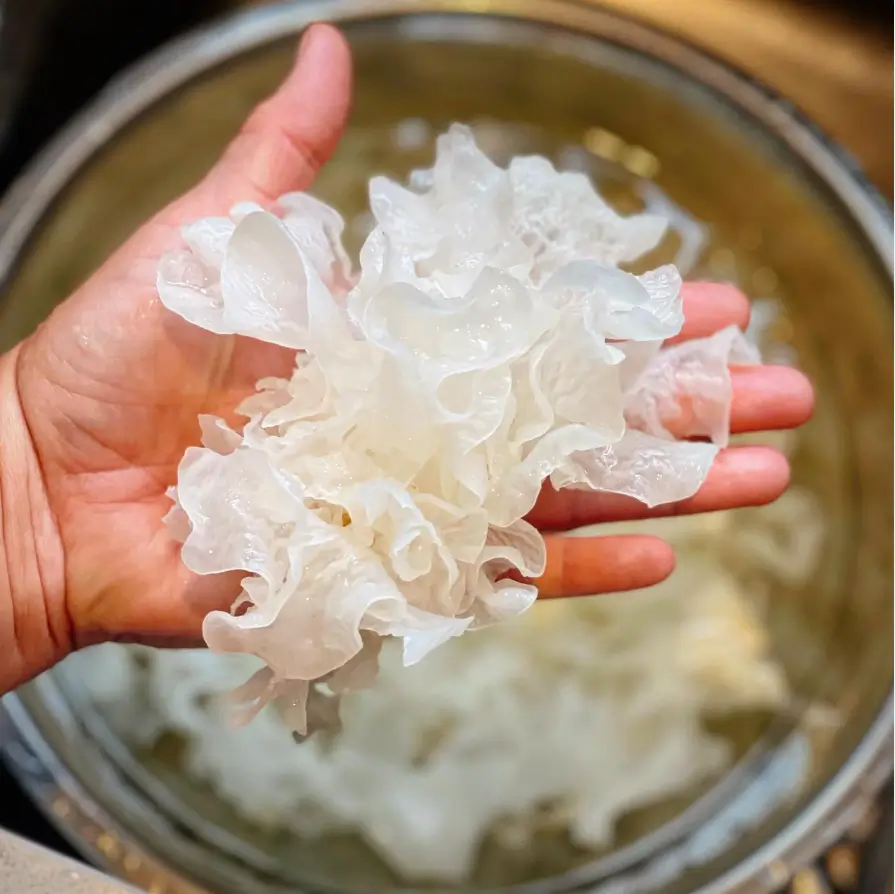
Tremella fuciformis, commonly known as Snow Fungus or Silver Ear Mushroom, is a species of jelly fungus that holds a place of esteem in traditional Chinese medicine and cuisine.
This mushroom is characterized by its unique, gelatinous texture and white, almost translucent appearance, resembling a cluster of snowflakes or coral.
Primarily grows on the dead branches of broadleaf trees in the warmer regions of Asia, including China, where it forms a parasitic relationship with other fungi, notably the Annulohypoxylon species, which it requires for nutrition.
Rich in dietary fibers, essential minerals, and antioxidants, Tremella fuciformis is reputed to offer numerous health benefits, including hydration and improvement of skin elasticity, immune system support, and potential anti-inflammatory and antioxidant properties.
In traditional medicine, it is believed to nourish the body, moisturize the skin, improve lung health, and enhance overall vitality, making it a sought-after ingredient in the preparation of health-promoting dishes and remedies.
39. Tricholoma giganteum
Tricholoma giganteum, known as the Giant Tricholoma or Giant Knight, is a species of mushroom that belongs to the Tricholoma genus. It is notable for its large size and robust structure, making it an impressive find in the wild. This mushroom typically grows in grassy areas near or in deciduous and coniferous forests, often forming symbiotic relationships with the roots of trees, which is essential for its growth and the nutrient exchange within the ecosystem.
Characterized by a large, thick cap that can range in color from white to grey or light brown, with a smooth to slightly scaly surface, and a robust, white stem that is solid and meaty.
The Giant Tricholoma is appreciated for its substantial flesh and mild, often nutty flavor, making it a desirable species for culinary use in dishes where mushrooms are a central ingredient, such as stews, sautés, and grilled preparations.
Found in temperate regions, it emerges in the late summer to autumn, often in groups or rings in grassy areas adjacent to forests, benefiting from the nutrient-rich soil and the proximity to trees with which it forms mycorrhizal associations.
While Tricholoma giganteum is edible and sought after by foragers, it’s important to exercise caution and proper identification when collecting wild mushrooms, as there are poisonous species with similar appearances.
40. Tricholoma lobayense
Tricholoma lobayense, a species within the Tricholoma genus, is less widely known and documented in the broader mycological and culinary communities compared to other members of its genus. Tricholoma species are known for their diverse habitats, often forming symbiotic mycorrhizal relationships with trees, which are crucial for nutrient exchange in forest ecosystems. While specific information on Tricholoma lobayense might be limited, general characteristics of Tricholoma mushrooms can provide insight into its potential ecology and uses.
41. Volvariella diplasia
Volvariella diplasia is a species of mushroom belonging to the genus Volvariella, which is known for its distinctive feature of having a volva or sac-like structure at the base of the stem, similar to some Amanita species but without the risk of toxicity associated with many Amanitas. This genus includes mushrooms that are commonly found in grassy areas, wood chips, or rich soil, often thriving in warmer climates.
Typically grows in nutrient-rich, disturbed soils, which can include gardens, fields, and areas with decaying wood or compost, indicating its role in decomposing organic matter and contributing to soil health.
Volvariella diplasia is characterized by a cap that can range from white to pale pink or gray, often with a smooth to slightly fibrillose texture. The presence of a volva at the base of its stem is a key identifying feature, distinguishing it from other mushroom species.
This species, like other members of the Volvariella genus, is considered edible, but it’s essential to distinguish it from potentially toxic look-alikes, particularly some Amanita mushrooms, which also have a volva but can be highly poisonous.
Cultivation of Volvariella diplasia is less common compared to some other edible mushrooms, but interest in its growth reflects a broader trend in exploring diverse and sustainable sources of food.
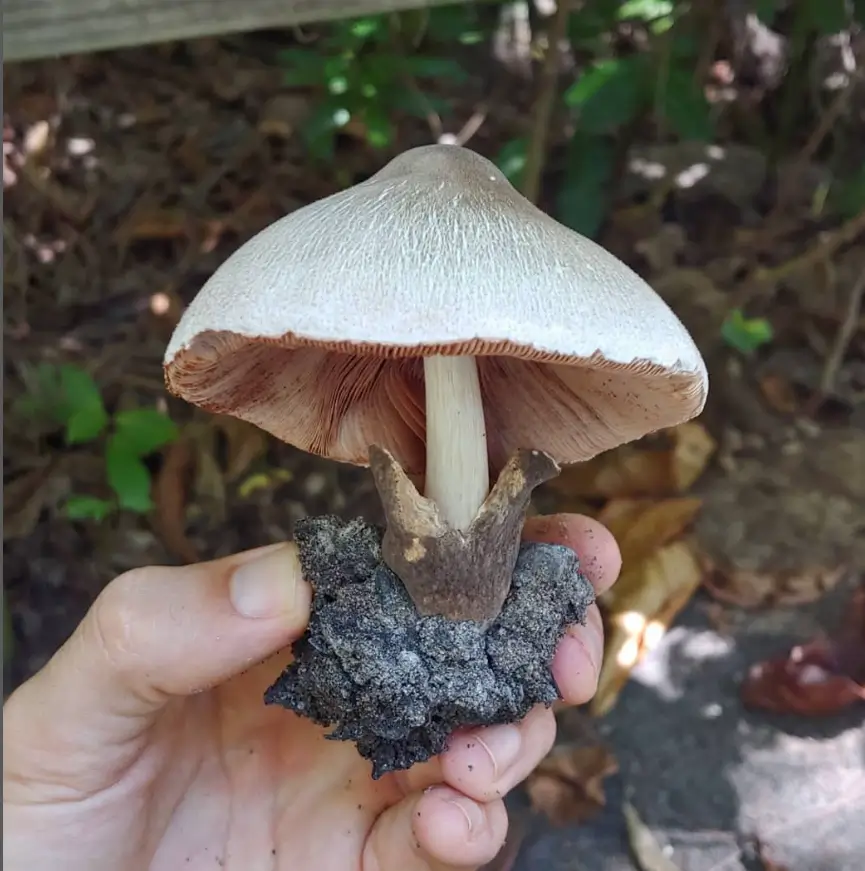
42. Volvariella esculenta – the Paddy Straw Mushroom
Volvariella esculenta, commonly known as the Paddy Straw Mushroom, is a highly esteemed edible mushroom, especially in Asian cuisines, for its delicate texture and flavor. It thrives in warm, humid climates and is frequently cultivated in regions where rice straw is abundant, as it grows well on this substrate.
Grows optimally in warm, humid conditions, making it a common choice for cultivation in Southeast Asia, where these environmental conditions are prevalent.
Typically cultivated on rice straw, which not only provides an ideal substrate for growth but also contributes to the recycling of agricultural waste, thereby promoting sustainable agricultural practices.
Characterized by a smooth, white to light brown cap and a volva at the base, similar to other species in the Volvariella genus, distinguishing it from many other edible mushrooms.
The cultivation process for Paddy Straw Mushrooms is relatively simple and cost-effective, allowing for small-scale and commercial production. This accessibility has led to its widespread use and appreciation in culinary traditions.
Volvariella volvacea, commonly known as the Straw Mushroom, is an edible mushroom, particularly in Asian cuisine. This mushroom thrives in warm, tropical climates and is typically cultivated on rice straw, hence its common name.
Volvariella volvacea’s popularity in culinary applications and its role in sustainable agriculture highlight its importance as a food source. Its ability to be cultivated on agricultural waste products not only promotes efficient resource use but also provides economic opportunities for farmers in tropical regions.
Shiitake mushrooms (Lentinula edodes) have gained immense popularity among home gardeners for their delicious umami flavor and impressive health benefits. As someone who has successfully grown shiitake mushrooms in my own backyard for years, I can tell you that there’s something truly magical about harvesting your own homegrown mushrooms for the first time.
Best of all, growing shiitake mushrooms at home can be a sustainable, rewarding, and surprisingly accessible addition to your gardening repertoire—even if you have limited space. In this comprehensive guide, I’ll walk you through everything you need to know for successfully growing shiitake mushrooms at home.
Table of Contents
Quick start guide for beginners
If you’re eager to get started right away, here’s the condensed process:
Choose your method: Logs (longer-lasting but slower) or sawdust blocks (faster results)
For log method: Obtain freshly cut hardwood logs, drill holes, insert spawn plugs, seal with wax
For sawdust blocks: Purchase pre-made blocks or create your own with hardwood sawdust and nutrients
Incubate: Keep in shade with proper moisture (6-18 months for logs, 2-3 months for blocks)
Initiate fruiting: Soak in cold water, provide humidity, indirect light, and fresh air
Harvest: When caps are 70-90% open with edges still slightly curled
Rest and repeat: Allow medium to recover before next fruiting cycle
Now let’s dive into the complete process with detailed instructions for each step.
Growing Shiitake mushrooms on logs vs. sawdust blocks
There are two primary methods for growing shiitake mushrooms at home, each with distinct advantages:
Log Method
This is the method I’ve used successfully in my backyard for years. Hardwood logs (oak, maple, beech) are inoculated with shiitake spawn and then naturally produce mushrooms after a colonization period. Logs typically measure 3-4 feet in length and 4-8 inches in diameter.
Pros of log method:
Longer production (3-5 years)
More natural process
Lower maintenance once established
More drought-resistant
Authentic woodland flavor
Cons of log method:
Slow initial growth (8-18 months)
Requires outdoor space
Weather-dependent
Heavier to handle
Yield timeline: 8-18 months for first flush, then every 8-12 weeks for years
Best for: Hobbyists with outdoor space and patience
Sawdust block method
Sawdust mixed with supplemental nutrients is formed into blocks, sterilized, and then inoculated with shiitake spawn. This method produces results more quickly but requires more precise environmental control.
Pros of sawdust block method:
Faster results (2-3 months)
Can be grown indoors
More controlled process
Lighter to handle
Higher initial yield
Cons of sawdust block method:
Shorter production life (3-4 flushes)
Requires sterile techniques
More frequent maintenance
More susceptible to contamination
Yield timeline: 2-3 months for first flush, then every 3-4 weeks for 3-4 flushes
Best for: Those wanting quicker results or limited outdoor space
Cost Comparison
Expense
Log Method
Sawdust Block Method
Startup
$50-100 for 10 logs
$30-60 for 3 blocks
Spawn
$25-40
$15-30
Equipment
$30-50
$20-100+
Yield Value
$240-600 over lifetime
$60-120 over lifetime
ROI
4-6x investment
1.5-2x investment
Step-by-step Shiitake mushroom growing process
Understanding the basic lifecycle of shiitake mushrooms is essential before diving into cultivation:
Spawn colonization – Mycelium (the vegetative part of the fungus) grows throughout the wood medium
Incubation – Mycelium fully colonizes the logs/blocks (6-12 months for logs, 2-3 months for blocks)
Fruiting – Actual mushrooms form and develop
Harvesting – Mushrooms are collected when caps are still slightly curled under
Resting – The medium recovers before producing another flush of mushrooms
Popular Shiitake varieties for home cultivation
When selecting spawn, you’ll encounter different shiitake strains with varying characteristics:
Donko (Thick Cap): Larger, meatier caps with excellent texture and flavor. These premium mushrooms are highly sought after by chefs and fetch higher prices at markets.
Koshin (Thin Cap): Faster-growing with thinner caps. More productive but slightly less flavorful than Donko varieties.
Wide-Range Strains: Some strains like “WR46” or “Night Velvet” are bred to fruit across a wider temperature range, making them more forgiving for beginners.
From my personal experience growing shiitake on logs, I’ve found that starting with a wide-range strain provides the most consistent results for beginners while still delivering excellent flavor.
Essential equipment for cultivating Shiitake mushrooms
For the Log Method:
Chainsaw or bow saw for cutting logs
Drill with 5/16″ or 8mm bit for inoculation holes
Rubber or wooden mallet for inserting spawn plugs
Wax applicator (dauber) and wax melter
Food-grade wax (cheese wax or beeswax)
For the Sawdust Block Method:
Pressure cooker (if making your own blocks)
Heat-resistant grow bags with filter patches
Impulse sealer for closing bags
Spray bottle for maintaining humidity
Food grade hydrogen peroxide (3%) for sanitizing
Inoculation process
For logs:
Prepare materials and workspace: Choose a clean, shaded work area. Gather your logs, drill, plug spawn, and waxing supplies.
Drill inoculation holes: Using a 5/16″ (8mm) drill bit, create holes about 1-1.5 inches deep in a diamond pattern around the log, spacing holes 6-8 inches apart in rows, with rows offset by 2-3 inches.
Insert spawn plugs: Using a rubber mallet or hammer, tap plug spawn into each hole until it’s flush with the bark.
Seal with wax: Melt food-grade wax (cheese wax or beeswax) and apply over each plug using a dauber or brush to prevent the spawn from drying out and protect it from contaminants.
Label your logs: Use aluminum tags or weatherproof markers to record the shiitake strain and inoculation date on each log.
Pro Tip: I've found that inoculating 5-10 logs at once provides a manageable start for most hobbyists while ensuring a sustainable harvest rotation.
For sawdust blocks:
If you’re creating your own sawdust blocks rather than purchasing pre-made ones:
Prepare and sterilize substrate: Mix hardwood sawdust with supplements and water to approximately 60% moisture content. Pack into heat-resistant grow bags with filter patches and sterilize in a pressure cooker at 15 PSI for 2.5 hours.
Cool and inoculate: Allow bags to cool to room temperature. In a clean environment (ideally a still-air box or flow hood), add shiitake spawn to the bag at a rate of 5-10% of the substrate weight.
Mix and incubate: Thoroughly mix the spawn throughout the substrate, seal the bag, and place in a warm (65-75°F), dark location for colonization.
Best wood types for Shiitake mushroom logs
The success of your shiitake mushroom venture largely depends on selecting the appropriate growing medium. For log cultivation, the type of wood dramatically affects your results. Here’s my ranked list based on personal success and general recommendations:
Oak (White Oak, Red Oak) – The gold standard with excellent yields and longevity
Sugar Maple – Excellent alternative to oak
Beech – Very good yields with slightly faster colonization
Hornbeam – Good yields with good resistance to competing fungi
Ironwood – Dense wood that produces for longer periods
Sweet Gum – Accessible option in many regions with good results
Avoid: Pine, cedar, or other softwoods that contain natural fungicides.
Log selection best practices
For optimal results, follow these guidelines when selecting logs:
Timing: Harvest logs in late fall through early spring when trees are dormant and sap flow is minimal
Source: Use logs from healthy, living trees (not deadwood)
Size: Cut logs to manageable lengths (3-4 feet) for easier handling
Diameter: Select logs 4-8 inches in diameter (smaller logs colonize faster, larger ones last longer)
Age: Use logs from recently cut trees (ideally within 2-4 weeks of cutting)
Sawdust substrate formula
For the sawdust block method, the ideal substrate mixture contains:
For beginners, I recommend starting with pre-made sawdust spawn blocks from reputable suppliers like Field & Forest Products, North Spore, Mushroom Mountain, or Northwest Mycological Consultants.
Ideal temperature and conditions for growing Shiitake
Creating and maintaining the right environmental conditions is crucial for successful shiitake cultivation. Different stages of growth require different conditions.
Log Method Incubation
Location: Choose a shaded, sheltered area under coniferous trees or 80% shade cloth
Configuration: Stack logs in a crib stack (log cabin style) or lean them against a rack at a 30° angle to maximize air circulation
Protection: Keep logs off bare soil using bricks, pallets, or gravel to prevent contamination from ground fungi
Moisture: Maintain 35-45% moisture content within logs. In my experience, logs typically need watering during dry periods (when the bark feels completely dry to the touch)
Temperature: Optimal colonization occurs between 65-75°F (18-24°C). Protect from temperature extremes
Duration: Typically 6-18 months for full colonization, depending on log size, wood type, and temperature
Sawdust Block Incubation
Location: A dark, clean area like a closet, basement, or dedicated grow tent
Temperature: Maintain 70-75°F (21-24°C) for optimal colonization
Humidity: Keep humidity at ambient levels (40-60%) during incubation
Duration: Typically 4-8 weeks until blocks are fully colonized (completely white)
Fruiting conditions for both methods
Once your logs or blocks are fully colonized, you’ll need to initiate fruiting with these conditions:
Temperature: 55-70°F (13-21°C) for fruiting (cooler than incubation temperatures)
Humidity: 80-90% relative humidity during fruiting
Light: Indirect natural light or 12 hours of low-intensity artificial light
Air exchange: Fresh air prevents CO2 buildup and mushroom deformities
Moisture: Regular misting to maintain surface moisture on logs/blocks
Initiating Fruiting
For Logs:
Soak logs in cold water: Submerge fully colonized logs in cold, non-chlorinated water for 24-48 hours
Physical shock: After soaking, lift logs and drop them on one end from a height of a few inches to provide physical shock
Move to fruiting location: Place logs in a humid, shaded area with good air circulation
Maintain moisture: Mist logs with water 1-2 times daily during dry periods
Within 7-14 days after shocking, you should see small “pins” (baby mushrooms) forming, which will develop into full-sized mushrooms over the next week.
For Sawdust Blocks:
Initiate fruiting: Once blocks are fully colonized, remove them from the incubation area and expose them to light, fresh air, and cooler temperatures (55-65°F/13-18°C)
Create fruiting chamber: Place blocks in a humidity tent or modified tub with 80-90% humidity
Provide indirect light: Mushrooms need some light to develop properly – indirect natural light or 12 hours of low artificial light works well
Air exchange: Ensure adequate fresh air exchange by venting the fruiting chamber several times daily
Seasonal growing calendar
Season
Activities
Notes
Winter
Cut logs, prepare for spring inoculation
Dormant trees have ideal sap levels
Spring
Inoculate logs, maintain moisture
Primary natural fruiting season
Summer
Monitor for excessive drying, water as needed
Protect from extreme heat
Fall
Secondary natural fruiting season
Ideal time for forcing fruitings
Winter
Protect logs from freezing with mulch
Plan for next year’s expansion
Harvesting and storing your homegrown Shiitake mushrooms
Knowing when and how to harvest your shiitake mushrooms is crucial for the best flavor, texture, and continued production.
When to harvest shiitake mushrooms
Optimal Harvest Timing: Harvest shiitake mushrooms when the caps are 70-90% open and still curled slightly at the edges. At this stage, the caps will be 2-4 inches in diameter with the best flavor and texture profile.
Signs of Harvest Readiness:
Caps should be firm and slightly domed
Gills should be white to cream-colored (not discolored)
Stems should be firm without excessive dryness
Harvesting technique
The proper technique is to grasp the mushroom at the base of the stem and twist gently while pulling away from the log or block. This preserves the growing area for future flushes. For stubborn mushrooms, use a sharp knife to cut at the base of the stem.
Post-Harvest Maintenance
Rest Period: After a flush of mushrooms, logs or blocks need a rest period of 6-8 weeks (logs) or 2-3 weeks (blocks) to recover and build energy for the next fruiting cycle.
Forcing Next Flush:
For Logs: Allow logs to rest for 6-8 weeks, soak logs in cold water for 24-48 hours, return to fruiting location
For Blocks: Allow blocks to rest for 2-3 weeks, soak in cold water for 12-24 hours, return to fruiting chamber
Storage and preservation methods
Fresh Storage:
Store unwashed mushrooms in a paper bag in the refrigerator
Most shiitake will keep 7-14 days when properly stored
For maximum freshness, avoid plastic bags which cause condensation
Preservation Methods:
Drying: Slice mushrooms and dry at 110-120°F until crisp (excellent for reconstituting in soups)
Freezing: Sauté lightly in butter before freezing for best texture
Powder: Grind dried shiitake into powder for instant umami flavor boost
Health Benefits of Shiitake Mushrooms
Scientific research has demonstrated several potential health benefits of shiitake mushrooms:
Immune System Support: Shiitake contains beta-glucans, particularly lentinan, which has been studied for its ability to stimulate the immune system and enhance the body’s defense against infections.
Cardiovascular Health: Studies suggest that compounds in shiitake may help reduce LDL (bad) cholesterol levels and support healthy blood pressure.
Antioxidant Properties: Shiitake mushrooms contain several antioxidant compounds that help combat oxidative stress and inflammation.
Potential Anti-Cancer Effects: Research indicates that certain compounds in shiitake may have anti-cancer properties, though more human studies are needed.
Troubleshooting Common Shiitake Growing Problems
Even experienced growers encounter challenges. Here’s how to identify and address common problems:
Contamination Issues
Green Mold (Trichoderma)
Symptoms: Green furry patches on logs or blocks
Causes: Contaminated spawn, poor sterilization, or exposure to spores
Solutions: Remove affected logs/blocks, increase air circulation, and isolate from healthy logs
Turkey Tail Fungus
Symptoms: Thin, multi-colored brackets growing from log
Causes: Competing wild fungus colonizing before shiitake is established
Maitake (Hen of the Woods) – Delicious culinary mushroom
Companion Plants for Mushroom Areas: Create a mushroom-friendly ecosystem with:
Ferns – Natural companions that thrive in similar conditions
Hostas – Provide additional shade and humidity
Wild ginger – Ground cover that helps retain moisture
Advanced Techniques to Explore
Totem Stack Method: Stacking short log sections vertically to create “totems” that colonize quickly and produce abundantly.
Raft Method: Partially burying logs horizontally to maintain moisture and extend production periods.
Supplementation Techniques: Methods to increase yields through additional nutrients during the growing cycle.
Strain Development: Experimenting with creating your own strains through stem butt propagation and spore collection.
Frequently Asked Questions
Q: How long does it take to grow shiitake mushrooms? A: On logs, expect 6-18 months before your first harvest, with subsequent harvests every 6-8 weeks for 3-5 years. On sawdust blocks, initial harvests come in 2-3 months, with 3-4 flushes over 3-4 months.
Q: How many mushrooms can I expect from a single log? A: A typical 4-foot oak log (6″ diameter) can produce 2-3 pounds of shiitake mushrooms over its productive lifetime of 3-5 years.
Q: Can I grow shiitake mushrooms indoors? A: Yes, using the sawdust block method. Logs are generally better suited for outdoor cultivation due to space requirements and natural weathering benefits.
Q: What’s the difference between wild and cultivated shiitake mushrooms? A: Wild shiitake mushrooms are rarely found in North America. What’s marketed as “wild” often refers to mushrooms grown on logs in forest-like conditions, which develop more intense flavor than indoor-grown varieties.
Q: How do I know if my logs are fully colonized? A: Look for white mycelium visible at the end of logs and “pop-corn” patches of white mycelium on the bark. Fully colonized logs feel slightly lighter than fresh logs and make a different sound when tapped (more hollow).
Q: Are there organic methods for pest control with shiitake cultivation? A: Yes, diatomaceous earth, beneficial nematodes, physical barriers, and maintaining biodiversity around your growing area are all effective organic pest management techniques.
Q: Is it worth it financially to grow my own shiitake mushrooms? A: Yes, especially if you enjoy gourmet mushrooms regularly. With shiitake selling for $12-20 per pound, even a small home operation of 10 logs can produce $240-600 worth of mushrooms over their lifetime for an initial investment of $50-100.
Conclusion
Growing shiitake mushrooms at home combines science, art, and patience to create a rewarding and sustainable hobby. By following the methods outlined in this guide and adapting them to your specific conditions, you can enjoy the satisfaction of harvesting your own gourmet mushrooms.
Remember that each growing environment is unique, and part of the joy of mushroom cultivation is learning to work with the specific conditions of your location. Keep detailed records, experiment with different techniques, and connect with fellow growers to continue improving your skills.
Whether you’re growing shiitake mushrooms for your kitchen, your community, or potentially as a small business, the knowledge and experience you gain will provide lasting benefits beyond the delicious harvests. With each flush of mushrooms, you’ll deepen your connection to nature’s cycles and the fascinating world of fungi.
Ready to get started? Gather your supplies, select your logs or blocks, and begin your journey into the rewarding world of shiitake mushroom cultivation!
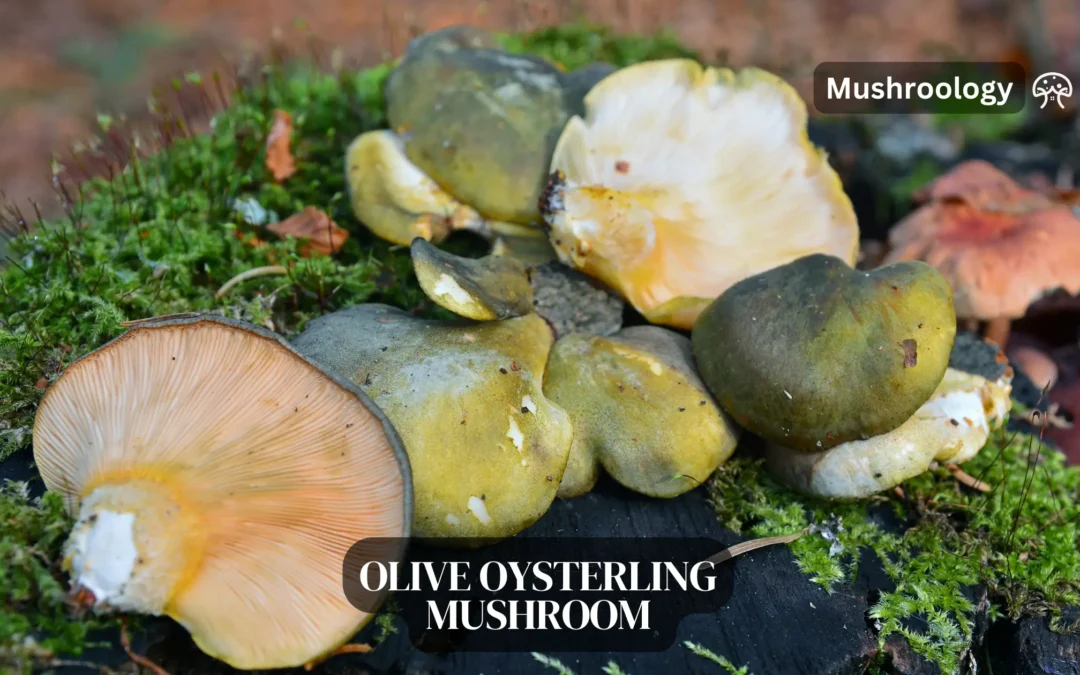
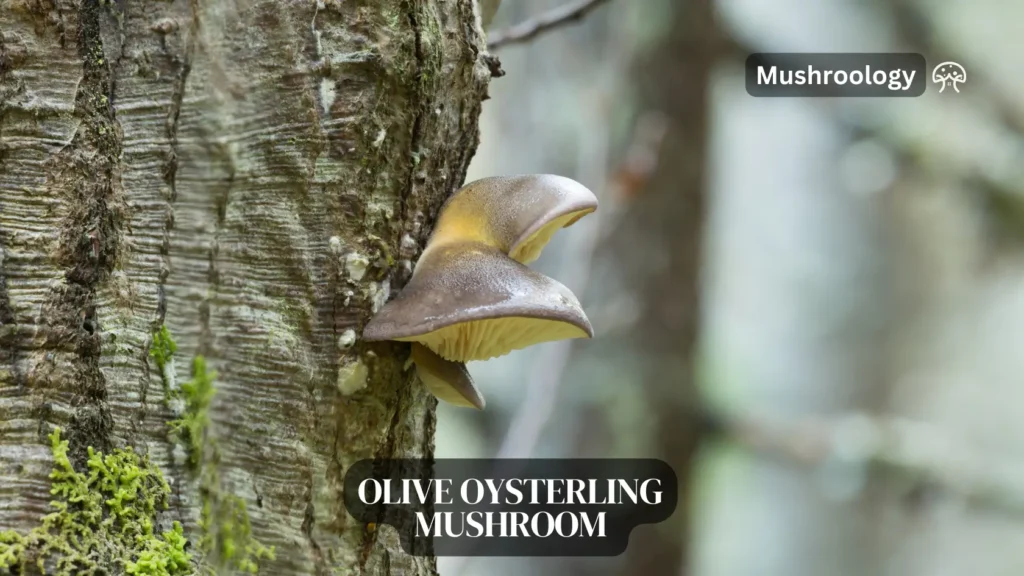
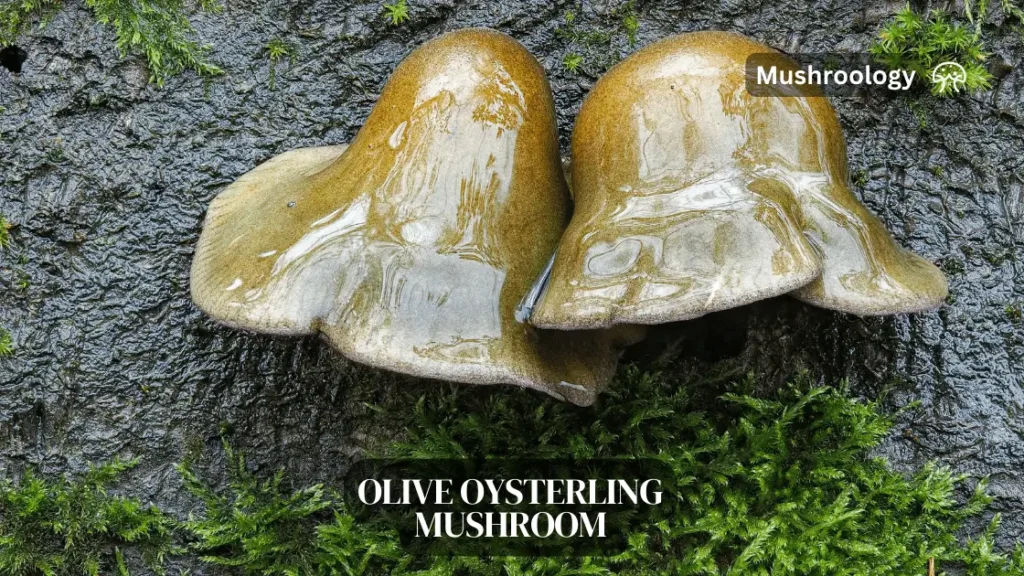
The Olive Oysterling (Panellus serotinus) stands out as one of nature’s most fascinating fungi. With its distinctive olive-green to brownish caps that sometimes display violet hues, this gourmet mushroom offers both visual appeal and culinary delight. Also known as the Late Fall Oyster or Green Oyster mushroom, this species thrives in cooler temperatures, making it perfect for cultivation during seasons when other mushroom varieties struggle.
Native to temperate forests across North America, Europe, and Asia, Olive Oysterlings naturally grow on dead hardwood trees. Their natural fruiting season extends from late autumn through early winter, but with proper cultivation techniques, you can enjoy these delicious mushrooms year-round.
Why grow olive oysterling mushrooms?
Culinary value
Olive Oysterlings offer a mild, nutty flavor with a delicate texture that becomes firmer when cooked. Unlike some commercial mushrooms, they retain their structure well in cooking, making them excellent for sautéing, grilling, or adding to soups and stews.
Unique Characteristics of olive oysterling mushrooms
What many cultivators don’t realize is that young Olive Oysterling mushrooms possess bioluminescent properties, particularly in their gills. In complete darkness, they emit a faint, ethereal glow—a fascinating feature to observe during your cultivation journey.
Medicinal Potential
Recent mycological research has revealed that Olive Oysterlings contain bioactive compounds with promising health benefits. Studies suggest these mushrooms may have anti-inflammatory, antioxidant, and antimicrobial properties. They contain beta-glucans, known for immune system support, and various phenolic compounds that contribute to their antioxidant activity.
Environmental Benefits
By growing Olive Oysterlings, you’re participating in sustainable food production. These mushrooms efficiently convert waste wood material into nutritious food, representing a closed-loop system that reduces environmental impact.
Scientific Classification and Identification
Taxonomy
Kingdom: Fungi
Phylum: Basidiomycota
Class: Agaricomycetes
Order: Agaricales
Family: Mycenaceae
Genus: Panellus
Species: Panellus serotinus
Historical Scientific Names
Though currently classified as Panellus serotinus, this mushroom has been known by several synonyms throughout mycological history:
Agaricus serotinus (Pers.) Schrad.
Pleurotus serotinus (Pers.) P. Kumm.
Hohenbuehelia serotina (Pers.) Singer
Sarcomyxa serotina (Pers.) P. Karst.
Physical Characteristics of olive oysterling mushrooms
Cap: 2-10 cm in diameter, kidney-shaped or fan-shaped, with olive-green to brownish coloration, often with violet tones. The surface feels slightly velvety when young and becomes smoother with age. In wet conditions, the cap may become slimy.
Gills: Thick, widely spaced, and decurrent (running down the stem). Typically cream to pale yellow in color.
Stem: Short and lateral (off-center) or sometimes absent entirely.
Spore Print: White to cream-colored.
Odor and Taste: Mild, with subtle sweet or nutty notes.
Look-Alikes
While Olive Oysterlings have few dangerous look-alikes, it’s important to note some similar species:
Panellus stipticus: Smaller, tan-colored, and bitter-tasting. While not poisonous, it’s unpalatable.
Pleurocybella porrigens (Angel Wings): White, with no olive coloration. Can be toxic to people with certain health conditions.
Omphalotus species: May have similar shape but typically have orange to yellow coloration and glow more intensely in the dark.
What You’ll Need to Grow Olive Oysterling mushrooms at Home: Supplies and Materials
Spawn Options
The foundation of successful mushroom cultivation begins with quality spawn. For Olive Oysterlings, consider these options:
Sawdust Spawn: Finely ground wood particles fully colonized with mycelium. This is the most versatile option and ideal for log inoculation, especially when using the drill-and-fill method. The fine texture allows for efficient colonization.
Plug Spawn: Small wooden dowels pre-colonized with mycelium. These are exceptionally beginner-friendly, requiring minimal tools and preparation. Simply hammer them into drilled holes in your logs.
Liquid Culture: Mycelium suspended in a nutrient-rich solution. This advanced option allows for precise inoculation and can be used to create your own spawn. It offers the fastest colonization rates but requires more sterile technique.
Pro Tip: When purchasing spawn, examine it closely. Healthy spawn should appear white and vigorous, with no signs of contamination (green, black, or unusual colors). Quality spawn from reputable suppliers significantly improves success rates.
Substrate Selection for olive oysterling mushrooms
Olive Oysterlings show a strong preference for hardwood substrates. The best options include:
Oak: Offers excellent nutrition and durability, supporting multiple flushes over several years.
Maple: Provides balanced nutrition and good moisture retention.
Beech: Creates an ideal texture for mycelium penetration.
Elm: Less common but highly effective for Olive Oysterlings.
Alder: Good option in regions where other hardwoods are less available.
Avoid softwoods like pine, spruce, or cedar, as their natural resins inhibit mycelial growth.
Log Requirements
For optimal results, your logs should meet these specifications:
Freshness: Cut within 2-4 weeks of inoculation. This timing is crucial—logs cut too recently contain natural antifungal compounds that inhibit mycelium, while logs cut too long ago may already harbor competing fungi.
Bark Integrity: Logs must retain their bark, which provides natural protection against contaminants and helps maintain optimal moisture levels.
Diameter: 4-8 inches (10-20 cm) offers the ideal balance between ease of handling and sufficient substrate volume.
Length: 3-4 feet (0.9-1.2 meters) sections are manageable while providing adequate space for multiple inoculation points.
Drill and Drill Bits: A cordless drill with a 5/16 inch (8.5mm) bit for plug spawn or a 7/16 inch (12mm) bit for sawdust spawn.
Cheese Wax or Specialized Mushroom Wax: Used to seal inoculation holes, preventing contamination and moisture loss. Specialized mushroom wax is formulated to expand and contract with temperature changes without cracking.
Inoculation Tool: For sawdust spawn, a palm inoculator or specialized “thumb inoculator” makes the process more efficient. A clean spoon can work as a simple alternative.
Spray Bottle: Essential for maintaining humidity levels during both colonization and fruiting stages.
Humidity Gauge: While optional, this helps monitor environmental conditions more precisely.
Protective Tarp or Shade Cloth: Useful for outdoor incubation to protect logs from excessive sun exposure or extreme weather.
Step-by-Step Growing Instructions
1. Preparing Your Logs for olive oysterling mushrooms
Log Selection and Preparation:
Choose recently felled hardwood trees, ideally cut during dormant season (late fall to early spring) when sugar content in the wood is highest.
Before cutting, sanitize cutting tools with a 10% bleach solution to reduce contamination risk.
Cut logs to the recommended dimensions (3-4 feet long, 4-8 inches in diameter).
Allow logs to rest for 2-3 weeks after cutting but before inoculation. This resting period allows natural antifungal compounds to dissipate while ensuring the wood hasn’t begun to decompose.
Advanced Technique: Research indicates that soaking logs in cold water for 24-48 hours before inoculation can increase success rates by up to 30%. This process helps rehydrate the wood and leach out additional antifungal compounds.
2. Inoculation Methods
Standard Drill-and-Fill Method
Creating the Inoculation Pattern:
Drill holes in a diamond pattern, with rows staggered to maximize coverage.
Space holes 4-6 inches (10-15 cm) apart for optimal colonization speed.
Drill to a depth of 1-1.5 inches (2.5-4 cm), ensuring holes don’t penetrate through the log.
Inserting Spawn:
For plug spawn: Insert plugs fully into each hole, tapping gently with a hammer if needed.
For sawdust spawn: Use an inoculation tool or clean spoon to pack sawdust spawn firmly into each hole.
Sealing the Inoculation Sites:
Melt your wax in a dedicated container (an old pot or metal can works well).
Apply melted wax liberally over each inoculation site, creating a complete seal.
Ensure the wax extends slightly beyond the hole’s edge for a proper seal.
Expert Insight: Many cultivators mark the inoculation date on their logs using a permanent marker or aluminum tag. This simple step helps track colonization progress and predict fruiting times more accurately.
Totem Inoculation Method
This space-saving alternative is particularly effective for urban growers with limited space:
Building the Totem:
Place the first log section upright in a large plastic bag.
Cover the top surface with a generous layer of sawdust spawn (approximately ¼ inch thick).
Stack a second log directly on top of the spawn layer.
Continue alternating logs and spawn until you have 3-5 log sections stacked.
Incubating the Totem:
Gather the plastic bag around the totem and secure it at the top.
Place in a cool, shaded location for incubation.
Check occasionally for colonization progress.
Advantages:
Uses vertical space efficiently
Generally achieves faster colonization than traditional methods
Creates an attractive display when fruiting
Important Note: Totems typically have a shorter productive lifespan (1-2 years) compared to traditional log cultivation (2-3 years) but often produce more mushrooms per flush during their active period.
3. Incubation: The Patience Phase
The incubation period represents the longest phase of the cultivation process, typically lasting 6-12 months depending on environmental conditions and log characteristics.
Ideal Incubation Environments
Indoor Options:
Unheated basement or garage with stable temperature
Dedicated grow room with temperature control
Under beds or in closets (for smaller logs)
Outdoor Options:
Shaded woodland area
Under dense shrubs
North side of buildings where direct sunlight is minimal
Environmental Parameters
Temperature:
Optimal range: 65-70°F (18-21°C)
Acceptable range: 50-75°F (10-24°C)
Below 50°F (10°C), colonization slows significantly but doesn’t stop
Humidity:
Maintain 60-70% relative humidity around logs
In dry climates, consider periodic soaking (submerge logs in non-chlorinated water for 24 hours every 2-3 months)
Use loose plastic coverings or shade cloth to help retain moisture in outdoor settings
Stacking Configurations:
Crib Stack: Arrange logs in alternating layers like a log cabin for maximum air circulation
Lean-To Method: Lean logs against a support at a 60-70° angle
X-Pattern: Cross logs in an X formation to save space while maintaining air flow
Monitoring Colonization: White mycelium will become visible at the ends of logs and eventually through bark cracks. Full colonization is indicated by:
Visible white growth at log ends
White patches appearing at bark cracks
A slightly lighter weight as the mycelium begins breaking down the wood
A hollow sound when tapping the log (compared to the solid sound of an uncolonized log)
Less-Known Technique: Some commercial growers accelerate colonization by introducing beneficial bacteria like Bacillus subtilis to the logs. These bacteria can help suppress competing fungi while creating micro-environments favorable to Olive Oysterling mycelium.
4. Triggering Fruiting
Once logs are fully colonized, you’ll need to initiate fruiting conditions—essentially mimicking the environmental cues that trigger wild Olive Oysterlings to produce mushrooms.
The Cold Shock Method
The most reliable technique for triggering Olive Oysterling fruiting is a temperature drop combined with increased humidity:
Temperature Reduction:
Reduce ambient temperature to 40-60°F (4-16°C)
Ideal temperature is around 50°F (10°C)
Humidity Increase:
Raise humidity to 80-90%
Use frequent misting (3-4 times daily)
Soaking Process (optional but effective):
Submerge logs in cold water for 24 hours
Use non-chlorinated water (rainwater is ideal)
This mimics fall rain patterns that trigger wild fruiting
Fruiting Environment Options
Outdoor Fruiting:
Naturally effective during fall months in temperate climates
Place logs in shaded areas with good air circulation
Cover with burlap or shade cloth that’s regularly misted
Indoor Fruiting Chamber:
Convert a plastic storage bin with air holes
Use a humidifier or regular misting system
Provide indirect light for 6-8 hours daily
Ensure good air exchange without drying effects
Greenhouse Option:
Ideal for balancing humidity and light
Use shade cloth to prevent direct sunlight
Maintain cool temperatures with ventilation
Light Requirements: Olive Oysterlings need some light to develop properly—unlike the colonization phase, which can occur in darkness. Provide:
Indirect natural light or
12 hours of low-intensity artificial light (LED grow lights set to blue spectrum work well)
Signs of Imminent Fruiting
About 1-2 weeks after initiating fruiting conditions, watch for these indicators:
Small white to yellowish bumps appearing on the bark (primordia)
Areas of bark becoming slightly raised
Increased mycelial activity visible at log ends
5. Harvesting and Post-Harvest Handling
Optimal Harvest Timing
The perfect time to harvest Olive Oysterlings is when:
The caps have fully expanded but before edges begin to curl upward
The color is vibrant olive-green to brownish-green
The texture is still firm and resilient when gently pressed
Typically, this occurs 5-10 days after primordia first appear, depending on temperature conditions.
How to harvest your olive oysterling mushrooms?
Use a sharp, clean knife to cut the entire cluster at its base where it meets the log
Avoid pulling or tearing, which can damage mycelium and reduce future flushes
Harvest during dry conditions when possible to reduce moisture on the mushrooms
Handle gently to prevent bruising
Expert Tip: Harvest in the morning when mushrooms have the highest moisture content and nutritional value.
How to store and preserve olive oysterling mushrooms?
Fresh Storage:
Place harvested mushrooms in paper bags (not plastic) in the refrigerator
Store at 34-38°F (1-3°C)
Use within 5-7 days for optimal flavor and texture
Preservation Methods:
Drying: Slice mushrooms and dry at 110-120°F (43-49°C) until crisp
Freezing: Sauté briefly in butter, cool, then freeze in airtight containers
Pickling: Creates a delicious preservation option with extended shelf life
Powder: Completely dry mushrooms can be ground into powder for soups and sauces
Between Flushes
After harvesting, allow logs to rest for 6-8 weeks before initiating another fruiting cycle. During this rest period:
Some growers recommend a light “maintenance soak” (8-12 hours) between flushes
Keep logs in a cool, moderately humid environment
Avoid direct sunlight
Occasional light misting can be beneficial
Long-Term Maintenance and Productivity
Extending Log Productivity for olive oysterling mushrooms
While Olive Oysterling logs typically produce for 2-3 years, these strategies can maximize their productive lifespan:
Nutrient Supplementation:
After the first year, drill small holes between original inoculation points
Insert a mixture of hardwood sawdust and 10-20% wheat bran
Seal with wax as with original inoculation
Strategic Soaking Schedule:
Establish a regular soaking schedule (every 2-3 months)
Use collected rainwater when possible
Protection from Extreme Conditions:
Shield logs from temperatures below 20°F (-6°C) and above 85°F (29°C)
Provide adequate shade during summer months
In winter, stack logs and cover with straw for insulation
how to recognize the end of productivity for olive oysterling mushrooms?
Signs that logs are depleted include:
Significantly reduced yields (less than 25% of peak production)
Visible decomposition of the log structure
Appearance of competing fungi species
Bark beginning to slough off extensively
When logs are spent, they make excellent additions to compost piles or can be broken down to create mulch for garden beds.
Spawn Running: Creating Your Own Spawn
Advanced growers often create their own spawn from successful harvests:
Select healthy mushroom tissue from the inner stem of freshly harvested mushrooms
Place on sterilized agar medium
Transfer healthy mycelium to grain spawn
Use this to inoculate new logs
This process creates spawn adapted to your specific growing conditions and can improve success rates over time.
How to cook olive oysterling mushrooms?
Preparation Basics
Olive Oysterlings should be:
Cleaned with a dry brush or cloth (avoid washing if possible)
Cooked thoroughly (never consumed raw)
Prepared with complementary flavors like garlic, thyme, or soy sauce
Simple Sauté
The perfect way to appreciate the natural flavor of Olive Oysterlings
Ingredients:
1 pound fresh Olive Oysterlings, torn into bite-sized pieces
3 tablespoons butter or olive oil
3 cloves garlic, minced
1 tablespoon fresh thyme leaves
Salt and freshly ground black pepper to taste
1 tablespoon lemon juice
Instructions:
Heat butter or oil in a large skillet over medium-high heat
Add mushrooms and cook without stirring for 2-3 minutes to develop browning
Add garlic and thyme, stir, and continue cooking for 3-4 minutes until mushrooms are golden
Season with salt and pepper, finish with lemon juice
Serve immediately as a side dish or on toast
Troubleshooting Common Issues
Colonization Problems
Issue: No visible mycelium after 3-4 months
Possible Causes:
Low-quality or contaminated spawn
Logs too old or too fresh at inoculation
Extreme temperature fluctuations
Solutions:
Ensure proper log selection timing
Use spawn from reputable suppliers
Maintain more consistent environmental conditions
Fruiting Difficulties
Issue: Fully colonized logs not producing mushrooms Possible Causes:
Insufficient temperature drop
Inadequate humidity levels
Logs too dry internally Solutions:
Try a more dramatic cold shock (overnight temperature drop of 15-20°F)
Increase misting frequency or use a humidifier
Soak logs for 24-48 hours in cold water
Pest and Competitor Management
Issue: Unwanted fungi appearing on logs
Possible Causes:
Contaminated spawn
Incomplete wax sealing
Natural spore competition
Solutions:
Remove competing fungi manually
Move affected logs away from healthy ones
In severe cases, soak logs in salt water solution (2 tablespoons salt per gallon) for 12 hours
Frequently Asked Questions
Can I grow Olive Oysterlings indoors year-round?
Yes, Olive Oysterlings can be grown indoors throughout the year. For successful indoor cultivation:
Create a dedicated fruiting chamber with humidity control
Use a refrigerator or wine cooler to provide cold shock periods
Provide indirect light for 6-8 hours daily
Monitor temperature and humidity closely, as indoor environments can fluctuate
How do Olive Oysterlings compare to other oyster mushroom varieties?
Compared to common oyster mushrooms (Pleurotus ostreatus):
Olive Oysterlings have a firmer texture and more complex flavor
They require cooler temperatures for fruiting
They typically have a longer incubation period
They can be more resistant to some common contaminants
They generally produce fewer but larger mushrooms per flush
Can I use Olive Oysterlings medicinally?
While research is ongoing, preliminary studies suggest Olive Oysterlings contain:
Beta-glucans with immune-modulating properties
Antioxidant compounds that may help reduce oxidative stress
Antimicrobial compounds effective against certain bacteria
Always consult with a healthcare provider before using any mushroom for medicinal purposes.
How can I maximize yield from my Olive Oysterling logs?
To achieve optimal yields:
Use logs with 20-35% moisture content
Maintain proper spacing between inoculation points
Perform seasonal soaking (especially during dry periods)
Provide optimal fruiting conditions with temperature fluctuations
Harvest promptly to avoid spore release, which signals the end of a fruiting cycle
Is it possible to grow Olive Oysterlings on substrates other than logs?
While logs are the traditional and most reliable substrate, some growers have had success with:
Hardwood sawdust blocks supplemented with 10-20% wheat bran
Hardwood wood chips mixed with straw in a 80:20 ratio
Compressed hardwood fuel pellets rehydrated to proper moisture content
These alternative methods typically produce faster results but may not sustain as many fruiting cycles as logs.
Can I mix Olive Oysterling spawn with other mushroom species on the same log?
This is generally not recommended because:
Different species compete for the same resources
Optimal fruiting conditions vary between species
One species typically dominates, reducing overall yield
For best results, dedicate separate logs to different mushroom species.
Conclusion
Growing Olive Oysterling mushrooms offers a rewarding blend of science, patience, and hands-on cultivation. While the process requires an investment of time, the unique flavors, potential health benefits, and satisfaction of harvesting your own gourmet mushrooms make it well worth the effort.
Remember that each cultivation environment is unique—success often comes through observation, adaptation, and learning from each growing cycle. With proper techniques and attention to detail, your Olive Oysterling logs can provide delicious harvests for years to come.
Whether you’re a beginner mushroom cultivator or an experienced grower looking to diversify your fungi portfolio, Olive Oysterlings represent an excellent choice that connects you to seasonal growing rhythms while providing a culinary ingredient rarely found in markets.
Button mushrooms (Agaricus bisporus) are the unsung heroes of the culinary world and a perfect entry point for mushroom growing enthusiasts. These small white fungi are not only the most commercially cultivated mushrooms globally but also one of the most accessible species for home growers to master.
Whether you’re a complete beginner or have some experience with other fungi, this comprehensive guide will walk you through everything you need to know about growing these versatile mushrooms at home.
What makes Button Mushrooms special?
Button mushrooms are the same species as cremini and portobello mushrooms—they’re just harvested at different stages of maturity. These mushrooms offer:
Beginner-friendly cultivation: Relatively forgiving for new growers
Consistent yields: With proper care, they produce multiple flushes
Versatility in the kitchen: From salads to stir-fries, these mushrooms enhance countless dishes
Impressive nutrition: Low in calories yet high in protein, B vitamins, and minerals
Year-round growing potential: Can be cultivated indoors regardless of season
To successfully grow button mushrooms indoors, you’ll need:
Temperature control system: Button mushrooms prefer 60-65°F (15-18°C) during fruiting
Humidity monitoring tools: Hygrometers are essential as mushrooms require 80-90% humidity
Proper ventilation equipment: Fresh air exchange prevents CO₂ buildup and contaminants
Lighting setup: Indirect, diffused lighting works best
Sterilization tools: Pressure cooker or autoclave for substrate preparation
pH testing kit: Aim for slightly alkaline conditions (pH 7-7.5)
Personal tip: I’ve found that a small indoor greenhouse tent with a humidifier works wonders for maintaining perfect conditions without modifying your entire room.
The complete cultivation process for Button Mushrooms
1. Substrate Preparation
Button mushrooms require a nutrient-rich growing medium. Unlike oyster mushrooms that can grow on simple materials like straw, button mushrooms need a more complex substrate.
Traditional compost recipe:
40% fresh horse manure (primary nitrogen source)
40% wheat straw (carbon source and structure)
10% chicken manure (nitrogen boost)
5% gypsum (calcium source and pH adjuster)
5% agricultural lime (pH adjuster)
Phase I Composting
This initial decomposition process breaks down raw materials and kills competing organisms:
Mix all ingredients thoroughly, adding water until 65-70% moisture content is reached
Form a pile approximately 3ft high by 4ft wide
Turn the pile every 2-3 days to ensure even decomposition
Monitor internal temperature (should reach 160°F/71°C to kill pathogens)
Continue this process for 14-21 days until the compost darkens and becomes pliable
Phase II Pasteurization
This critical step eliminates ammonia and unwanted microorganisms:
Place compost in trays or containers 6-8 inches deep
Heat to 140°F (60°C) for 2 hours to kill insects and pests
Reduce temperature to 126°F (52°C) for 8-10 hours to eliminate harmful bacteria
Allow temperature to gradually drop to 75-80°F (24-27°C)
Troubleshooting tip: If your compost smells strongly of ammonia after Phase II, it’s not ready. Continue conditioning until the ammonia smell dissipates.
2. Spawn Selection and Inoculation
Types of Spawn
Spawn is essentially the mushroom “seed” material. For button mushrooms, options include:
Grain spawn: Typically rye or millet colonized by mushroom mycelium
Sawdust spawn: Hardwood sawdust blocks colonized by mycelium
Plug spawn: Wooden dowels colonized by mycelium (less common for button mushrooms)
For beginners, grain spawn is recommended as it colonizes compost more efficiently.
Inoculation Techniques
Allow compost to cool to 75°F (24°C) before introducing spawn
Break spawn into small pieces to distribute evenly
Mix thoroughly using the rate of 1lb spawn per 15-20lbs compost
Pack inoculated compost into trays or containers
Cover loosely with clean plastic to maintain humidity
Personal experience: When I first started growing, I tried to save money by using less spawn. Big mistake! Adequate spawn ensures faster colonization, reducing contamination risk.
3. Spawn run (Mycelium Development)
This is where patience becomes crucial:
Maintain temperature at 75-78°F (24-25°C)
Keep relative humidity at 85-90%
Ensure minimal light exposure
Allow 14-21 days for complete colonization
Monitor for even white mycelial growth throughout the substrate
During this time, the mycelium creates a network throughout the compost, digesting nutrients and preparing for fruiting.
4. Apply the casing layer
The casing layer is what triggers button mushrooms to form pins and fruit bodies:
Traditional Casing Mix:
80% sphagnum peat moss (pasteurized)
20% limestone or calcium carbonate
Water to reach field capacity (when squeezed, a few drops emerge)
Application Process:
Apply a 1-1.5 inch layer evenly across colonized compost
Lightly pat down but don’t compact
Mist with water to maintain moisture
Maintain at 75°F (24°C) for 5-7 days until mycelium begins to appear in casing
Insight from commercial growers: Adding a small amount of activated charcoal to your casing mix can help prevent diseases and improve moisture retention.
5. Pinning and fruiting conditions of Button Mushrooms
This is when visible mushroom formation begins:
Drop temperature to 60-65°F (15-18°C)
Maintain high humidity (85-95%)
Introduce indirect light (12 hours on/off cycle)
Increase fresh air exchange
Mist casing layer lightly to prevent drying out
You’ll notice small white dots (pins) forming within 7-14 days after casing. These will develop into harvestable button mushrooms over the next week.
6. Harvesting your Button Mushrooms
Proper harvesting ensures maximum yield and quality:
Harvest when caps are firm and closed, before the veil breaks
Gently twist and pull entire mushroom from substrate
Use a sharp knife to cut at base if twist method causes damage
Handle gently to prevent bruising
Harvest daily as mushrooms mature at different rates
Expected Yields: A well-managed indoor cultivation setup can produce approximately 5-7lbs of button mushrooms per square foot over three flushes.
7. Multiple Flush Management
Button mushrooms typically produce 3-4 flushes (harvests) from a single substrate:
After first harvest, lightly mist casing layer
Return to fruiting conditions
Wait 7-10 days for next flush to appear
Expect diminishing yields with each subsequent flush
Discard substrate after 3-4 flushes or when yields become minimal
Common Cultivation Challenges
Pest Management
The most common pests affecting indoor button mushroom cultivation:
Fungus gnats: Tiny flying insects that lay eggs in the substrate
Solution: Yellow sticky traps and reducing excess moisture
Mites: Microscopic arthropods that feed on mycelium
Solution: Maintain proper air circulation and humidity levels
Nematodes: Microscopic worms that damage mycelium
Solution: Proper pasteurization of all growing materials
Disease Prevention
Common diseases that affect button mushrooms:
Green mold (Trichoderma): Fast-growing green fungus that competes with mushroom mycelium
Prevention: Proper sterilization and clean cultivation practices
Prevention: Maintain proper humidity and avoid temperature fluctuations
Bacterial blotch: Brown spots on caps
Prevention: Avoid over-watering, ensure good air circulation
From experience: The best defense against all these issues is prevention through cleanliness. I keep a dedicated set of clothes for mushroom work and always shower before entering my grow room.
Advanced cultivation techniques for Button Mushrooms
Temperature Manipulation for Higher Yields
Research from Pennsylvania State University shows that a cold shock (dropping temperature to 50°F/10°C for 12 hours) can trigger more uniform fruiting in button mushrooms.
Controlled CO₂ Levels
Commercial growers maintain CO₂ levels between 800-1000ppm during fruiting. While hobbyists may not need CO₂ monitors, ensuring regular fresh air exchange helps manage CO₂ buildup.
Supplementing Substrate
Adding nitrogen supplements like soybean meal (1-2% by weight) to the substrate after Phase II composting can increase yields by 15-25% according to studies from the Mushroom Research Center.
Tips for Success
Start small: Begin with 1-2 trays until you understand the process
Keep detailed records: Track temperature, humidity, and results to improve
Practice patience: Mushroom cultivation rewards methodical growers
Join communities: Connect with other growers online to share experiences
Experiment gradually: Once you master basics, try different techniques
Sources and Further Reading
This guide synthesizes information from several authoritative sources:
Paul Stamets’ “The Mushroom Cultivator” (Ten Speed Press)
Pennsylvania State University’s Mushroom Research Center publications
The American Mushroom Institute’s cultivation guidelines
Journal of Agricultural and Food Chemistry research on Agaricus bisporus
Commercial cultivation practices from mushroom farms in Pennsylvania and the Netherlands
Happy growing! There’s nothing quite like watching your first pin set emerge from the casing layer. With patience and attention to detail, you’ll soon be enjoying the fruits of your mycological labor!
Frequently Asked Questions
1. How long does it take from start to harvest for button mushrooms?
Answer: The entire process from substrate preparation to first harvest typically takes 8-10 weeks. This includes approximately 2-3 weeks for composting, 2-3 weeks for spawn run, 1-2 weeks for casing colonization, and 2-3 weeks for fruiting. Subsequent flushes will appear every 7-10 days after the previous harvest.
2. Can I grow button mushrooms without manure?
Answer: Yes, though yields may be lower. Alternative substrates include:
Straw-based compost supplemented with cottonseed meal
Commercial mushroom growing kits that use pre-composted substrates
Synthetic compost utilizing agricultural byproducts like spent brewery grains
These alternatives are especially useful for indoor growers concerned about odors. However, traditional manure-based compost typically produces the highest yields due to its nutrient profile.
3. Why do my button mushrooms develop brown spots?
Answer: Brown spots on button mushrooms usually indicate bacterial blotch, which is caused by:
Excessive moisture on mushroom caps
Poor air circulation
Watering directly onto developing mushrooms
Pseudomonas bacteria contamination
To prevent this, improve ventilation, water only the casing layer (not the mushrooms), and maintain clean growing conditions. If brown spots appear, harvest affected mushrooms immediately to prevent spread.
4. Do I need a special strain of button mushroom for indoor growing?
Answer: While wild Agaricus bisporus strains exist, commercial cultivation strains have been selectively bred for indoor growing conditions. For best results, purchase spawn from reputable suppliers that offer strains specifically developed for home cultivation. These strains typically have better resistance to common diseases and are adapted to perform well in controlled indoor environments.
5. Is a casing layer absolutely necessary for button mushrooms?
Answer: Yes, unlike some other mushroom species, button mushrooms (Agaricus bisporus) absolutely require a casing layer to fruit properly. The casing layer:
Creates a microclimate that initiates pinning
Maintains moisture levels critical for fruiting
Provides a protective barrier for developing mushrooms
Contains beneficial microorganisms that stimulate fruiting
Without a proper casing layer, the mycelium may fully colonize the substrate but fail to produce mushrooms or produce very poor yields.
6. Can I reuse the substrate for another batch of mushrooms?
Answer: After 3-4 flushes, the substrate is generally depleted of nutrients and should not be used for another batch of button mushrooms. However, it has several valuable uses:
As a soil amendment for garden beds (fully composted spent substrate is excellent for plants)
To grow outdoor garden mushrooms in summer months (placed in shaded areas)
As a component (10-20%) in new compost batches
The substrate should be thoroughly pasteurized again before any reuse to eliminate potential disease organisms.
7. How do I know if my substrate is properly colonized before applying the casing layer?
Answer: A properly colonized substrate will show these signs:
Even, white mycelial growth throughout the entire substrate
A slightly sweet, mushroom-like smell (no ammonia or sour odors)
The substrate holds together when gently handled
Temperature stabilized (no more heat generation from composting)
If you observe uncolonized patches, allow more time before casing. Rushing to case before full colonization increases contamination risks and reduces yields.
8. What is the ideal room size for a home button mushroom operation?
Answer: For a hobbyist or small-scale grower, a dedicated space as small as 6′ x 6′ (36 square feet) can be sufficient to produce 5-10 pounds of mushrooms weekly. This space should accommodate:
Growing shelves for 4-6 standard trays (16″ x 24″)
Work area for preparation and harvesting
Storage for supplies
Room for air circulation equipment
Temperature-controlled basements or spare rooms work well. The space should allow for easy cleaning and have access to electricity for temperature/humidity control systems.
9. How do I prevent contamination in my mushroom growing area?
Answer: Contamination prevention is critical for successful cultivation:
Designate clean clothes and footwear for your growing area
Install a HEPA air purifier to reduce airborne contaminants
Clean all surfaces with 70% isopropyl alcohol before working
Work with spawn in still air (avoid drafts and ventilation during inoculation)
Use a face mask to prevent breathing onto sterile materials
Consider using UV sterilization lamps when the growing area is unoccupied
Maintain a positive pressure environment if possible (air flows out, not in)
Remember that prevention is much easier than treating contamination once it appears.
10. Can I grow white and brown button mushrooms (cremini) using the same method?
Answer: Yes, white button mushrooms and brown button mushrooms (cremini) are the same species (Agaricus bisporus) with different strain characteristics. The cultivation process is identical for both varieties. The main differences are:
Brown varieties typically have a slightly stronger flavor
Some brown strains may be more resistant to certain diseases
Brown varieties often command higher market prices
White varieties tend to show contamination more visibly
You can even grow both varieties simultaneously using the same methods, equipment, and growing conditions
The Poplar Mushroom, or Pioppino or Black Poplar Mushroom, is the edible fungus Agrocybe aegerita. This delicious mushroom has a unique sweet, nutty flavour and meaty texture. Poplar Mushrooms typically grow on dead hardwood trees and stumps in the wild. However, they can also be easily cultivated at home, both indoors and outdoors.
This article provides step-by-step instructions for beginners on how to grow Poplar Mushrooms at home using ready-made grow kits or homemade substrates.
Substrate selection for growing Black Poplar Mushrooms
If you’re looking to grow black poplar mushrooms (Cyclocybe aegerita) and want killer yields, nailing the right substrate is non-negotiable. Let’s break it down into simple, actionable insights.
1. Non-Woody Substrates (Top Performer!)
What Works: Use 78% wheat straw + 20% wheat bran.
Why It’s Gold: This mix hits a biological efficiency (BE) of 194%! That means you’re getting almost double the mushrooms for your effort.
Pro Tip: Wheat bran supercharges the process by adding essential nutrients to fuel mycelium growth.
2. Woody Substrates (The Sustainable Choice)
Recipe for Success:
73% wood chips
10% wheat bran
10% cottonseed
5% wheat seed
Why It’s Smart: Delivers a solid BE of 123% and is great for those who prefer long-lasting substrate options.
Extra Advantage: Wood chips decompose slower, giving your mushrooms a steady growth environment.
Results You’ll Love: High yield and excellent biological efficiency without breaking the bank.
Best Use Case: Perfect for beginners and large-scale growers alike.
Why Substrate Matters
Your choice of substrate for black poplar mushrooms directly affects your yield and profits. Whether you go with wheat straw, wood chips, or paddy straw, optimizing the mix ensures maximum results.
Start with the substrate that fits your resources and goals—and watch your harvest thrive!
What Is the Ideal Temperature for Black Poplar Mushroom Growth?
Temperature control is one of the most critical factors in growing black poplar mushrooms. The right temperature ensures rapid mycelium development and proper fruiting, so let’s break it down.
Mycelial Growth Temperature: 75–82°F (24–28°C)
This temperature range is perfect for mycelium—the underground network that will eventually produce mushrooms. Here’s why:
Optimal Growth Zone: Mycelium spreads quickly at 75–82°F, colonizing the substrate efficiently.
Avoid Extremes: Temperatures below 75°F will slow mycelial growth, while anything above 82°F can increase the risk of contamination.
Fruiting Temperature: 59–68°F (15–20°C)
Once the substrate is fully colonized, it’s time to shift to fruiting conditions:
Cooler Temps Trigger Fruiting: A temperature drop to 59–68°F mimics the natural environment, signaling the mycelium to form mushrooms.
Consistency Is Critical: If the temperature exceeds 68°F, the fruiting process may stall. Temperatures below 59°F will slow mushroom development.
Pro Tips:
Use a thermostat to maintain precise control over temperature during both phases.
Place thermometers at the substrate level and in the air to track actual growing conditions.
How Long Does It Take for Black Poplar Mushrooms to Grow?
When conditions are ideal, black poplar mushrooms grow fast. You can expect to go from inoculation to harvest in just 4–6 weeks, depending on temperature, humidity, and substrate quality.
Growth Timeline: Week by Week
Inoculation Phase (Week 1):
Introduce the spawn (mycelium) into your prepared substrate.
Key Tip: Sterile conditions are essential to avoid contamination.
Mycelial Colonization (Weeks 2–4):
Maintain temperatures at 75–82°F (24–28°C).
Mycelium will spread across the substrate, turning it into a white, web-like structure.
Humidity Check: Keep substrate moisture at 60–65% during this stage.
Fruiting Phase (Weeks 5–6):
Reduce temperatures to 59–68°F (15–20°C).
Small mushroom pins will appear within 7–10 days, growing into mature fruiting bodies over the next week.
Pro Tip: Maintain humidity at 80–90% and provide indirect light to encourage proper cap development.
Growing Poplar Mushrooms Indoors
Growing Poplar Mushrooms indoors typically involves using either a pre-colonized grow kit or inoculating your own substrate.
Using a Grow Kit
Grow kits provide an easy introduction to mushroom cultivation for beginners. Kits come pre-colonized with mycelium and are ready to fruit when you receive them.
Here are the basic steps when using a Poplar Mushroom grow kit:
Select a growing area – Choose a spot between 55-65°F (13-18°C) with indirect sunlight.
Set up the grow kit – Carefully open the grow kit, following any specific instructions. Stand the block upright and loosen the bag to allow air flow.
Maintain humidity – Mist the inside of the bag 1-2 times daily to keep humidity levels above 90%. Avoid directly spraying the mushrooms.
Harvest mushrooms – Use scissors to cut mature mushroom clusters away from the block gently—target clusters where caps have just started to flatten. Store freshly harvested mushrooms in paper bags in the refrigerator for up to 14 days.
Subsequent flushes – Keep the kit in ideal growing conditions to produce 1-2 more flushes. Yield will decrease with each flush. Discard after the 3rd flush.
Using Your Own Substrate
You can also grow Poplar Mushrooms by inoculating your sterilized hardwood substrate, such as sawdust, wood chips, or straw. This involves a few more steps but allows you to reuse the substrate for multiple grow cycles.
Here is the basic homemade substrate process:
Choose a substrate – Hardwood sawdust, wood pellets, or chopped straw work well. Submerge in water for 24 hours to hydrate.
Pasteurize – Pasteurize the substrate to kill contaminants by submerging in 160-180°F (71-82°C) water for 1-2 hours. Allow to cool overnight.
Inoculate – Mix pre-colonized grain or liquid mushroom spawn into the cooled substrate in a ratio of at least 10% spawn. Transfer to jars, bags, or other containers.
Colonize – Store inoculated containers around 75°F (24°C) for 14-30 days until the spawn fully colonises the substrate.
Fruit – Once colonized, move containers to a humidity chamber or tent. Maintain 55-65°F (13-18°C) and above 90% humidity. Harvest mushrooms as they mature.
Repeat flushes – Keep ideal fruiting conditions to produce 1-3 flushes. Each flush will be smaller than the last.
Growing Poplar Mushrooms Outdoors
Growing Poplar Mushrooms outdoors involves inoculating logs or beds of wood chips or straw. This takes more time and effort than indoor cultivation but can provide an ongoing supply once established.
The basic outdoor cultivation steps are:
Obtain substrate – Use untreated hardwood logs or wood chips/straw for mushroom beds.
Pasteurize (optional) – Soak logs in water for 24 hours or heat wood chip beds to 160°F (71°C) for 6 hours to kill competitors.
Inoculate – Insert grain or sawdust mushroom spawn into drilled holes in logs or mix spawn into mushroom beds. Seal with wax (logs) or cover with burlap (beds).
Colonize – Leave inoculated logs/beds undisturbed for 12-24 months until fully colonized by mycelium. Mist occasionally.
Fruit – Move colonized logs or uncover beds once pinheads start to form. Maintain moisture. Harvest mushrooms as they mature.
Repeat flushes – Inoculated logs and beds will continue fruiting for years with proper care and moisture.
Growing tasty Poplar Mushrooms at home is an enjoyable hobby and a great way to add nutrient-rich mushrooms to your diet. With the right temperature, humidity, and substrate conditions, beginners and experts can cultivate a successful harvest. Start with a grow kit or make your own substrate for a fun gardening project!
How to store poplar mushrooms?
After harvesting, it’s crucial for me to store my poplar mushrooms properly to ensure they retain their flavor and potent nutrients. I share with fellow growers my experience and guidelines for storing poplar mushrooms, ensuring they can enjoy their harvest well after the picking season concludes.
Refrigeration and Short-term Storage Solutions
For a brief window post-harvest, I recommend refrigeration to maintain the freshness of the mushrooms. Storing these delicate fungi in a breathable container and placing them in the cooler part of the fridge can significantly decelerate spoilage. This method of storing poplar mushrooms allows me to enjoy their earthy goodness in dishes I wish to prepare shortly after harvest.
Preserving Techniques: Drying and Freezing
To extend their usability beyond a mere few days, I’ve found that preserving poplar mushrooms through drying and freezing is an effective method. Drying desiccates the fungi, thwarting any mold wishing to take up residence. This technique gives me a ready-to-use ingredient that I can easily rehydrate when the recipe calls for it.
Alternatively, freezing is another viable way I keep my poplar mushroom harvest. Simple steps like cleaning, slicing, and flash-freezing individual pieces before transferring them to airtight containers have proven both practical and convenient.
FAQ
What is the ideal light condition for fruiting Poplar Mushrooms?
Indirect natural light or regular room lighting for 8+ hours per day works best. Avoid direct sunlight.
Can I grow Poplar Mushrooms at normal room temperature?
No, Poplar Mushrooms require cooler temperatures between 50-68°F (10-20°C) to fruit well. Use a grow tent, wine cooler, or other methods to maintain this temperature range.
How often should I mist or fan the Poplar Mushrooms?
Mist 1-2 times per day to maintain humidity above 90%. Fan only if excessive moisture builds up. Avoid directly spraying developing mushrooms.
What is the average yield per flush when growing Poplar Mushrooms?
On average, you can expect 200-450g (0.4-1lb) fresh weight of mushrooms per flush when using a commercial grow kit or quality homemade substrate.
Can I grow Poplar Mushrooms outdoors?
Yes, inoculate hardwood logs or beds of wood chips/straw. This takes 12-24 months before producing mushrooms though.
How do I harvest Poplar Mushrooms?
Carefully twist or cut mushroom clusters away from the substrate when caps start to flatten out. Store freshly picked mushrooms in the refrigerator.
What is the shelf life of freshly harvested Poplar Mushrooms?
Properly stored in the refrigerator, fresh Poplar Mushrooms typically last 7-14 days in a paper bag or loose plastic bag.
Can I reuse substrate from a Poplar Mushroom grow kit to cultivate more mushrooms?
No, commercial grow kits are designed for 1-3 flushes of mushrooms. Make your own reusable hardwood substrate instead.
Is it safe to grow edible mushrooms at home?
Yes, with proper pasteurization, clean technique, and consistent environmental conditions, it is generally safe to cultivate edible mushrooms at home.