Everything you need to know about cultivating Trametes versicolor at home
You can grow turkey tail mushrooms using three proven methods: grow kits (easiest, ready in 2-4 weeks), log cultivation (best yields, 6-12 months), or sawdust blocks (year-round control, 3-4 months). Beginners should start with grow kits costing $15-30 that include everything needed.
You’ve probably seen turkey tail mushrooms growing on dead logs during forest walks and wondered if you could cultivate these medicinal fungi at home.
Turkey Tail mushrooms (Trametes versicolor), also known as “cloud polypore” are gaining popularity due to their potential health benefits. These versatile fungi boast a beautiful fan-shaped appearance and are prized for their medicinal properties. Growing Turkey Tail mushrooms at home is surprisingly achievable, even for beginners with the right knowledge and equipment.
Top 3 turkey tail growing methods compared
Method
Timeline
Cost
Difficulty
Best For
Grow Kits
2-4 weeks
$15-30
⭐
Beginners, indoor growing
Log Cultivation
6-12 months
$5-10/log
⭐⭐⭐
Long-term yields, outdoor space
Sawdust Blocks
3-4 months
$8-15
⭐⭐⭐⭐
Year-round control, experienced growers
Choose your cultivation method
Grow kit method
Ideal for: Complete beginners with limited space and equipment.
The grow kit method is the simplest way to get started with turkey tail cultivation. These kits come pre-inoculated with turkey tail mycelium and require minimal setup.
Pros:
No specialized equipment needed
Step-by-step instructions included
High success rate
Can be grown indoors year-round
Cons:
Less customization
Higher cost per harvest
Usually smaller yields than DIY methods
How to grow turkey tail mushrooms on logs
Ideal for: Those with outdoor space and patience for longer-term results.
The log method is the most traditional and natural way to grow turkey tail mushrooms. It involves inoculating hardwood logs with turkey tail spawn.
Pros:
Most natural growing environment
Logs can produce for years
Larger yields over time
More sustainable
Cons:
Longer waiting period for first harvest (10-12 months)
Requires outdoor space
More labor-intensive initially
Growing turkey tail mushrooms indoors with sawdust blocks
Ideal for: Intermediate growers looking for faster results than logs.
This method uses sterilized sawdust blocks supplemented with nutrients to grow turkey tail mushrooms indoors.
Pros:
Faster colonization than logs
Can be done indoors
More control over growing conditions
Higher yields than grow kits
Cons:
Requires more equipment (pressure cooker/autoclave)
More technical knowledge needed
Higher contamination risk
Instagram @fungiwoman
Growing turkey tail mushrooms using a kit
If you’re new to mushroom cultivation, starting with a grow kit is the most straightforward approach. Here’s how to succeed with a turkey tail grow kit:
Unbox and inspect your kit. Check that the mycelium (white, thread-like growth) is visible and there’s no contamination (unusual colors or smells).
Find an appropriate location. Choose a spot with indirect light and temperatures between 68-77°F (20-25°C). Avoid direct sunlight or heating/cooling vents.
Follow the kit’s specific instructions. Most kits require you to open the bag, mist with water, and place in the humidity tent.
Maintain proper humidity. Mist the inside of the humidity tent 1-2 times daily to maintain high humidity levels. Don’t spray directly on the growing substrate.
Watch for primordia formation. Small bumps or “pins” will start to form, which will develop into turkey tail mushrooms. This typically begins 2-4 weeks after setting up the kit.
Allow for proper air exchange. While humidity is important, so is fresh air. Open the humidity tent briefly each day to allow for air exchange.
Be patient. Turkey tail mushrooms grow more slowly than culinary varieties like oyster mushrooms. Full development can take several weeks
Growing turkey tail mushrooms on logs
Log cultivation is the most traditional method for growing turkey tail mushrooms and produces the most natural results. Here’s how to do it:
Materials needed
Freshly cut hardwood logs (oak, maple, beech, alder, or birch)
Turkey tail spawn (dowel plugs or sawdust spawn)
Drill with 12mm (1/2 inch) bit
Hammer (for dowel plugs) or spawn applicator (for sawdust)
Wax (cheese wax or beeswax)
Brush for applying wax
Heat source for melting wax
Step-by-step process
Select appropriate logs. Choose hardwood logs cut from healthy living trees within the last 4-5 weeks. Logs should be 4-8 inches in diameter and 2-3 feet long
Clean the logs. Brush off any dirt, moss, or lichen from the bark without damaging it. This helps prevent contamination from competing fung.
Drill holes in the logs. Create holes approximately 1-1.5 inches deep using a 12mm drill bit. Space holes about 6 inches apart in a diamond pattern around the log.
Inoculate the logs.
For dowel spawn: Tap the dowels into the drilled holes with a hammer until they’re flush with the bark
For sawdust spawn: Use an inoculator tool or improvise with a turkey baster to fill each hole with spawn
Seal with wax. Melt the wax and apply it over each inoculated hole to prevent contamination and moisture loss. Some growers also seal the cut ends of the logs
Place logs in an appropriate location. Find a shady, moist area outdoors. You can lay logs on the ground, lean them against a structure, or stack them in a log crib.
Wait for colonization. Turkey tail mycelium needs about 10-12 months to fully colonize a log. During this time, maintain moisture by watering during dry periods.
Watch for fruiting. The first mushrooms typically appear in late summer or early fall of the year following inoculation. Logs can continue producing for 3-5 years.
Growing turkey tail mushrooms on sawdust blocks
The sawdust block method for growing turkey tail mushrooms is indeed an excellent choice for intermediate growers seeking faster results than log cultivation. Here are the key details of this method:
Substrate Preparation
The ideal substrate mix for turkey tail mushrooms on sawdust blocks typically consists of:
78% hardwood sawdust or hardwood fuel pellets
20% wheat bran (or other nitrogen-rich supplements like rice bran)
1% gypsum
1% brown sugar
Water to achieve 60-65% moisture content
Sterilization Process
Sterilization is crucial to prevent contamination. The substrate should be sterilized by:
Boiling the moistened sawdust mixture in a large pot or container
Maintaining the boil for 1-2 hours to eliminate competing microorganisms
Allowing the mixture to cool before inoculation
Inoculation and incubation
After sterilization:
Mix turkey tail spawn thoroughly into the cooled substrate
Pack the inoculated mixture into filter-patch bags or containers with small air holes
Incubate in a dark, warm environment (70-75°F or 21-24°C) for about 2-3 weeks
Colonization and fruiting
For optimal results:
Allow the mycelium to colonize and form a thick layer for about 3 months in the high CO2 environment of the sealed bag
Remove the top 1/4 to 1/3 of the bag to expose the colonized substrate
Place in a fruiting chamber with proper humidity and indirect light
Harvest the thick layer of fruit bodies that form on the exposed surface
Advantages of the sawdust block ,ethod
Faster colonization compared to logs, with fruiting possible in as little as a few weeks
Can be done indoors, allowing for year-round cultivation
Provides more control over growing conditions, leading to more consistent yield
Higher yields compared to grow kits
Challenges
Requires specialized equipment like a pressure cooker or autoclave for proper sterilization
Demands more technical knowledge and attention to sterile technique
Higher risk of contamination if proper procedures are not followed
Tips for successful Turkey Tail cultivation
Here are some additional tips to enhance your chances of successfully cultivating Turkey Tail mushrooms at home:
Maintain optimal conditions:
Temperature: Aim for a consistent temperature range between 68°F and 77°F (20°C and 25°C) during the colonization and fruiting stages.
Humidity: Maintain high humidity levels, around 80-90%, throughout the fruiting stage. Regularly misting the fruiting chamber or using a humidifier can help achieve this.
Airflow: Provide adequate fresh air exchange to prevent stagnation and promote healthy fungal growth. Create small holes in the grow bags or fruiting chamber for passive air circulation.
Light: While direct sunlight should be avoided, some indirect sunlight can be beneficial during fruiting. Aim for around 12 hours of diffused light per day.
Prevent contamination:
Sterilization: Ensure proper sterilization of all equipment and materials used in the cultivation process to minimize the risk of contamination. This is especially crucial for the DIY method.
Cleanliness: Maintain a clean and hygienic environment throughout the cultivation process. Wash your hands thoroughly before handling any materials or mushrooms.
Monitoring: Regularly inspect your grow kits or DIY setups for signs of mold or other contaminants. If contamination occurs, isolate and dispose of the affected materials promptly to prevent further spread.
Be patient!
Patience: Cultivating mushrooms takes time. Be patient and allow the mycelium to colonize the substrate fully before expecting fruiting bodies to appear.
Experimentation: As you gain experience, you can experiment with different substrates, spawn types, and fruiting conditions to optimize your results.
How to harvest turkey tail mushrooms properly
Instagram @mushroom__mama_official
Proper harvesting techniques ensure continued production while maintaining mushroom quality for medicinal use.
When to harvest turkey tail mushrooms
You should harvest turkey tail mushrooms when they reach full size but before the edges become brittle and dry. Fresh specimens have vibrant colors and slightly flexible texture.
Timing indicators: Harvest when mushrooms are 2-6 inches (5-15 cm) across with distinct color zones. Avoid specimens with faded colors, insect damage, or completely rigid texture.
Seasonal considerations: Prime harvesting occurs during active growing periods in spring and fall when mushrooms are fresh and potent.
Harvesting technique and tools
Cutting method: Use sharp scissors or a knife to cut mushrooms at the base, leaving the attachment point intact. This allows potential regrowth from the same location.
Sustainable practices: Take only what you need and leave smaller specimens to mature. Harvest no more than 75% of mushrooms from any single location to support ecosystem health.
Processing fresh turkey tail after harvest
Cleaning process: Remove debris with a soft brush, avoiding water unless absolutely necessary. Trim any tough or damaged portions before processing.
How to store Turkey Tail Mushrooms
Storing turkey tail mushrooms properly is essential to maintain their quality, potency, and longevity. Here are the best methods for storing both fresh and dried turkey tail mushrooms:
Storing Fresh Turkey Tail Mushrooms
1. Refrigeration
Container: Store fresh turkey tail mushrooms in a breathable container, such as a paper bag or a loosely covered container. Avoid plastic bags or airtight containers as they trap moisture and can cause the mushrooms to spoil quickly.
Temperature: Place the container in the refrigerator at a temperature between 34-38°F (1-3°C).
Moisture Control: To prevent excess moisture, place a dry paper towel or a clean cloth in the container with the mushrooms to absorb any residual moisture.
Shelf Life: Fresh turkey tail mushrooms are best used within a week to ensure optimal flavor and texture.
Storing Dried Turkey Tail Mushrooms
1. Airtight Containers
Store dried turkey tail mushrooms in an airtight container to protect them from moisture and humidity. Glass jars or resealable bags with the air squeezed out are ideal.
Keep the container in a cool, dark place, such as a pantry or cupboard, to avoid exposure to light which can degrade the quality over time.
Label the container with the name and date of the dried mushrooms to keep track of their freshness.
Dried mushrooms can be stored for several years, but it is best to use them within a year for optimal flavor and potency.
2. Adding Moisture Absorbers
For long-term storage, consider adding an oxygen absorber or food-safe silica desiccant packet to the container. This helps to absorb any residual moisture and keeps the mushrooms fresh.
Freeze your Turkey Tail Mushrooms
Clean the mushrooms thoroughly and remove any dirt or debris.
Blanch the mushrooms by boiling them for 1-2 minutes, then immediately transfer them to a bowl of ice water to cool. This step helps preserve their quality and extend their shelf life.
Divide the mushrooms into portion sizes that you are likely to use at once. This makes it convenient to defrost only what you need.
Place the portions in airtight containers, freezer bags, or vacuum-sealed bags.
Label each container with the name and date.
Store the containers in the freezer. Frozen turkey tail mushrooms can be stored for up to 12 months.
Preparation: Steep dried turkey tail mushrooms in alcohol (such as vodka) for several weeks.
Storage: Store the tincture in a cool, dark place away from direct sunlight. Tinctures can last for several years if stored properly.
By following these storage methods, you can ensure that your turkey tail mushrooms remain fresh and potent, allowing you to enjoy their medicinal benefits for an extended period.
Where do turkey tail mushrooms grow?
Turkey tail mushrooms are highly adaptable and can be found in a variety of environments across the globe. Here are some key details about their natural habitat:
Turkey tail mushrooms are found almost anywhere in the world, including North America, Europe, Asia, and other regions. They are particularly prolific in North America and are one of the most common forest mushrooms.
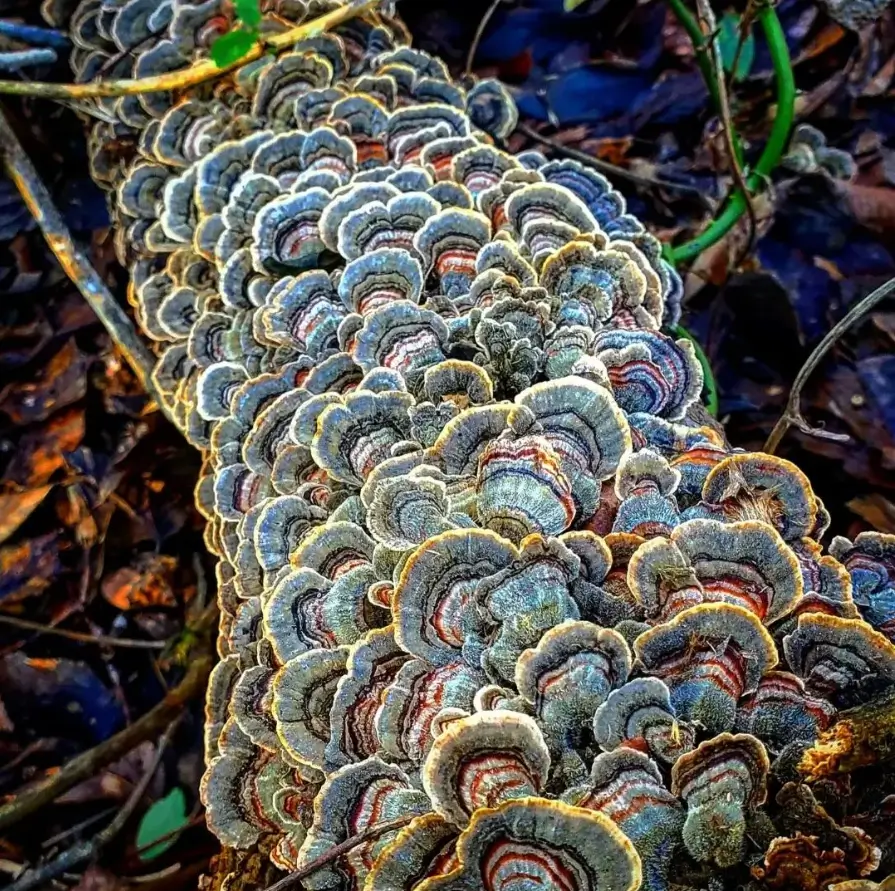
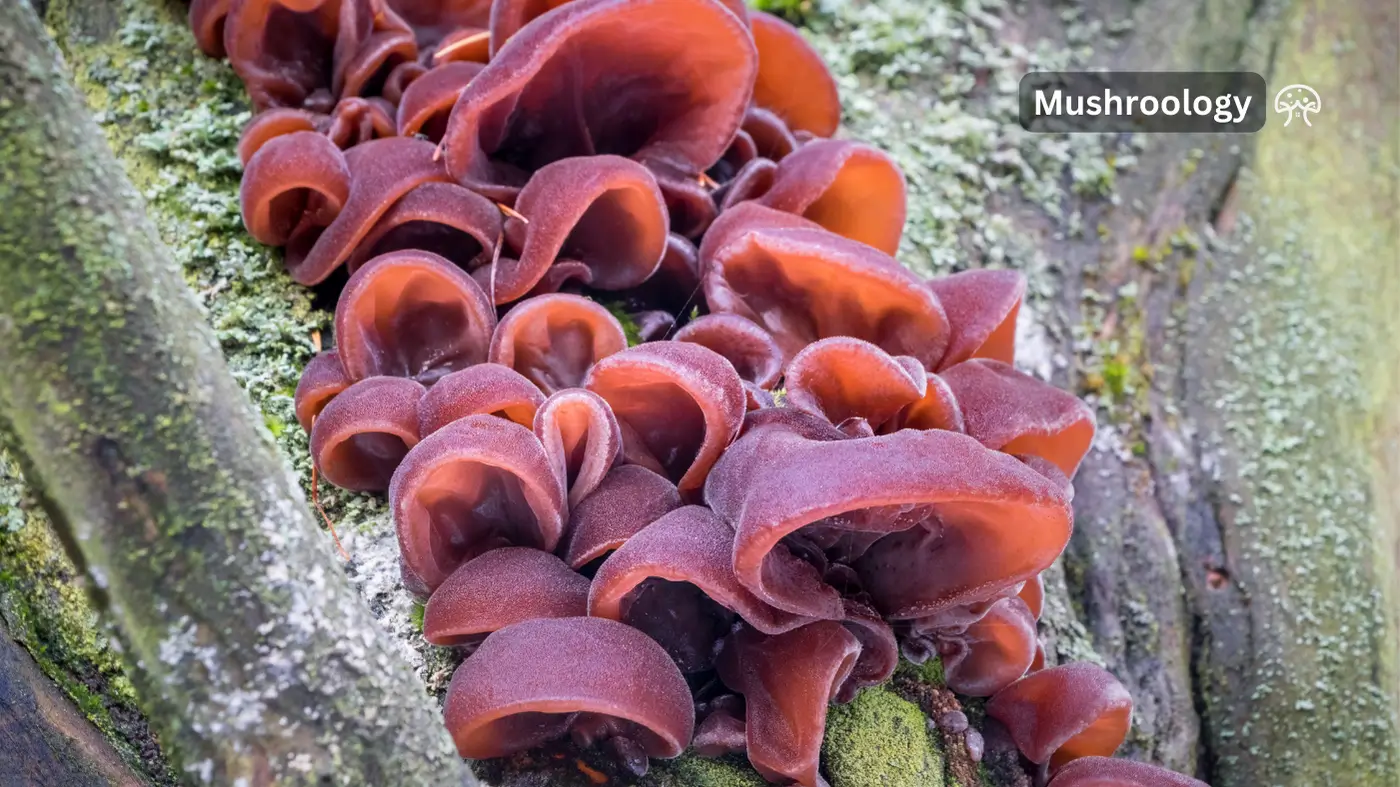
Turkey tail mushrooms primarily grow on dead or decaying hardwood logs, stumps, and fallen branches. They are saprotrophic, meaning they feed on decomposing organic matter, which helps in nutrient recycling in forest ecosystems.
They are most commonly found on hardwood trees such as oak, beech, maple, and birch. Occasionally, they can also grow on coniferous trees like fir and pine.
These mushrooms can grow year-round, but they are most noticeable and abundant in the autumn and winter months when they release their spores.
Ecological Role
Turkey tail mushrooms play a crucial role in breaking down tough materials in wood, returning nutrients to the soil, and maintaining forest health.
They cause white rot in the wood they colonize, which helps decompose lignin and cellulose, the primary components of wood.
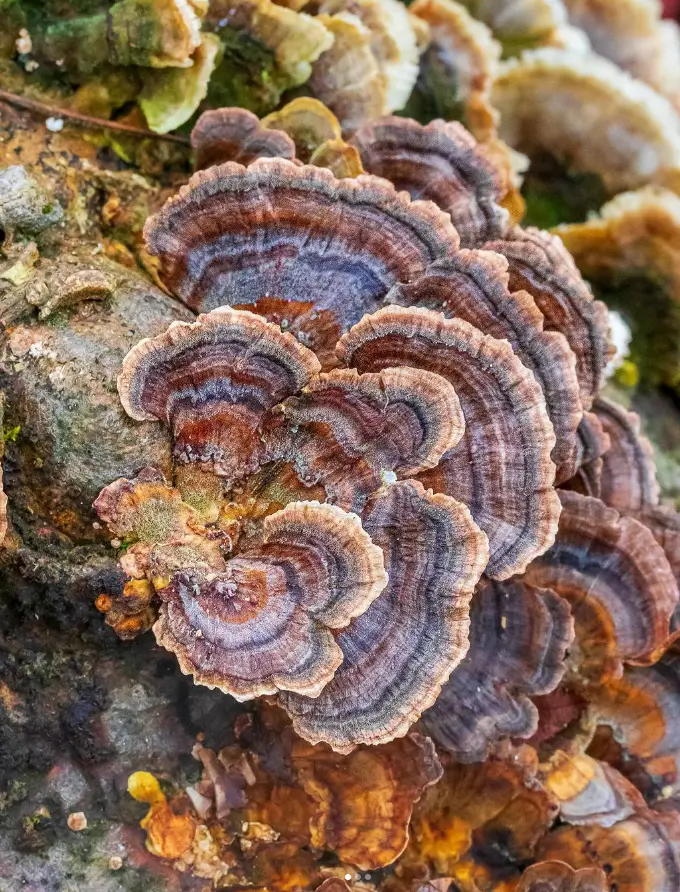
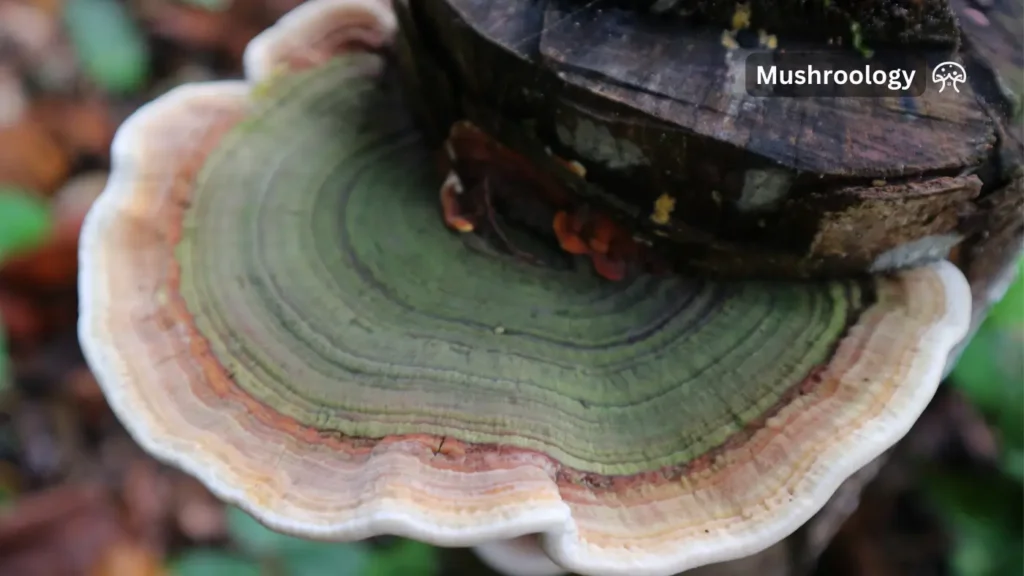
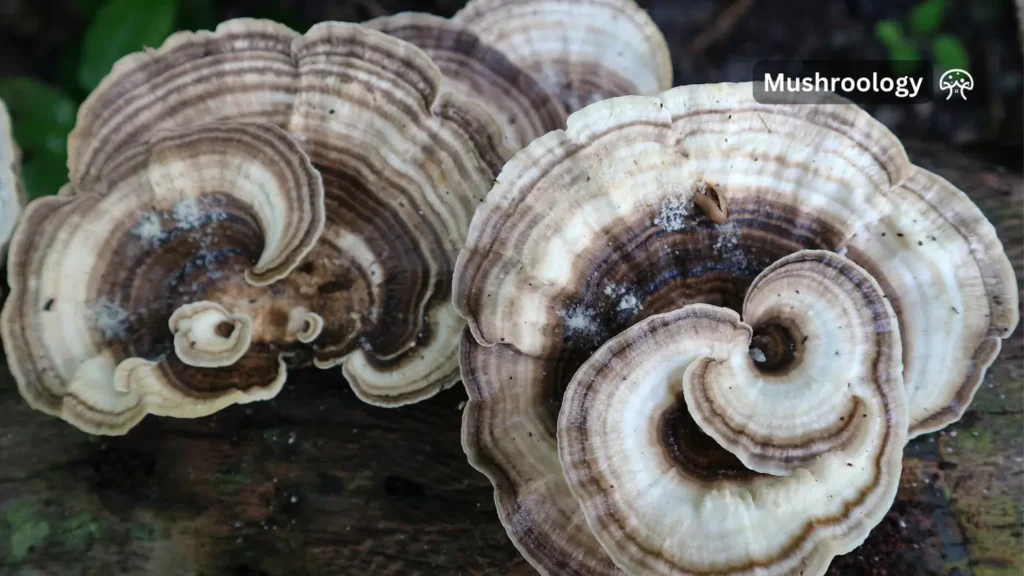
Turkey tail mushrooms are recognized by their multicolored, concentric zones on the cap, which resemble a turkey’s tail feathers. The underside of the cap is white and porous.
They often grow in groups, rows, or clusters, forming layered structures on the wood.
When foraging, look for them on the trunks of downed trees, dead stumps, or branches in deciduous forests. They are relatively easy to find due to their distinctive appearance and widespread presence.
Ensure proper identification by checking for the characteristic multicolored bands and white porous underside to avoid confusing them with lookalikes such as the false turkey tail (Stereum ostrea).
FAQs About Turkey Tail Mushroom
What is turkey tail mushroom?
Turkey tail mushroom (Trametes versicolor) is a type of medicinal fungus that grows on dead logs and trees worldwide. It gets its name from the colorful stripes on its cap, which resemble the tail feathers of a wild turkey. It has been used in traditional medicine for centuries, particularly in Asia.
2. What are the potential health benefits of turkey tail mushroom?
Turkey tail is rich in antioxidants and polysaccharides, such as PSK (polysaccharide-K) and PSP (polysaccharide-peptide), that have been studied for their potential benefits on the immune system. Research suggests it may help boost the immune response in people with certain cancers when used alongside conventional treatments like chemotherapy. Additionally, it is being studied for its potential role in gut health and fighting infections.
3. How is turkey tail mushroom consumed?
Turkey tail is typically consumed as a supplement in capsule or powder form, or as an ingredient in teas and soups. It is not typically eaten as a culinary mushroom due to its tough texture.
4. Are there any side effects of turkey tail mushroom?
Turkey tail is generally considered safe for consumption, but some people may experience mild side effects such as upset stomach, nausea, or darkened stools. It’s essential to consult with your doctor before taking turkey tail supplements, especially if you are pregnant, breastfeeding, or have any underlying health conditions.
5. Where can I buy turkey tail mushroom?
Turkey tail mushroom supplements can be found at health food stores, pharmacies, and online retailers. It’s important to choose reputable brands that offer high-quality, pure extracts.
6. What is the best way to grow turkey tail mushrooms?
The most common and effective way to cultivate turkey tail mushrooms is on hardwood logs, such as oak, maple, or beech. You can also grow them on supplemented sawdust blocks or even indoors using grow kits.
7. What are the ideal conditions for growing turkey tail mushrooms?
Turkey tail mushrooms thrive in a shaded and humid environment. They prefer temperatures between 18-24°C (64-75°F) and high humidity levels. Proper ventilation is crucial to prevent mold growth. Logs should be kept moist but not waterlogged.
8. How long does it take to grow turkey tail mushrooms?
The time to fruiting for turkey tail mushrooms can vary, but it usually takes about 6-12 months for the mycelium to colonize the substrate and produce mushrooms. The timing can be affected by factors like temperature, humidity, and the type of substrate used.
9. How do I know when turkey tail mushrooms are ready to harvest?
Turkey tail mushrooms are typically ready to harvest when the edges of the fruiting bodies start to turn brown or when the mushrooms become brittle and dry. Harvesting at this stage ensures that the mushroom has reached its peak potency for medicinal purposes.
10. Can I grow turkey tail mushrooms indoors?
Yes, you can grow turkey tail mushrooms indoors using grow kits available from various suppliers. These kits typically contain a pre-colonized substrate, like sawdust or wood chips, and instructions for creating the ideal growing conditions indoors.
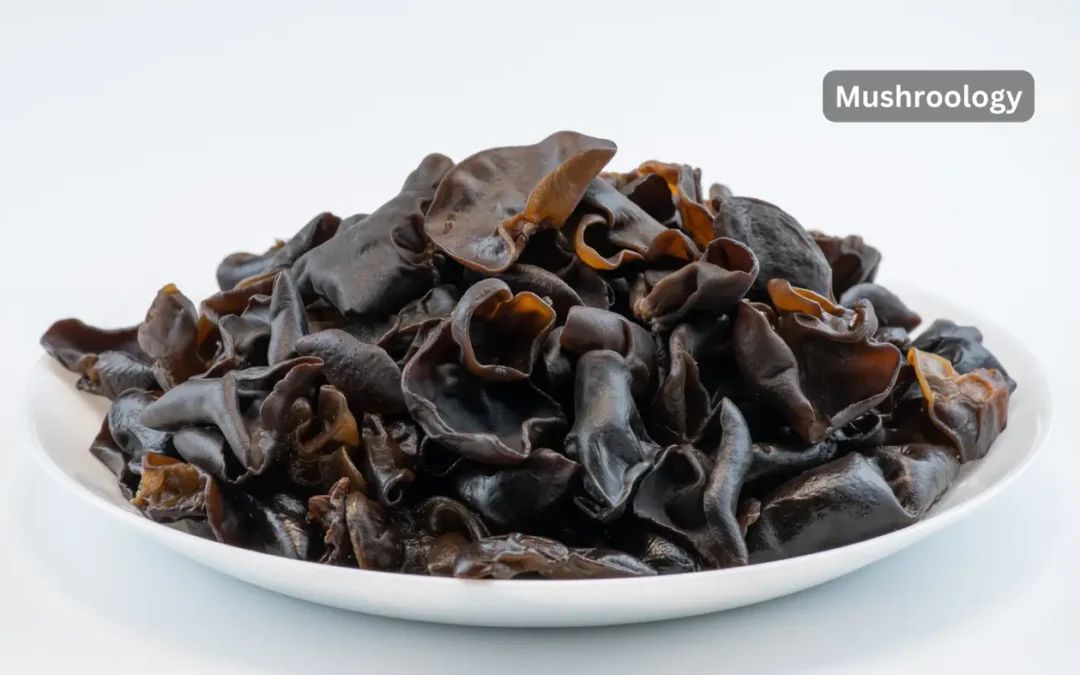
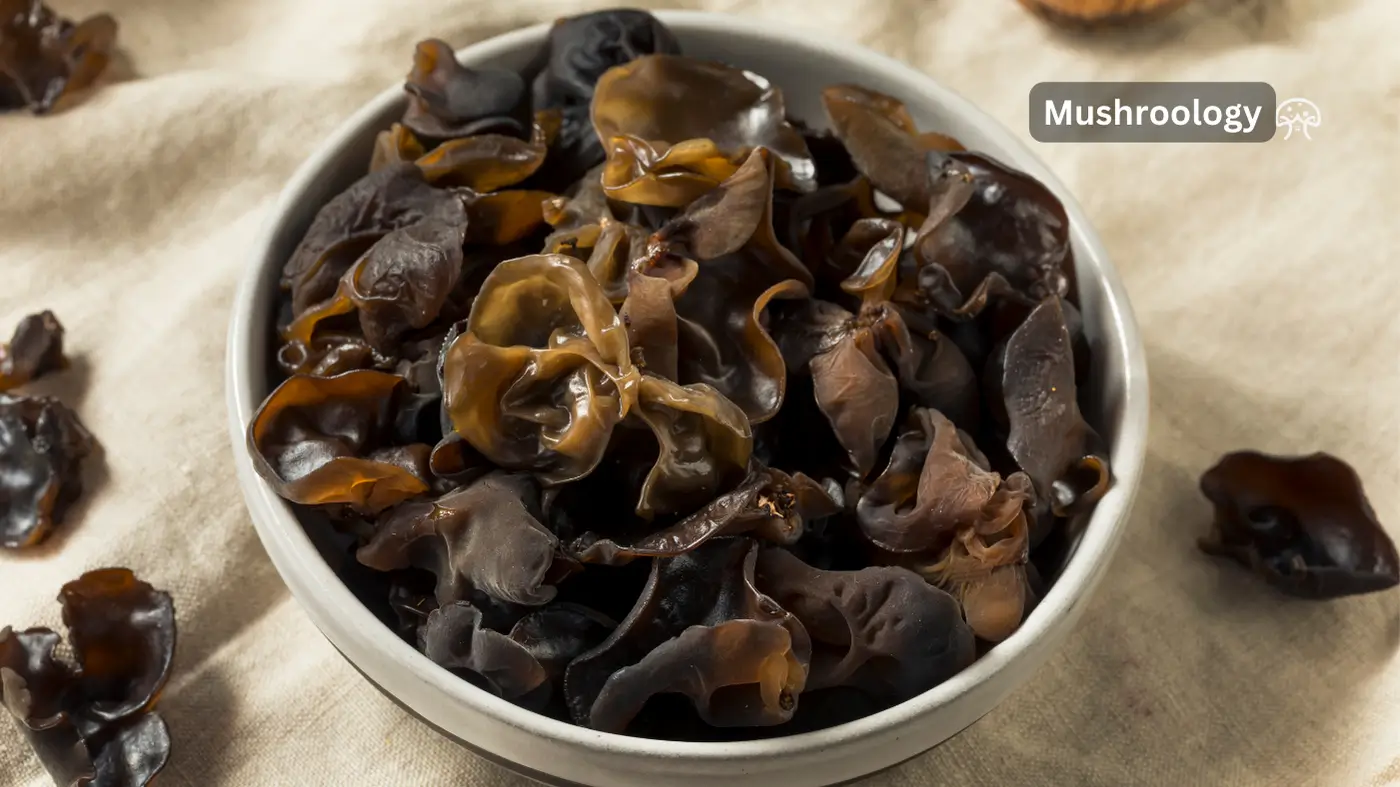
Wood ear mushrooms, also known as black fungus, jelly ear, or tree ear mushrooms, are a culinary delight and packed with numerous health benefits. These mushrooms have been used in traditional Chinese medicine for centuries and are now gaining recognition worldwide for their nutritional and medicinal properties. Here’s an in-depth look at the health benefits of wood ear mushrooms and why you should consider incorporating them into your diet.
Low in Calories and Fat: With only about 20-25 calories per serving, wood ear mushrooms are an excellent low-calorie food option.
Rich in B Vitamins: They are particularly high in B vitamins such as riboflavin (B2), pantothenic acid (B5), and folate (B9), which are crucial for energy metabolism and red blood cell formation.
Minerals: These mushrooms provide significant amounts of copper, iron, magnesium, selenium, and zinc, all of which play vital roles in various bodily functions.
2. Wood ear mushrooms are rich in antioxidants
Wood ear mushrooms are rich in antioxidants, which help protect your body from damage caused by free radicals:
Selenium: This mineral acts as a potent antioxidant, supporting heart health, joint health, and the immune system.
Polysaccharides and Flavonoids: These compounds have been linked to antioxidant activity, potentially reducing the risk of chronic diseases and supporting overall well-being.
3. Wood ear mushrooms provide immune system support
The polysaccharides found in wood ear mushrooms have immunomodulatory effects, meaning they can help regulate and boost the immune system:
Beta-Glucans: These compounds stimulate the activity of phagocytes, immune cells that ingest harmful particles, bacteria, and dead or dying cells, enhancing the body’s defense mechanisms.
Prebiotics: Wood ear mushrooms contain prebiotics that feed beneficial gut bacteria, promoting digestive health and maintaining bowel regularity.
Cholesterol Management: The dietary fiber and polyphenols in wood ear mushrooms help lower LDL (bad) cholesterol levels, which can reduce the risk of heart disease.
Blood Clotting: Compounds like adenosine and polysaccharides in these mushrooms inhibit blood clotting and platelet aggregation, improving circulation and potentially preventing heart attacks and strokes.
5. Blood Sugar Regulation
For individuals concerned about blood sugar levels, wood ear mushrooms may offer benefits:
Steady Blood Glucose Levels: Hot water extracts of wood ear mushrooms have been shown to help maintain steady blood sugar levels after meals, preventing spikes in blood glucose.
6. Brain Health
Wood ear mushrooms may also support brain health:
Inhibition of Beta Secretase: These mushrooms have been found to inhibit the activity of beta secretase, an enzyme that releases beta amyloid proteins linked to degenerative diseases like Alzheimer’s.
7. Anti-Inflammatory Properties
The anti-inflammatory compounds in wood ear mushrooms can help reduce inflammation in the body:
Chronic Inflammation: By reducing chronic inflammation, these mushrooms may help prevent various health issues, including arthritis and other inflammatory conditions.
How to Clean Wood Ear Mushrooms
Cleaning wood ear mushrooms is an essential step to ensure they are free from dirt, debris, and any potential contaminants. Here are the detailed steps to clean both dried and fresh wood ear mushrooms:
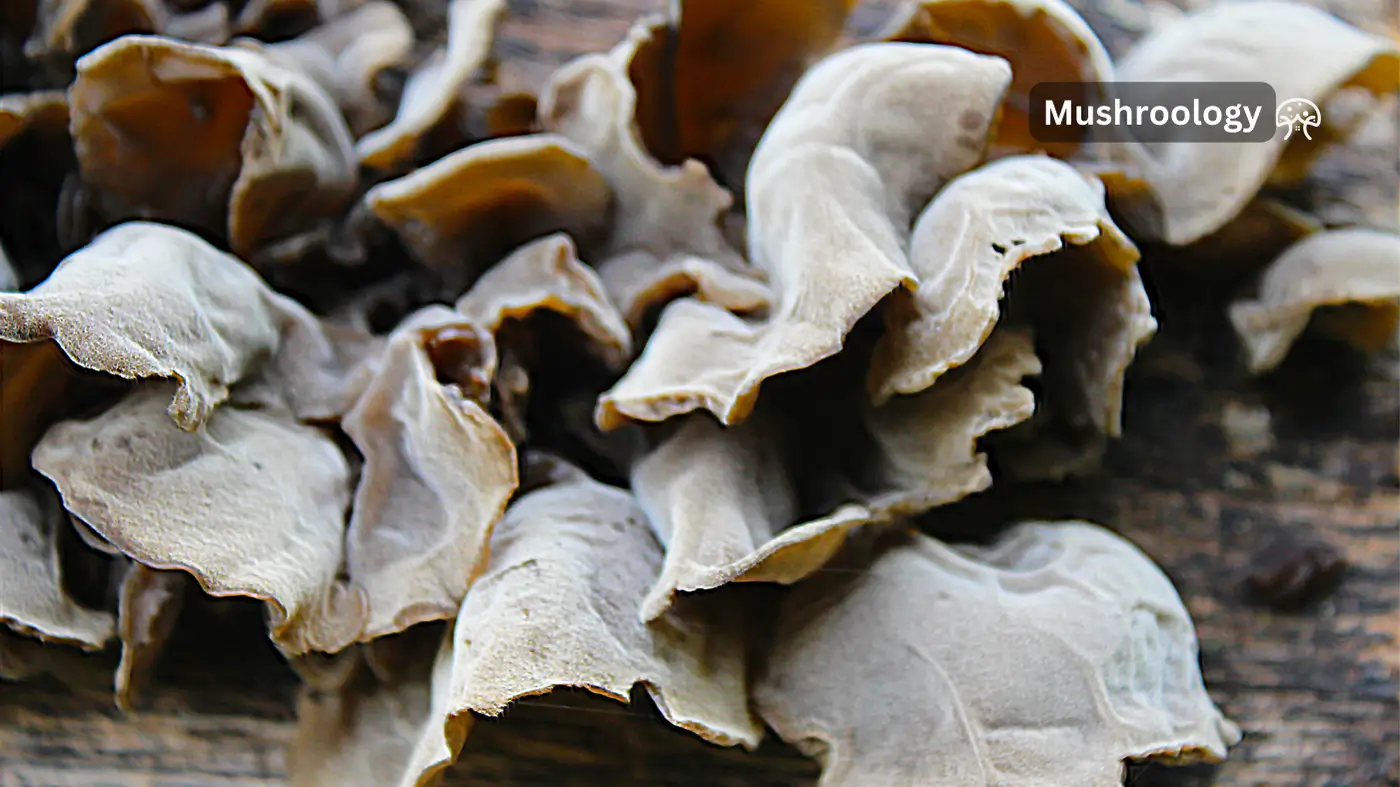
Cleaning Dried Wood Ear Mushrooms
Soak the Mushrooms:
Place the dried wood ear mushrooms in a bowl and cover them with warm water. Allow them to soak for about 15-20 minutes until they rehydrate and expand to their original size.
Alternatively, you can use cold water and soak them for about 1 hour or even overnight for a better texture.
Rinse and Rub:
After soaking, drain the water and rinse the mushrooms under running water.
Rub each mushroom gently between your fingers to remove any dirt or debris hidden in the folds.
Trim the Tough Parts:
Use a knife or scissors to trim off the tough stems or any hard parts where the mushroom was attached to the wood.
Final Rinse:
Give the mushrooms a final rinse under running water to ensure they are clean and free from any remaining dirt.
Cleaning Fresh Wood Ear Mushrooms
Brush or Cloth Method:
Use a dry brush, such as a mushroom brush, pastry brush, or toothbrush, to gently scrub away any dirt or debris from the surface of the mushrooms.
Alternatively, you can use a damp cloth to wipe the mushrooms clean, which allows for a more thorough cleaning without soaking the mushrooms in water.
Rinse Method:
Place the mushrooms in a colander and rinse them under cold running water. Gently rub the mushrooms with your fingers to remove any dirt.
If the mushrooms are particularly dirty, you can dunk them in a bowl of clean water and swish them around to dislodge any debris.
Trim the Tough Parts:
As with dried mushrooms, trim off any tough stems or hard parts using a knife or scissors.
Drying:
After cleaning, pat the mushrooms dry with a clean kitchen towel or paper towels to remove excess water before cooking.
Avoid Over-Soaking: Do not soak the mushrooms for too long as it can affect their texture and may lead to spoilage.
Use Immediately: It is best to use the cleaned mushrooms immediately or within a day to ensure freshness and prevent spoilage.
How to store wood ear mushrooms
Are you looking to keep your wood ear mushrooms fresh and flavorful for as long as possible? Let’s discover the essential steps to properly store both fresh and dried wood ear mushrooms, ensuring they remain in prime condition for your culinary adventures.
1. Store Fresh Wood Ear Mushrooms
Fresh wood ear mushrooms require careful handling to maintain their texture and prevent spoilage. Here’s how you can store them effectively:
Refrigeration
Container: Place the fresh wood ear mushrooms in a paper bag or wrap them in paper towels. This helps absorb excess moisture and prevents the mushrooms from becoming slimy.
Temperature: Store the mushrooms in the main compartment of your refrigerator, where the temperature is consistent. Avoid the door shelves, as temperatures can fluctuate.
Shelf Life: Fresh wood ear mushrooms can last up to one week in the refrigerator when stored properly.
2. Store Rehydrated Wood Ear Mushrooms
If you’ve rehydrated more wood ear mushrooms than you need, freezing them is the best way to preserve their quality:
Freezing
Immediate Freezing: Freeze the rehydrated mushrooms immediately to prevent bacterial growth.
Blanching: Quickly blanch the mushrooms in hot water before freezing to help preserve their texture.
Storage: Place the blanched mushrooms in a freezer-safe bag or container, removing as much air as possible before sealing.
3. Store Dried Wood Ear Mushrooms
Dried wood ear mushrooms have a long shelf life when stored correctly. Follow these steps to keep them fresh:
Airtight Containers
Container: Store dried mushrooms in an airtight container, such as a glass jar or resealable plastic bag. This prevents moisture from entering and spoiling the mushrooms.
Location: Keep the container in a cool, dark, and dry place, such as a pantry or cupboard. Avoid warm locations as heat can reduce their shelf life.
Shelf Life: Dried wood ear mushrooms can last for six months to a year when stored properly.
Cold Storage
Refrigeration or Freezing: For maximum shelf life, store dried mushrooms in the refrigerator or freezer. This helps maintain their freshness and prevents spoilage due to heat and moisture.
Preparation: Before using dried mushrooms, rehydrate them by soaking in warm water for 15-30 minutes until they regain their original texture.
How Long Do Wood Ear Mushrooms Last?
Understanding the shelf life of wood ear mushrooms is crucial for ensuring their freshness and safety. Whether you have fresh, dried, or rehydrated wood ear mushrooms, knowing how long they last and how to store them properly can make all the difference.
1. Fresh Wood Ear Mushrooms
Fresh wood ear mushrooms have a relatively short shelf life and need to be stored properly to maximize their freshness.
Refrigeration
Whole, Uncooked: Fresh wood ear mushrooms can last for 7 to 14 days when stored in the refrigerator. Place them in a paper bag or wrap them in paper towels to absorb excess moisture and prevent them from becoming slimy.
Sliced, Uncooked: If you’ve already sliced the mushrooms, they will last for about 5 to 7 days in the fridge.
Cooked: Cooked wood ear mushrooms should be consumed within 3 to 5 days when stored in the refrigerator.
2. Rehydrated Wood Ear Mushrooms
Rehydrated wood ear mushrooms have a very short shelf life due to their tendency to attract bacteria that produce toxins.
Refrigeration
Short-Term: After rehydrating, wood ear mushrooms should be used within 3 to 4 days if stored in a covered dish or container in the refrigerator.
Freezing: For longer storage, it is recommended to freeze rehydrated wood ear mushrooms immediately. This helps prevent bacterial growth and preserves their texture. Blanch them quickly in hot water before freezing for best results.
3. Dried Wood Ear Mushrooms
Dried wood ear mushrooms have the longest shelf life and are the most convenient for long-term storage.
Airtight Storage
Shelf Life: When stored in an airtight container in a cool, dry, and dark place, dried wood ear mushrooms can last for 1 to 2 years. This method prevents moisture from entering and spoiling the mushrooms.
Freezing: For maximum shelf life, store dried mushrooms in the freezer. This can extend their shelf life to up to 3 years.
How to maximize Shelf Life of wood ear mushrooms?
Humidity and Ventilation: Ensure a balance between humidity and ventilation. Too much humidity can promote mold growth, while inadequate humidity can cause the mushrooms to dry out and shrivel.
Temperature Consistency: Keep your storage area at a consistent temperature to prevent spoilage. For fresh mushrooms, the refrigerator should be set at or below 40°F (4°C).
Avoid Washing Before Storage: Do not wash fresh mushrooms before storing them, as this can cause them to absorb water and spoil more quickly.
Regular Inspection: Regularly check stored mushrooms for any signs of spoilage, such as mold, an off smell, or a slimy texture, and discard any affected pieces to prevent contamination.
Can You Eat Wood Ear Mushrooms Raw?
While it might be tempting to try wood ear mushrooms raw, it’s best to cook them to ensure they are safe to eat and to enjoy their full range of textures and flavors.
Why You Shouldn’t Eat Wood Ear Mushrooms Raw
Bacterial Contamination
One of the primary reasons to avoid eating wood ear mushrooms raw is the risk of bacterial contamination. Raw wood ear mushrooms can harbor harmful bacteria that may lead to foodborne illnesses. Cooking the mushrooms thoroughly helps to eliminate these bacteria, making them safe to eat.
Digestive Issues
Consuming raw wood ear mushrooms can also cause digestive discomfort. The mushrooms have a tough, gelatinous texture that can be difficult to digest when not cooked. Cooking helps to soften the mushrooms, making them easier on your digestive system.
What Does Wood Ear Mushroom Taste Like?
Wood ear mushrooms, are a unique ingredient in many Asian cuisines. While they may not be known for their strong flavor, their distinctive texture and ability to absorb the flavors of the dishes they are cooked with make them a versatile and valued component in various recipes.
Mild and Earthy
Wood ear mushrooms have a very mild flavor, often described as slightly earthy or woodsy. This subtle taste allows them to blend seamlessly into a variety of dishes without overpowering other ingredients. They are particularly good at absorbing the spices and nuances of the dishes they are added to, making them a versatile ingredient in many culinary applications.
Savory Umami
While the mushrooms themselves do not impart a strong flavor, they do have a hint of savory umami, which can enhance the overall taste of a dish. This makes them a great addition to soups, stews, and stir-fries where they can soak up the flavors of the broth and seasonings.
Texture
The texture of wood ear mushrooms is one of their most distinctive features and is often the main reason they are included in recipes:
Crunchy and Gelatinous
Crunchy: When cooked, wood ear mushrooms maintain a firm, crunchy texture that adds a pleasant contrast to softer ingredients in a dish. This crunchiness is particularly appreciated in dishes like hot and sour soup, stir-fries, and salads.
Gelatinous: They also have a slightly gelatinous, jelly-like consistency, which can provide a unique mouthfeel. This texture is often described as slippery but pleasant, adding an interesting dimension to the dishes they are included in.
Are There Any Known Side Effects of Consuming Wood Ear Mushrooms?
Here’s a detailed look at the known side effects of consuming wood ear mushrooms and precautions you should take.
1. Allergic Reactions
While allergic reactions to wood ear mushrooms are relatively rare, they can occur, particularly in individuals who are sensitive to fungi. Symptoms of an allergic reaction may include:
Itching
Swelling
Rash
Difficulty breathing
If you experience any of these symptoms after consuming wood ear mushrooms, seek medical attention promptly.
2. Digestive Distress
Some people may experience digestive discomfort after consuming wood ear mushrooms. This can include:
Bloating
Gas
Upset stomach
If you are trying wood ear mushrooms for the first time, it’s advisable to start with a small portion to gauge your body’s response.
3. Interactions with Medications
Wood ear mushrooms could potentially interact with certain medications, particularly:
Blood-thinning medications: Wood ear mushrooms have natural anticoagulant properties, which can enhance the effects of blood-thinning medications and increase the risk of bleeding.
Medications affecting blood sugar levels: If you are taking medications for diabetes, consult your healthcare provider before incorporating wood ear mushrooms into your diet, as they may affect blood sugar levels.
4. Contaminant Risk
Wild-harvested wood ear mushrooms can carry the risk of contamination with harmful substances from their environment. It’s advisable to purchase wood ear mushrooms from reputable sources that follow proper harvesting and handling practices. Contaminated mushrooms can lead to foodborne illnesses, so proper cleaning and cooking are essential.
5. Culinary Precautions
Improper preparation of wood ear mushrooms can result in an unappetizing, rubbery texture. To avoid this:
Rehydrate dried mushrooms properly: Soak them in warm water until they are soft and pliable.
Cook thoroughly: Always cook wood ear mushrooms before consuming them to kill any potential bacteria and improve their texture.
6. Risk of Anaphylaxis
In rare cases, wood ear mushrooms can cause anaphylaxis, a severe and life-threatening allergic reaction. This is caused by proteins in the mushrooms that can trigger a severe immune response.
Symptoms include severe hypotension, difficulty breathing, and loss of consciousness. If you have experienced anaphylaxis after consuming wood ear mushrooms, avoid them entirely and consult a healthcare professional.
While wood ear mushrooms offer numerous health benefits, it’s important to be aware of their potential side effects.
Always start with a small portion if you are trying them for the first time, and consult your healthcare provider if you are on medication or have known allergies. Proper handling, cleaning, and cooking are crucial to avoid any adverse effects and to enjoy the unique texture and mild flavor of wood ear mushrooms safely.
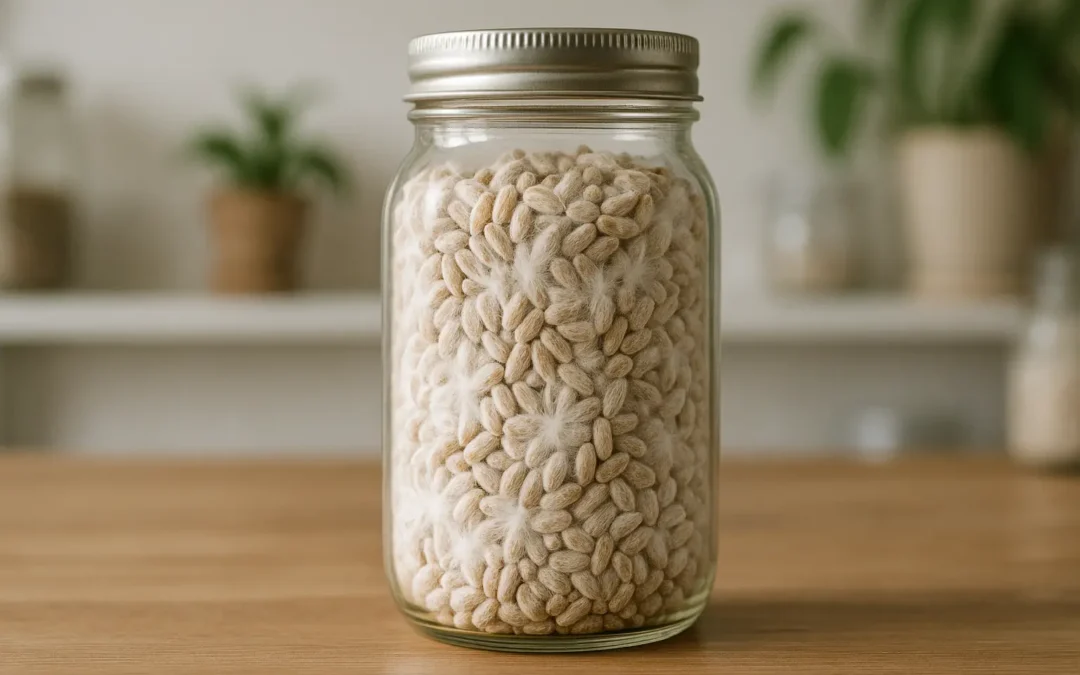
Everything you need to know about creating perfect grain spawn for your mushroom growing projects
You’ve decided to grow mushrooms at home, but you’re wondering how to make grain spawn that actually works. Here’s the step-by-step process that transforms ordinary grains into the foundation of your mushroom cultivation success.
Grain spawn acts like seeds in your mushroom garden – it’s sterilized grain that’s been inoculated with mushroom mycelium. When you get this right, you’ll have the building blocks for pounds of fresh mushrooms.
Why you need perfect grain spawn preparation
Your grain spawn quality determines everything that follows in mushroom cultivation. The North American Mycological Association (NAMA) emphasizes that proper grain spawn preparation prevents contamination and ensures strong mycelium growth.
You’re aiming for three critical conditions: complete water saturation inside each grain, a dry exterior surface, and intact kernels. When grains explode or break apart, bacteria can easily consume the porridge-like material while your mushroom mycelium struggles.
What grains work best for mushroom cultivation
Rye grain stands out as the preferred choice for most home cultivators. It offers exceptional nutritional density and water absorption properties, though it requires more careful preparation than alternatives.
You can also use these grain spawn alternatives:
Sorghum and millet – smaller grains that colonize faster
Wheat – readily available and nutritious
Oats – popular for low cost and easy sourcing
Brown or white rice – works well for various mushroom species
Choose organic grains whenever possible. Conventional grains often contain fungicides that prevent fungal growth – exactly what you don’t want when growing mushrooms. Plus, mushrooms bioaccumulate environmental toxins at much higher levels than their growing environment.
Step-by-step grain spawn preparation process
Step 1: Clean and soak your grains
Start by rinsing your grains thoroughly to remove debris and floating materials. You’ll soak them for 12-24 hours to allow gradual moisture absorption.
Adjust soaking time based on your climate – longer soaking in cooler weather (below 60°F/15°C), shorter in warmer conditions (above 75°F/24°C).
Step 2: Cook grains to perfect moisture levels
Bring your soaked grains to a full rolling boil using high heat. Cook until they reach an al dente state – translucent exterior with a slightly raw center. This typically takes 10-20 minutes depending on grain type.
Here’s what you’re looking for: grains that are fully saturated inside but won’t turn to mush when you handle them.
Step 3: Drain and dry the surface
Strain your hot grains and spread them on clean towels or screens. The surface moisture evaporates as steam, creating that ideal dry exterior with saturated interior condition. This process takes 1-2 hours.
Don’t rush this step – proper surface drying prevents contamination during sterilization and inoculation.
Step 4: Load containers and prepare lids
Fill sterilized mason jars or grow bags to about 2/3-3/4 capacity, leaving room for shaking during colonization. You’ll need specialized lids with injection ports and breathable filter patches for sterile inoculation.
Cover everything with aluminum foil during sterilization to protect the filters.
Sterilization: Your grain spawn safety checkpoint
Pressure cooking requirements for grain spawn
You must sterilize at 15 PSI for 90 minutes minimum. This combination reaches 250°F (121°C), eliminating all potential contaminants while preserving grain integrity.
Military and academic research confirms that properly operated home pressure cookers achieve sterilization equivalent to professional autoclaves. Studies show 100% sterility when maintaining 15 PSI for appropriate durations.
Using an Instant Pot? These units typically operate at 13 PSI, so extend cooking time by 30 minutes for reliable sterilization.
Always verify your pressure cooker reaches proper pressure and temperature
Contact your local extension office for pressure cooker testing services
How you inoculate grain spawn for best results
Why liquid culture beats spore syringes
Liquid culture inoculation provides superior results compared to spore syringes every time. You’ll see faster colonization (2-3 weeks ahead of spore methods), reduced contamination risk, and consistent results with established mycelium cultures.
Standard inoculation ratios:
1-2ml per quart (946ml) jar of prepared grain
5-10ml per 5-pound (2.3kg) bag of sterilized grain
Shake gently after inoculation for even distribution
Creating optimal incubation conditions
Maintain these environmental parameters during colonization:
Temperature: 68-75°F (20-24°C) for most species
Humidity: Natural humidity within sealed containers
Light: Dark or minimal diffuse lighting
Duration: 14-45 days depending on species and conditions
You won’t need to add moisture during this phase – your sealed containers maintain perfect humidity levels.
Advanced technique: Break and shake method for faster colonization
When and how to shake your grain spawn
The “break and shake” technique dramatically speeds up colonization by creating multiple inoculation points throughout your grain spawn. Apply this method when you see 20-30% colonization (some growers prefer waiting until 40-50%).
Benefits you’ll see:
2-3 week reduction in total colonization time
More uniform mycelium distribution
Increased inoculation points throughout the substrate
Prevention of slow-colonizing dead zones
Proper technique: Gently but thoroughly agitate containers to break mycelium clumps, then redistribute colonized grains completely. One application typically provides sufficient acceleration for most cultivations.
Troubleshooting common grain spawn problems
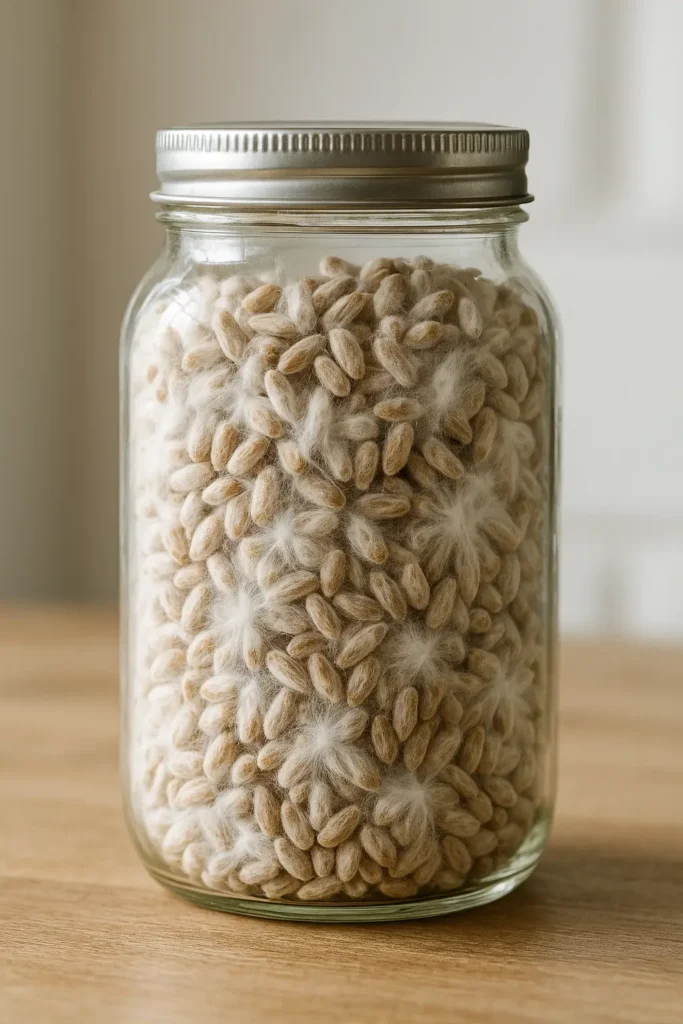
Identifying healthy vs. contaminated grain spawn
Successful grain spawn shows:
Dense white mycelium coating individual grains
Rope-like mycelial structures rather than fluffy growth
Pleasant mushroom aroma without sour or ammonia odors
Firm substrate consistency with intact grain structure
Warning signs of contamination:
Bright green patches (Trichoderma mold) that spread rapidly
Slimy, wet areas with foul odors (bacterial contamination)
Slow colonization usually results from insufficient temperature, inadequate moisture, or poor air exchange. Any contamination requires immediate isolation and disposal.
Scaling grain spawn production for larger projects
Mathematical approach to consistent batches
For larger operations, use this proven scaling method: Calculate your baseline ratio by dividing total dry grain weight by total wet weight after cooking. For rye grain, this typically equals 0.58.
Total target weight – Soaked grain weight = Additional water needed
This eliminates guesswork and ensures consistent moisture ratios across batches of any size.
Frequently asked questions about grain spawn
Q: How long does grain spawn take to fully colonize? A: Most grain spawn takes 2-6 weeks under ideal conditions of 68-75°F (20-24°C), depending on species and inoculation method.
Q: What’s the best grain for beginners? A: Start with organic rye grain if available, or oats for a more forgiving option. You’ll need about 2-4 pounds (0.9-1.8kg) of dry grain per 5-pound growing project.
Q: When should I use my finished grain spawn? A: Use fresh grain spawn within 1-2 months for optimal viability. Refrigerated storage extends shelf life, though some species like Pink Oyster prefer room temperature.
Q: Can I store grain spawn long-term? A: Fresh grain spawn works best, but properly stored spawn lasts 2-3 months refrigerated at 35-40°F (2-4°C).
Your next step: Gather organic grains, a pressure cooker, and mason jars with modified lids. Start with small batches to perfect your technique.
What you need to know about vertical mushroom farming
You’ve probably seen those expensive mushrooms at the grocery store and wondered if you could grow them yourself. Here’s the thing: mushroom towers let you produce 6.5 to 10 kilograms per square meter weekly—that’s 14-22 pounds (6.5-10 kg/m²) of fresh mushrooms in a space smaller than your kitchen table.
What you need to know about mushroom tower systems
When you’re starting with mushroom towers, you’re basically stacking your growing space vertically instead of spreading it horizontally. These vertical cultivation structures use wire mesh or specialized containers filled with substrate where mushrooms grow out the sides. You’ll get 2-4 times more mushrooms from the same floor space compared to traditional methods.
The science is simple: mushrooms don’t need soil—they need organic matter, moisture, and the right environment. Tower systems give you all three while maximizing your growing area. Modern indoor facilities can produce 12,000 pounds (5,443 kg) monthly using these configurations.
Types of mushroom towers you can build
Outdoor straw towers work great for beginners. You’ll need hog wire fencing, fresh hardwood chips, and mushroom spawn. These towers need partial shade and protection from direct sun. Rain actually helps—it provides natural irrigation.
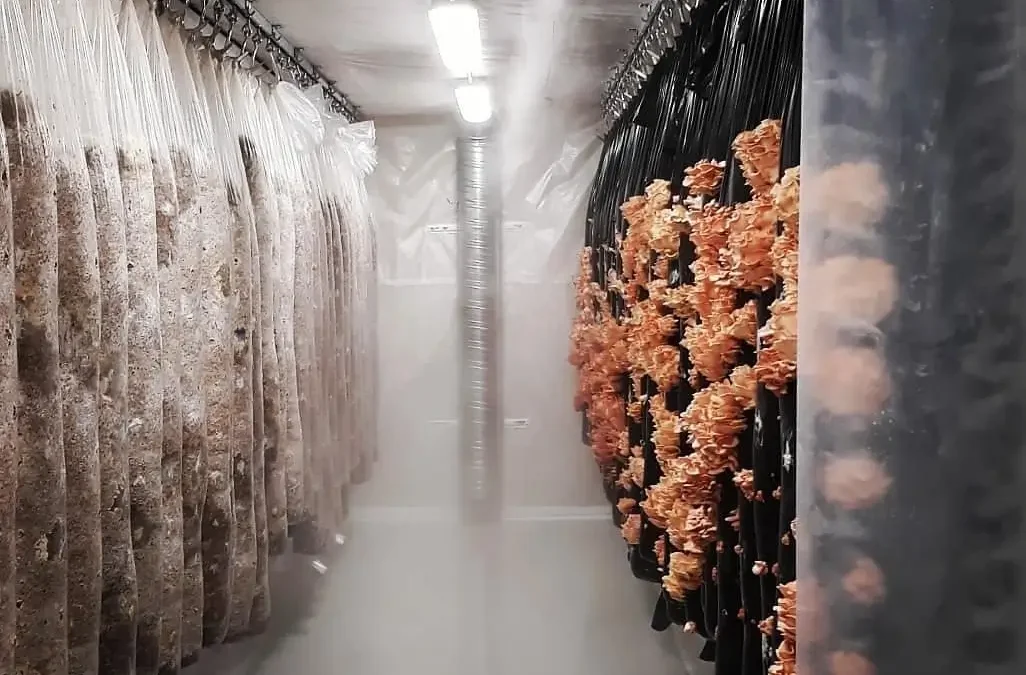
Indoor controlled towers give you year-round production. You control temperature, humidity, and air circulation precisely. Yes, they cost more upfront, but you’ll harvest mushrooms every week regardless of weather.
Smart automated systems use IoT sensors and AI to monitor growing conditions. They track temperature, humidity, CO2 levels, and moisture content in real-time. Fancy? Sure. But they can double your yields.
How you prepare substrates for mushroom towers
Your substrate choice determines your success. Different mushroom species need different materials. For shiitake (Lentinula edodes), mix 1 kilogram hardwood sawdust with 250 grams wheat bran and 1.6 liters water. Oyster mushrooms (Pleurotus species) aren’t picky—they’ll grow on straw, sawdust, or fresh wood chips.
Why you must sterilize your substrate
Here’s what kills most beginner grows: contamination. You need to sterilize or pasteurize your substrate to eliminate competing organisms. Boil your materials for 5-10 minutes or pressure cook them. Skip this step and you’ll grow mold instead of mushrooms.
The squeeze test tells you if moisture levels are right. Grab a handful of substrate and squeeze hard. You want just a few drops of water—not a stream, not bone dry. Too wet? You’ll get contamination. Too dry? Your mycelium won’t colonize properly.
Safety Warning
Never eat wild mushrooms without 100% positive identification
Some mushrooms have toxic look-alikes that can be fatal
Join your local mycological society for proper training
When in doubt, throw it out
What environmental conditions your mushroom towers need
Temperature control makes or breaks your operation. Oyster mushrooms need 75°F (24°C) during colonization, then 64°F (18°C) for fruiting. Shiitake prefers 77°F (25°C) for spawn run and 61°F (16°C) to fruit. Stay within ±3.6°F (±2°C) of these targets.
Evaporative cooling systems can drop your temperature by 9°F (5°C) while raising humidity by 10%. That’s often all you need for perfect growing conditions.
How to manage humidity and air flow
You need 80-95% humidity, but here’s the trick: you also need fresh air. Mushrooms breathe oxygen and release CO2, just like us. Without proper ventilation, they’ll grow long stems with tiny caps—what growers call “fuzzy feet.”
Aim for 3-5 complete air changes per hour. During colonization, CO2 levels can reach 5,000-8,000 parts per million (ppm). But when fruiting starts, drop that to 800-1,200 ppm. Professional operations use specialized nozzles and ductwork to ensure even air distribution.
How you build mushroom towers step by step
Start with basic materials: food-grade wire mesh with 4-6 inch (10-15 cm) openings, organic substrate, mushroom spawn, and support structures. Budget $200-500 for a small system or $10,000-30,000 for commercial automation.
Your tower construction process
Form a circular wire enclosure 3-4 feet (0.9-1.2 m) in diameter
Place cardboard at the base to block soil fungi
Add 6 inches (15 cm) of moistened substrate
Sprinkle spawn at 1:5 ratio (1 part spawn to 5 parts substrate by weight)
Repeat layers until tower reaches 4-5 feet (1.2-1.5 m) tall
Top with plastic to retain moisture during colonization
For indoor systems, integrate sensors that monitor conditions 24/7. Wireless networks using machine learning algorithms predict optimal irrigation timing and environmental adjustments.
Which mushroom varieties work best in towers
Not all mushrooms suit vertical growing. Here’s what actually works:
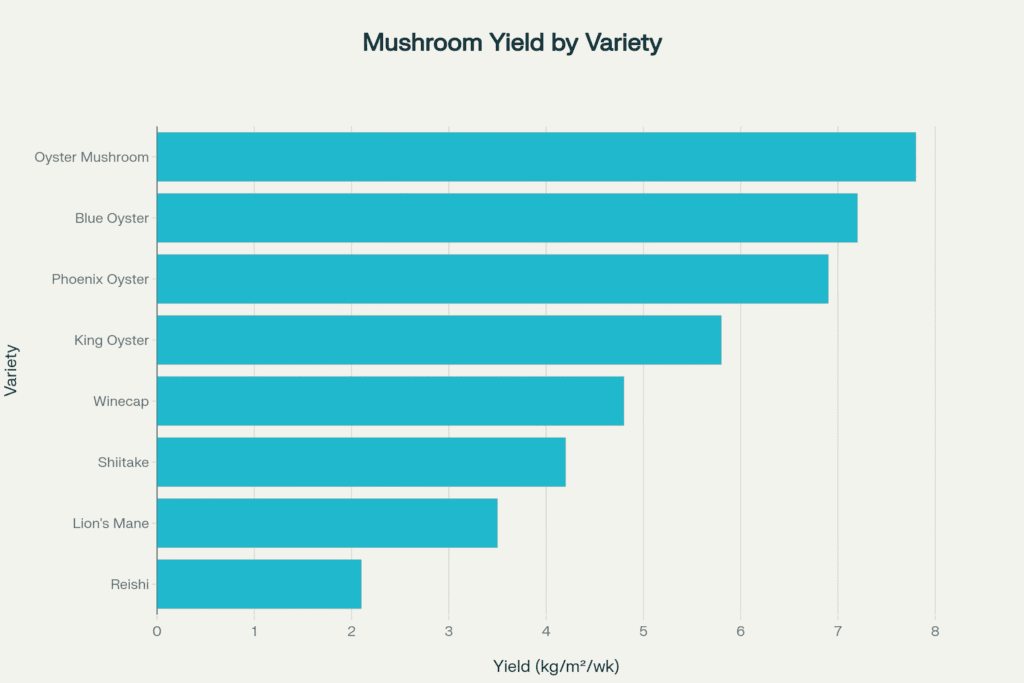
Oyster mushrooms (Pleurotus ostreatus) remain the champions of tower cultivation. You’ll harvest 7.8 kg per square meter weekly (1.6 lbs/sq ft). Blue oysters yield 7.2 kg/m²/week, phoenix oysters produce 6.9 kg/m²/week. They tolerate temperature swings and grow on almost anything organic.
Shiitake mushrooms (Lentinula edodes) take longer—45 days per cycle—but command $25 per kilogram ($11.34/lb) at market. They yield 4.2 kg/m²/week on hardwood substrates. Keep log temperatures at 72-77°F (22-25°C) for best results.
Specialty mushrooms for premium markets
Lion’s mane(Hericium erinaceus) looks like a white waterfall and tastes like seafood. You’ll get 3.5 kg/m²/week at 90% humidity, but they sell for $35 per kilogram ($15.88/lb).
King oyster(Pleurotus eryngii) produces thick, meaty stems perfect for slicing. Expect 5.8 kg/m²/week on straw supplemented with nitrogen. Wine cap (Stropharia rugosoannulata) thrives outdoors, yielding 4.8 kg/m²/week at $20 per kilogram ($9.07/lb).
Equipment and infrastructure you’ll need
Your infrastructure investment depends on scale and automation level. Small operations need $2,500 for basic towers, while large commercial systems require $25,000 just for structures.
Climate control breaks down like this:
Temperature regulation: $3,000-45,000
Ventilation equipment: $1,500-18,000
Humidity control: $800-8,000
Monitoring sensors: $600-8,000
Advanced robotic systems reduce labor by 60-70%. They handle substrate prep, inoculation, and harvesting, cutting labor hours from 45 to 15 per 100kg production.
Setting up monitoring and automation
Modern towers use comprehensive sensor networks tracking every environmental parameter. IoT-enabled sensors provide real-time data and automated adjustments. You’re looking at $600-8,000 for monitoring equipment, depending on sophistication.
Start simple with basic temperature/humidity sensors, then upgrade as you grow. Even basic automation beats manual monitoring every time.
Why mushroom towers make economic sense
Initial investments range from $10,000-150,000 depending on your goals. Small operations generating $48,400 annually achieve 30% profit margins. Medium and large facilities see margins exceeding 150% with proper management.
The global mushroom market hit $18.74 billion in 2024 and projects growth to $25.41 billion by 2030. You can sell button mushrooms for $1.65/kg, while specialty varieties command premium prices.
Understanding your operational costs
Annual expenses include:
Substrate materials: $300-4,000
Spawn inoculation: $200-3,000
Labor: $1,000-12,000
Energy for climate control: varies by region
Tower systems achieve 12.8 kg/m² space efficiency versus 3.2 kg/m² for horizontal growing. Water usage drops from 4.5 L/kg to 1.2 L/kg with advanced technology. Those numbers translate directly to your bottom line.
How to troubleshoot common mushroom tower problems
Contamination kills more mushroom grows than any other factor. Healthy mycelium looks white and smells fresh. Brown, black, green, orange, or pink colors mean contamination. Remove affected areas immediately—don’t wait.
Maintain sterile conditions with 70% isopropyl alcohol on all tools and surfaces. One contaminated batch can spread spores throughout your operation.
Managing environmental issues
Moisture problems show up fast. Too dry? Mushrooms crack and shrivel. Too wet? Bacterial blotch appears as slimy brown spots. Aim for that perfect balance—moist but not dripping.
CO2 buildup causes “fuzzy feet”—long stems with underdeveloped caps. Increase ventilation immediately. Light deficiency creates similar symptoms, so provide 12 hours of reading-level light daily.
Wrong spawn ratios wreck yields. Use 20% spawn to 80% substrate by weight for most species. Less spawn means slower colonization and contamination risk. More spawn wastes money without improving yields.
How mushroom towers support sustainability
Mushroom production uses just 1.8 gallons water per pound (15 liters/kg) compared to much higher requirements for other proteins. You’re recycling agricultural waste—straw, sawdust, coffee grounds—into food.
The carbon footprint stays minimal. Mushroom farming produces lower greenhouse gas emissions than crops, fruits, or animal proteins. Energy use ranges from 1.2-2.1 kWh per kilogram depending on system sophistication.
Creating circular economy systems
Every kilogram of mushrooms produces three kilograms of compostable organic matter. This spent substrate enriches garden soil, supports microalgae cultivation, and treats wastewater.
Integrate mushroom towers with other agricultural systems. Use spent substrate for soil improvement, supporting biodiversity while creating valuable secondary products.
What’s next for mushroom tower technology
AI-powered systems now optimize growing conditions through predictive analytics. Machine learning algorithms analyze cultivation data, identifying optimal parameters and predicting harvest timing.
Biotechnology advances create disease-resistant strains with enhanced yields. These innovations expand cultivation possibilities in varying climates while improving economic viability.
Meeting market demands
Consumer preferences favor sustainably produced foods. Rising vegetarian and vegan populations drive demand for mushroom-based proteins. Medicinal mushroom supplements represent the fastest-growing market segment.
Urban agriculture loves mushroom towers. Minimal space requirements and controlled environments make them perfect for city farming. You’re looking at local food security with reduced transportation costs.
Frequently asked questions about mushroom tower cultivation
Q: How much space do I need to start mushroom tower cultivation? A: You can start with as little as 20 square feet (1.9 m²) for a small tower system. Commercial operations typically need 200-1,600 square meters (2,150-17,200 sq ft) for profitable production.
Q: What’s the average yield from mushroom towers compared to traditional growing? A: Tower systems produce 6.5-10+ kg per square meter weekly, while traditional horizontal methods yield 2-3 kg/m²/week. That’s 2-4 times more mushrooms from the same floor space.
Q: How long before I see my first mushroom harvest? A: Oyster mushrooms fruit in 10-14 days after inoculation. Shiitake takes 45-60 days. Most varieties produce multiple flushes over 2-3 months.
Q: What’s the minimum investment for a profitable mushroom tower operation? A: Small profitable operations start around $10,000-15,000 initial investment. You’ll need $200-500 for a hobby system, or $25,000+ for automated commercial production.
Q: Which mushroom variety offers the best return on investment? A: Oyster mushrooms provide the best ROI for beginners—high yields (7.8 kg/m²/week) and moderate prices. Specialty varieties like lion’s mane offer higher prices ($35/kg) but lower yields (3.5 kg/m²/week).
What you need to know about mushroom bag cultivation
You’ve probably wondered if you can grow fresh mushrooms at home without expensive equipment. Here’s what works: mushroom bag cultivation offers one of the most reliable methods for producing oyster, shiitake, lion’s mane, and other gourmet mushrooms. Based on research from Cornell University’s Small Farms Program and cultivation experts like Paul Stamets, this method yields 1-2.5 pounds (0.45-1.13 kg) per bag.
Why you should grow mushrooms in bags
When you’re starting mushroom cultivation, bags offer several advantages over other methods. North American Mycological Association (NAMA) recommends bag cultivation for beginners because it reduces contamination risks by 50-70% compared to open-air methods. You’ll need less space than log cultivation and can harvest mushrooms in 2-4 weeks instead of waiting 6-12 months.
According to research from Penn State Extension, bag cultivation produces the highest biological efficiency—the ratio of fresh mushrooms to dry substrate weight. You can achieve 100-200% biological efficiency with properly prepared bags, meaning 5 pounds (2.3 kg) of substrate can yield 5-10 pounds (2.3-4.5 kg) of fresh mushrooms.
What makes bag cultivation different
You control every aspect of the growing environment when you use bags. The filter patch technology allows gas exchange while preventing contamination. These specialized polypropylene bags withstand sterilization temperatures of 250°F (121°C) without melting, as confirmed by Unicorn Bags.
Here’s what experienced growers know: Filter patch size matters. Use 0.2 micron filters for aggressive species prone to contamination. Choose 0.5 micron filters for oyster mushrooms that need more air exchange. The 5 micron filters work for straw-based substrates but increase contamination risk by 30-40%.
How you select the right mushroom species for bags
Not all mushrooms grow equally well in bags. Based on yield data from FreshCap Mushrooms and commercial growers, here are your best options:
Your substrate choice directly impacts yields. The “Master’s Mix” developed by TR Davis from Earth Angel Mushrooms combines equal parts hardwood sawdust and soybean hulls. This mixture consistently produces the highest yields according to Fungi Ally research.
What you need to prepare mushroom growing bags
You’ll need specific materials and equipment for successful bag cultivation. Here’s your essential list based on Cornell’s Seven Stages of Cultivation:
Autoclavable polypropylene bags with filter patches
Substrate (sawdust, straw, or supplemented mixtures)
Mushroom spawn (grain or sawdust)
Gypsum (calcium sulfate) for pH buffering
Water
Equipment:
Pressure cooker or autoclave reaching 15 PSI
Scale for measuring ingredients
Mixing container
Heat sealer or zip ties
Spray bottle for misting
Thermometer and hygrometer
How you calculate substrate moisture content
Proper moisture content determines your success. According to Atlas Scientific, substrates need 50-70% moisture content. Here’s the calculation:
Weigh your dry substrate
Add water at 60-65% of dry weight
Mix thoroughly and squeeze test
Only 1-2 drops should come out when squeezed
For example: 10 pounds (4.5 kg) dry sawdust needs 6-6.5 pounds (2.7-2.9 kg) of water, which equals about 0.7-0.8 gallons (2.6-3 liters).
How to sterilize mushroom bags properly
Sterilization kills competing organisms that would otherwise contaminate your bags. Paul Stamets’ research and university studies confirm these requirements:
Temperature: 250°F (121°C) Pressure: 15 PSI Time: 90-120 minutes for 5-pound (2.3 kg) bags
Safety Warning
Never leave bags unattended in pressure cooker
Keep bags away from metal sides using jar rings
Allow complete pressure release before opening
Bags touching the bottom or sides may melt
The Shroomery community recommends wrapping bags in aluminum foil to prevent melting. Place jar rings between bags to ensure steam circulation.
Critical sterilization mistakes to avoid
You risk contamination if you rush sterilization. Common errors include:
Overfilling bags past the filter patch
Sealing 0.2 micron bags before sterilization (they’ll burst)
Insufficient sterilization time
Opening the pressure cooker too soon
When and how you inoculate mushroom bags
Timing matters when you inoculate. Wait until bags cool to 70-80°F (21-27°C) before adding spawn. Higher temperatures kill the mycelium.
Inoculation rates from Cornell research:
High rate (safer): 1 pound spawn per 4 pounds substrate (20%)
Standard rate: 1 pound spawn per 10 pounds substrate (10%)
After inoculation, place bags at optimal colonization temperatures. Most species colonize best at 70-75°F (21-24°C). Full colonization takes:
Oyster mushrooms: 10-14 days
Shiitake mushrooms: 45-90 days
Lion’s mane: 14-21 days
Monitor these conditions:
Temperature: Use digital thermometer
No light needed during colonization
Check for contamination daily
Don’t disturb bags unnecessarily
Initiating mushroom fruiting from bags
You trigger fruiting by changing environmental conditions. Cut 2-4 inch (5-10 cm) X-shaped slits in the bag where you see pins forming. According to North Spore’s ShroomTek guide:
Fruiting requirements:
Temperature drop: 5-10°F (3-6°C)
Humidity: 80-95%
Fresh air exchange: 4-8 times per hour
Light: 12 hours daily (reading-level intensity)
CO2: Below 1,000 ppm
Mist the slits 2-3 times daily. You’ll see pins in 3-7 days.
Why contamination happens and how you prevent it
Green mold (Trichoderma) ruins more bags than any other contaminant. Research from PMC’s contamination study shows sterilized substrates remain most vulnerable during spawning.
Contamination appears as:
Green sporulation (Trichoderma)
Orange/pink growth (Neurospora)
Black spots (Aspergillus)
Slimy, sour-smelling areas (bacterial)
If you spot contamination, remove the bag immediately. Don’t open contaminated bags indoors—spores spread everywhere. The Fungi Academy recommends burying contaminated bags in your garden.
Advanced contamination prevention strategies
Professional growers use these methods:
HEPA filtration in growing rooms
Positive pressure environments
UV-C sterilization between crops
pH adjustment to 6.0-6.5
Prophylactic peroxide treatment
How to maximize your mushroom yields
You can harvest multiple flushes from each bag. The circular economy research shows proper management extends production:
First flush: 50-60% of total yield Second flush: 25-30% of total yield Third flush: 10-15% of total yield
Between flushes, let bags rest 7-14 days. For shiitake, soak blocks in cold water for 12-24 hours to trigger the next flush.
Troubleshooting common growing problems
When mushrooms don’t develop properly, check these factors:
Long, thin stems: Increase fresh air exchange Small caps: Lower CO2 levels below 800 ppm Dry, cracked caps: Raise humidity to 85-90% Slow growth: Check temperature ranges Yellow mushrooms: Reduce light exposure
What happens to spent mushroom bags
After 2-3 flushes, your substrate becomes “spent.” But don’t throw it away. Penn State’s spent substrate guide shows this material improves garden soil.
Uses for spent substrate:
Garden compost addition
Mulch for acid-loving plants
Worm bin food
Livestock bedding supplement
Second-run mushroom cultivation
The sustainability research indicates over 100 million tons of spent substrate need recycling annually.
Economic considerations for bag cultivation
Your costs per 5-pound (2.3 kg) bag:
Substrate materials: $1.50-3.00
Spawn: $2.00-4.00
Bag: $0.50-1.00
Utilities: $0.50-1.00
Total: $4.50-9.00
With 1.5 pounds (0.68 kg) average yield selling at $10-16 per pound, you’ll gross $15-24 per bag.
Frequently asked questions about mushroom bag cultivation
Q: How long do mushroom bags take to produce mushrooms? A: Most oyster mushrooms fruit within 10-14 days after inoculation. Shiitake takes 45-90 days. Lion’s mane produces in 14-21 days at 65-75°F (18-24°C).
Q: What’s the best filter patch size for beginners? A: Start with 0.5 micron filter patches. They balance contamination prevention with adequate gas exchange. You’ll need about 1 filter per 5 pounds (2.3 kg) of substrate.
Q: Can you reuse mushroom grow bags? A: No, don’t reuse bags after mushroom production. The plastic weakens during sterilization and harbors contaminants. Fresh bags cost $0.50-1.00 and ensure success.
Q: Why do my mushroom bags keep getting contaminated? A: Check your sterilization time and temperature first. Ensure 90-120 minutes at 250°F (121°C). Also verify spawn quality and improve sterile technique during inoculation.
Q: What size bags work best for home cultivation? A: Use bags measuring 8″ x 5″ x 18″ (20 x 13 x 46 cm) for 5-pound (2.3 kg) blocks. You can fit 6 bags in a standard 23-quart pressure canner.