Ever tossed your used coffee grounds into the trash and thought, “There must be something better I could do with these”? Well, get ready for a surprising answer – those humble coffee grounds can become the perfect growing medium for delicious gourmet mushrooms!
Quick-start guide: growing mushrooms on coffee grounds in 5 steps
If you’re eager to get started, here’s the quick version:
- Collect fresh coffee grounds (within 24 hours of brewing)
- Mix with mushroom spawn (oyster mushrooms work best for beginners)
- Place in a clear container with air holes
- Keep in a warm, dark place until white mycelium fully colonizes (2-3 weeks)
- Introduce light and fresh air to trigger mushroom growth (harvest in 5-7 days)
The entire process takes about 3-4 weeks from start to finish, with minimal daily maintenance. Now let’s dive into the details so you can get growing!
What you’ll need: Materials checklist
Essential supplies
- Fresh coffee grounds (5-6 cups) – collect from your home or local coffee shop
- Mushroom spawn (about 1 cup) – oyster mushroom spawn recommended for beginners
- Clear plastic bag or container – food-grade plastic works best
- Spray bottle – for maintaining humidity
- Rubber bands or tape – for sealing your container
- Clean scissors or knife – for creating air holes and harvesting
Optional equipment for better results
- Thermometer/hygrometer – to monitor temperature and humidity
- Supplementary materials – straw or hardwood sawdust to mix with coffee grounds (70% coffee grounds, 20% supplement, 10% spawn works well)
- Isopropyl alcohol (70%) – for sanitizing tools and workspace
- Clean gloves – to prevent contamination during handling
Don’t worry about getting everything perfect – mushroom cultivation is forgiving, especially with oyster mushrooms. I started with just coffee grounds, spawn, and a plastic bag, and still got a decent first harvest!
Choosing the right Mushroom spawn for beginners
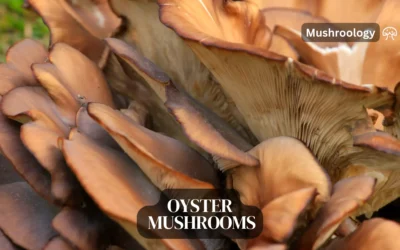
Oyster mushrooms: The ideal starter species
When I first started growing on coffee grounds, I tried several species and quickly discovered why everyone recommends oyster mushrooms for beginners. They’re practically the superheroes of the mushroom world:
- Fast colonizers – they’ll take over your coffee grounds in just 2-3 weeks
- Contamination resistant – they can often outcompete molds and bacteria
- Forgiving – they tolerate varying conditions better than most species
- Prolific fruiters – even a small container can produce impressive harvests
For your first grow, I’d specifically recommend Pearl Oysters (Pleurotus ostreatus) or Blue Oysters (Pleurotus columbinus). The Pearl variety does well at room temperature (65-75°F), while Blue Oysters prefer slightly cooler conditions.
Other Beginner-Friendly Options
Once you’ve mastered oysters, you might want to try:
- Pink Oysters (Pleurotus djamor) – great for warmer environments (75-85°F)
- Wine Cap (Stropharia rugosoannulata) – works well in outdoor coffee ground beds
- Shiitake – more challenging but possible when mixed with hardwood sawdust
I’d recommend sticking with oysters for your first few grows. They’re not just easier – they’re also delicious and versatile in the kitchen!
Step-by-Step growing process
Step 1: Collect and prepare coffee grounds
Your success starts with good coffee grounds. Here’s what you need to know:
Where to get your grounds:
- Your home coffee maker (easiest source)
- Local coffee shops (many are happy to give away grounds)
- Office break rooms (check with whoever makes the coffee)
What to look for:
- Freshness – use grounds within 24 hours of brewing
- Moisture – grounds should be damp but not soggy
- No mold – avoid grounds that smell musty or show discoloration
I’ve had great success asking my neighborhood café for grounds. I just drop off a clean bucket in the morning and pick it up at the end of the day – free substrate!
Preparation tips:
- Break up any clumps in your coffee grounds
- If the grounds seem too wet, spread them out to dry slightly
- If using supplementary materials like straw, pasteurize them first by soaking in hot water (160-170°F) for 1-2 hours
Remember, coffee grounds come pre-pasteurized from the brewing process – that’s one of their big advantages as a substrate!
Step 2: Add Mushroom Spawn
Now for the exciting part – adding the spawn that will grow into your mushrooms:
- Put your coffee grounds in a clean container
- Break up the mushroom spawn into small pieces
- Mix thoroughly with the coffee grounds (aim for 1 part spawn to 5 parts coffee grounds)
- Ensure the spawn is distributed evenly throughout
My first time, I didn’t break up the spawn enough, and it took longer to colonize. Learn from my mistake – really break it up for faster, more even growth!
Step 3: Create the perfect growing environment
Your coffee grounds and spawn need the right home to thrive:
- Transfer the mixture to a clear plastic bag or container
- Create small air holes (about 1/4 inch) every few inches around the container
- Seal the top with rubber bands or tape
- Place in a warm, dark location (65-75°F is ideal)
I use the top shelf of my kitchen cabinet – it’s warm, dark, and out of the way. Just remember where you put it so you don’t forget to check on it!
Your container doesn’t need to be fancy. I’ve used everything from ziplock bags to old takeout containers with great results.
Step 4: Monitoring the Colonization Phase
This is the waiting game, but it’s fascinating to watch:
- Within 3-5 days, you should see white, thread-like growth (mycelium) spreading through the grounds
- By 2 weeks, most of your container should appear white with mycelium
- The mycelium should smell fresh and earthy – any sour or unpleasant smell indicates contamination
I recommend checking your container daily, but don’t open it during this phase! Just observe through the clear plastic to avoid introducing contaminants.
What to watch for:
- White, cotton-like growth = good! This is healthy mycelium.
- Green, black, or blue spots = bad! This is mold contamination.
- Yellow liquid = stress. The mycelium may be too wet or fighting contamination.
If you see contamination, don’t panic! Small spots can sometimes be removed, or you can let the mycelium fight it out (oysters often win!).
Step 5: Triggering and Supporting Fruiting
When your container is fully colonized (mostly white), it’s time to trigger fruiting:
- Move your container to a location with indirect light (a north-facing window works well)
- Cut larger holes (1-2 inches) in the plastic to allow mushrooms to grow out
- Increase humidity by misting with water 2-3 times daily
- Maintain room temperature between 60-75°F
This change in environment signals to the mycelium that it’s time to produce mushrooms. Within 3-7 days, you should see tiny mushroom “pins” forming.
A little tip from my experience: After cutting the holes, I drape a lightly damp paper towel over parts of my container to create a humid microclimate that mushrooms love.
Step 6: Harvesting Your Mushrooms
The most rewarding part! Here’s how to know when and how to harvest:
When to harvest:
- Oyster mushrooms are ready when the caps are still slightly curved downward
- Don’t wait until the caps flatten completely or curl upward
- Most mushrooms will reach optimal size within 4-7 days of appearing
How to harvest:
- Grasp the cluster at the base
- Twist gently while pulling away from the substrate
- Alternatively, cut the mushrooms at the base with a clean knife
I remember my first harvest – I waited too long and the caps started dropping spores everywhere. For the best flavor and texture, harvest when the caps are still somewhat curled under.
After harvesting, refrigerate mushrooms immediately and use within a week. Or sauté them right away for the freshest meal you’ve ever had!

Troubleshooting: Common Problems and Solutions
Even experienced growers run into issues sometimes. Here are the problems I’ve encountered and how I solved them:
No Growth or Slow Growth
Problem: After 2 weeks, you see little or no white mycelium.
Possible causes:
- Temperature too low
- Contamination inhibiting growth
- Old or inactive spawn
Solutions:
- Move to a warmer location (65-75°F is ideal)
- Mix in more spawn if available
- Be patient – sometimes growth starts slowly but accelerates
When my first batch was growing slowly, I moved it from my basement to my kitchen cabinet, and the warmer temperature kickstarted the mycelium growth.
Mold and Contamination Issues
Problem: Green, black, or blue spots appearing in your container.
Possible causes:
- Unclean materials or workspace
- Old coffee grounds
- Too much moisture
Solutions:
- For small contamination: Remove affected areas with a clean spoon
- For widespread contamination: Unfortunately, it’s best to start over
- For future grows: Use fresher grounds and sanitize all equipment
My second grow developed a small green patch. I scooped it out with a clean spoon that I’d wiped with alcohol, and the mycelium took over the space successfully.
Fruiting Problems
Problem: Fully colonized substrate, but no mushrooms appear.
Possible causes:
- Insufficient fresh air exchange
- Too little light
- Low humidity
- Not enough temperature difference to trigger fruiting
Solutions:
- Create more/larger holes in your container
- Move to a location with indirect light
- Increase misting to 3-4 times daily
- Try a cooler location (a drop of 5-10°F can trigger fruiting)
I once had a stubborn batch that wouldn’t fruit until I moved it to my bathroom and gave it a light misting after every shower. The extra humidity did the trick!
Advanced Tips for Better Yields
Ready to take your mushroom growing to the next level? Here are some techniques that have helped me increase my harvests:
Supplementing Your Coffee Grounds
Coffee grounds alone work fine, but adding these supplements can boost your yields:
- Straw (pasteurized): Improves aeration and provides additional nutrients
- Hardwood sawdust: Great structural support for the mycelium
- Gypsum (1-2%): Helps regulate pH and provides calcium and sulfur
I’ve had great results with a mix of 70% coffee grounds, 25% pasteurized straw, and 5% gypsum – my yields nearly doubled compared to coffee grounds alone!
Getting Multiple Flushes
Don’t throw out your substrate after the first harvest! Try this to get additional flushes:
- After harvesting all mushrooms, submerge the entire block in clean, cold water for 12-24 hours
- Drain thoroughly and return to your fruiting container
- Resume regular misting and fresh air exposure
Most blocks will produce 2-3 flushes, with each subsequent flush yielding about 60-70% of the previous one. I’ve gotten up to 4 flushes from a single coffee ground block!
Scaling Up Your Growing Operation
Once you’ve mastered the basics, here are ways to expand:
- Multiple containers: Stagger your starts for continuous harvests
- Larger containers: Five-gallon buckets with holes work great for bigger grows
- Collect more grounds: Partner with local cafés for regular pickups
I started with one small container and now run five larger ones in rotation – providing enough mushrooms for my family and friends year-round!
Frequently asked questions
How long does it take to grow mushrooms on coffee grounds? From start to harvest, expect 3-4 weeks. The colonization phase takes 2-3 weeks, and fruiting takes another 5-7 days. The actual timeline can vary based on temperature, humidity, and mushroom species.
Can I use coffee grounds from any coffee maker? Yes! Grounds from drip makers, French press, espresso machines, or even instant coffee all work fine. Just ensure they’re free from mold and used within 24 hours of brewing.
What types of mushrooms grow best on coffee grounds? Oyster mushrooms (particularly Blue and Pearl varieties) grow best on coffee grounds. With some additional supplements, you can also grow Pink Oysters, Wine Caps, and even Shiitake mushrooms.
Is it safe to eat mushrooms grown on coffee grounds? Absolutely! The mushrooms don’t taste like coffee at all. They break down the compounds in the grounds and convert them into mushroom tissue. Just make sure your growing conditions are clean to avoid contamination.
Do I need special equipment to grow mushrooms? No special equipment is required for small-scale growing. Basic household items like plastic bags, spray bottles, and rubber bands are sufficient. The only specialty item you’ll need is mushroom spawn, which you can order online.
Can I reuse coffee grounds for multiple batches? After your mushroom block stops producing (usually after 2-4 flushes), the spent substrate makes excellent garden compost but shouldn’t be reused for new mushroom grows.
Your mushroom growing journey begins!
Growing mushrooms on coffee grounds is one of the most rewarding sustainable hobbies I’ve ever taken up. There’s something genuinely magical about transforming daily waste into delicious food – and once you’ve tasted freshly harvested mushrooms, store-bought will never compare!
Remember, mushroom cultivation is part science, part art, and part patience. Don’t be discouraged if your first attempt isn’t perfect. Each grow teaches you something new, and soon you’ll develop an intuition for what your mushrooms need.
So gather those coffee grounds, order some spawn, and start growing! I’d love to hear about your experiences and answer any questions that come up along the way. Happy growing!