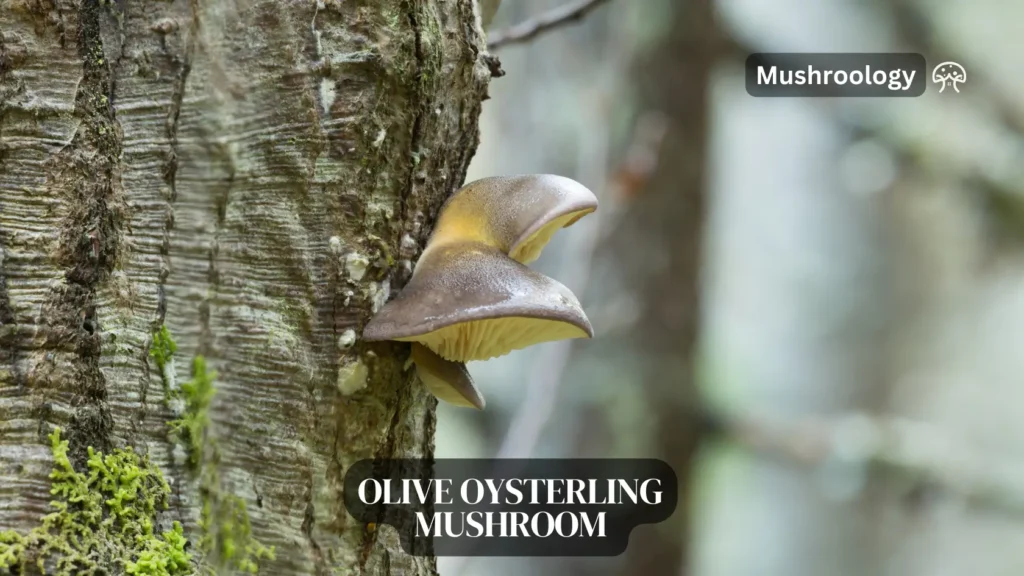
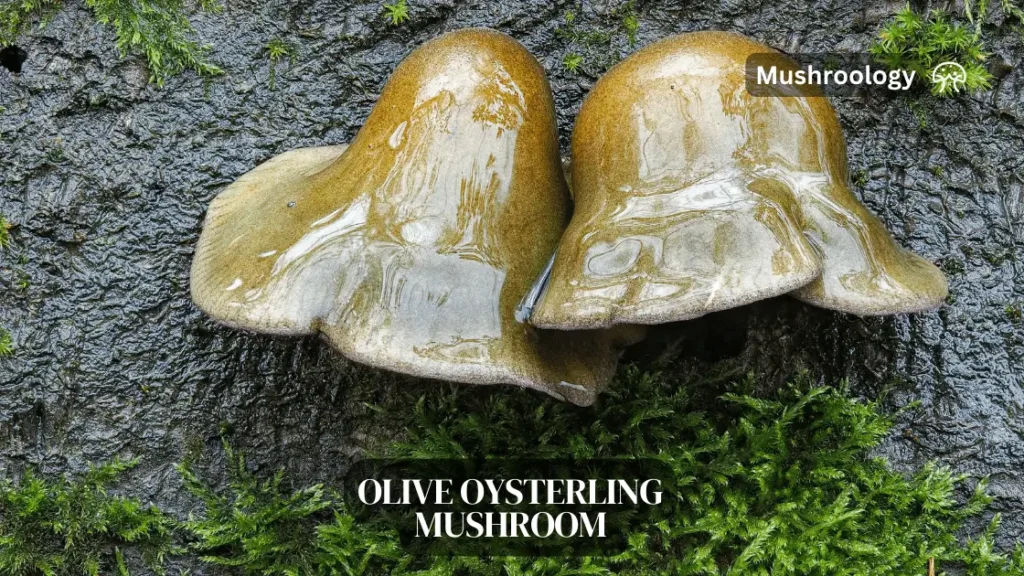
The Olive Oysterling (Panellus serotinus) stands out as one of nature’s most fascinating fungi. With its distinctive olive-green to brownish caps that sometimes display violet hues, this gourmet mushroom offers both visual appeal and culinary delight. Also known as the Late Fall Oyster or Green Oyster mushroom, this species thrives in cooler temperatures, making it perfect for cultivation during seasons when other mushroom varieties struggle.
Native to temperate forests across North America, Europe, and Asia, Olive Oysterlings naturally grow on dead hardwood trees. Their natural fruiting season extends from late autumn through early winter, but with proper cultivation techniques, you can enjoy these delicious mushrooms year-round.
Why grow olive oysterling mushrooms?
Culinary value
Olive Oysterlings offer a mild, nutty flavor with a delicate texture that becomes firmer when cooked. Unlike some commercial mushrooms, they retain their structure well in cooking, making them excellent for sautéing, grilling, or adding to soups and stews.
Unique Characteristics of olive oysterling mushrooms
What many cultivators don’t realize is that young Olive Oysterling mushrooms possess bioluminescent properties, particularly in their gills. In complete darkness, they emit a faint, ethereal glow—a fascinating feature to observe during your cultivation journey.
Medicinal Potential
Recent mycological research has revealed that Olive Oysterlings contain bioactive compounds with promising health benefits. Studies suggest these mushrooms may have anti-inflammatory, antioxidant, and antimicrobial properties. They contain beta-glucans, known for immune system support, and various phenolic compounds that contribute to their antioxidant activity.
Environmental Benefits
By growing Olive Oysterlings, you’re participating in sustainable food production. These mushrooms efficiently convert waste wood material into nutritious food, representing a closed-loop system that reduces environmental impact.
Scientific Classification and Identification
Taxonomy
- Kingdom: Fungi
- Phylum: Basidiomycota
- Class: Agaricomycetes
- Order: Agaricales
- Family: Mycenaceae
- Genus: Panellus
- Species: Panellus serotinus
Historical Scientific Names
Though currently classified as Panellus serotinus, this mushroom has been known by several synonyms throughout mycological history:
- Agaricus serotinus (Pers.) Schrad.
- Pleurotus serotinus (Pers.) P. Kumm.
- Hohenbuehelia serotina (Pers.) Singer
- Sarcomyxa serotina (Pers.) P. Karst.
Physical Characteristics of olive oysterling mushrooms
- Cap: 2-10 cm in diameter, kidney-shaped or fan-shaped, with olive-green to brownish coloration, often with violet tones. The surface feels slightly velvety when young and becomes smoother with age. In wet conditions, the cap may become slimy.
- Gills: Thick, widely spaced, and decurrent (running down the stem). Typically cream to pale yellow in color.
- Stem: Short and lateral (off-center) or sometimes absent entirely.
- Spore Print: White to cream-colored.
- Odor and Taste: Mild, with subtle sweet or nutty notes.
Look-Alikes
While Olive Oysterlings have few dangerous look-alikes, it’s important to note some similar species:
- Panellus stipticus: Smaller, tan-colored, and bitter-tasting. While not poisonous, it’s unpalatable.
- Pleurocybella porrigens (Angel Wings): White, with no olive coloration. Can be toxic to people with certain health conditions.
- Omphalotus species: May have similar shape but typically have orange to yellow coloration and glow more intensely in the dark.
What You’ll Need to Grow Olive Oysterling mushrooms at Home: Supplies and Materials
Spawn Options
The foundation of successful mushroom cultivation begins with quality spawn. For Olive Oysterlings, consider these options:
- Sawdust Spawn: Finely ground wood particles fully colonized with mycelium. This is the most versatile option and ideal for log inoculation, especially when using the drill-and-fill method. The fine texture allows for efficient colonization.
- Plug Spawn: Small wooden dowels pre-colonized with mycelium. These are exceptionally beginner-friendly, requiring minimal tools and preparation. Simply hammer them into drilled holes in your logs.
- Liquid Culture: Mycelium suspended in a nutrient-rich solution. This advanced option allows for precise inoculation and can be used to create your own spawn. It offers the fastest colonization rates but requires more sterile technique.
Pro Tip: When purchasing spawn, examine it closely. Healthy spawn should appear white and vigorous, with no signs of contamination (green, black, or unusual colors). Quality spawn from reputable suppliers significantly improves success rates.
Substrate Selection for olive oysterling mushrooms
Olive Oysterlings show a strong preference for hardwood substrates. The best options include:
- Oak: Offers excellent nutrition and durability, supporting multiple flushes over several years.
- Maple: Provides balanced nutrition and good moisture retention.
- Beech: Creates an ideal texture for mycelium penetration.
- Elm: Less common but highly effective for Olive Oysterlings.
- Alder: Good option in regions where other hardwoods are less available.
Avoid softwoods like pine, spruce, or cedar, as their natural resins inhibit mycelial growth.
Log Requirements
For optimal results, your logs should meet these specifications:
- Freshness: Cut within 2-4 weeks of inoculation. This timing is crucial—logs cut too recently contain natural antifungal compounds that inhibit mycelium, while logs cut too long ago may already harbor competing fungi.
- Bark Integrity: Logs must retain their bark, which provides natural protection against contaminants and helps maintain optimal moisture levels.
- Diameter: 4-8 inches (10-20 cm) offers the ideal balance between ease of handling and sufficient substrate volume.
- Length: 3-4 feet (0.9-1.2 meters) sections are manageable while providing adequate space for multiple inoculation points.
Essential Tools
- Drill and Drill Bits: A cordless drill with a 5/16 inch (8.5mm) bit for plug spawn or a 7/16 inch (12mm) bit for sawdust spawn.
- Cheese Wax or Specialized Mushroom Wax: Used to seal inoculation holes, preventing contamination and moisture loss. Specialized mushroom wax is formulated to expand and contract with temperature changes without cracking.
- Inoculation Tool: For sawdust spawn, a palm inoculator or specialized “thumb inoculator” makes the process more efficient. A clean spoon can work as a simple alternative.
- Spray Bottle: Essential for maintaining humidity levels during both colonization and fruiting stages.
- Humidity Gauge: While optional, this helps monitor environmental conditions more precisely.
- Protective Tarp or Shade Cloth: Useful for outdoor incubation to protect logs from excessive sun exposure or extreme weather.
Step-by-Step Growing Instructions
1. Preparing Your Logs for olive oysterling mushrooms
Log Selection and Preparation:
- Choose recently felled hardwood trees, ideally cut during dormant season (late fall to early spring) when sugar content in the wood is highest.
- Before cutting, sanitize cutting tools with a 10% bleach solution to reduce contamination risk.
- Cut logs to the recommended dimensions (3-4 feet long, 4-8 inches in diameter).
- Allow logs to rest for 2-3 weeks after cutting but before inoculation. This resting period allows natural antifungal compounds to dissipate while ensuring the wood hasn’t begun to decompose.
Advanced Technique: Research indicates that soaking logs in cold water for 24-48 hours before inoculation can increase success rates by up to 30%. This process helps rehydrate the wood and leach out additional antifungal compounds.
2. Inoculation Methods
Standard Drill-and-Fill Method
- Creating the Inoculation Pattern:
- Drill holes in a diamond pattern, with rows staggered to maximize coverage.
- Space holes 4-6 inches (10-15 cm) apart for optimal colonization speed.
- Drill to a depth of 1-1.5 inches (2.5-4 cm), ensuring holes don’t penetrate through the log.
- Inserting Spawn:
- For plug spawn: Insert plugs fully into each hole, tapping gently with a hammer if needed.
- For sawdust spawn: Use an inoculation tool or clean spoon to pack sawdust spawn firmly into each hole.
- Sealing the Inoculation Sites:
- Melt your wax in a dedicated container (an old pot or metal can works well).
- Apply melted wax liberally over each inoculation site, creating a complete seal.
- Ensure the wax extends slightly beyond the hole’s edge for a proper seal.
Expert Insight: Many cultivators mark the inoculation date on their logs using a permanent marker or aluminum tag. This simple step helps track colonization progress and predict fruiting times more accurately.
Totem Inoculation Method
This space-saving alternative is particularly effective for urban growers with limited space:
- Building the Totem:
- Place the first log section upright in a large plastic bag.
- Cover the top surface with a generous layer of sawdust spawn (approximately ¼ inch thick).
- Stack a second log directly on top of the spawn layer.
- Continue alternating logs and spawn until you have 3-5 log sections stacked.
- Incubating the Totem:
- Gather the plastic bag around the totem and secure it at the top.
- Place in a cool, shaded location for incubation.
- Check occasionally for colonization progress.
- Advantages:
- Uses vertical space efficiently
- Generally achieves faster colonization than traditional methods
- Creates an attractive display when fruiting
Important Note: Totems typically have a shorter productive lifespan (1-2 years) compared to traditional log cultivation (2-3 years) but often produce more mushrooms per flush during their active period.
3. Incubation: The Patience Phase
The incubation period represents the longest phase of the cultivation process, typically lasting 6-12 months depending on environmental conditions and log characteristics.
Ideal Incubation Environments
Indoor Options:
- Unheated basement or garage with stable temperature
- Dedicated grow room with temperature control
- Under beds or in closets (for smaller logs)
Outdoor Options:
- Shaded woodland area
- Under dense shrubs
- North side of buildings where direct sunlight is minimal
Environmental Parameters
Temperature:
- Optimal range: 65-70°F (18-21°C)
- Acceptable range: 50-75°F (10-24°C)
- Below 50°F (10°C), colonization slows significantly but doesn’t stop
Humidity:
- Maintain 60-70% relative humidity around logs
- In dry climates, consider periodic soaking (submerge logs in non-chlorinated water for 24 hours every 2-3 months)
- Use loose plastic coverings or shade cloth to help retain moisture in outdoor settings
Stacking Configurations:
- Crib Stack: Arrange logs in alternating layers like a log cabin for maximum air circulation
- Lean-To Method: Lean logs against a support at a 60-70° angle
- X-Pattern: Cross logs in an X formation to save space while maintaining air flow
Monitoring Colonization: White mycelium will become visible at the ends of logs and eventually through bark cracks. Full colonization is indicated by:
- Visible white growth at log ends
- White patches appearing at bark cracks
- A slightly lighter weight as the mycelium begins breaking down the wood
- A hollow sound when tapping the log (compared to the solid sound of an uncolonized log)
Less-Known Technique: Some commercial growers accelerate colonization by introducing beneficial bacteria like Bacillus subtilis to the logs. These bacteria can help suppress competing fungi while creating micro-environments favorable to Olive Oysterling mycelium.
4. Triggering Fruiting
Once logs are fully colonized, you’ll need to initiate fruiting conditions—essentially mimicking the environmental cues that trigger wild Olive Oysterlings to produce mushrooms.
The Cold Shock Method
The most reliable technique for triggering Olive Oysterling fruiting is a temperature drop combined with increased humidity:
- Temperature Reduction:
- Reduce ambient temperature to 40-60°F (4-16°C)
- Ideal temperature is around 50°F (10°C)
- Humidity Increase:
- Raise humidity to 80-90%
- Use frequent misting (3-4 times daily)
- Soaking Process (optional but effective):
- Submerge logs in cold water for 24 hours
- Use non-chlorinated water (rainwater is ideal)
- This mimics fall rain patterns that trigger wild fruiting
Fruiting Environment Options
Outdoor Fruiting:
- Naturally effective during fall months in temperate climates
- Place logs in shaded areas with good air circulation
- Cover with burlap or shade cloth that’s regularly misted
Indoor Fruiting Chamber:
- Convert a plastic storage bin with air holes
- Use a humidifier or regular misting system
- Provide indirect light for 6-8 hours daily
- Ensure good air exchange without drying effects
Greenhouse Option:
- Ideal for balancing humidity and light
- Use shade cloth to prevent direct sunlight
- Maintain cool temperatures with ventilation
Light Requirements: Olive Oysterlings need some light to develop properly—unlike the colonization phase, which can occur in darkness. Provide:
- Indirect natural light or
- 12 hours of low-intensity artificial light (LED grow lights set to blue spectrum work well)
Signs of Imminent Fruiting
About 1-2 weeks after initiating fruiting conditions, watch for these indicators:
- Small white to yellowish bumps appearing on the bark (primordia)
- Areas of bark becoming slightly raised
- Increased mycelial activity visible at log ends
5. Harvesting and Post-Harvest Handling
Optimal Harvest Timing
The perfect time to harvest Olive Oysterlings is when:
- The caps have fully expanded but before edges begin to curl upward
- The color is vibrant olive-green to brownish-green
- The texture is still firm and resilient when gently pressed
Typically, this occurs 5-10 days after primordia first appear, depending on temperature conditions.
How to harvest your olive oysterling mushrooms?
- Use a sharp, clean knife to cut the entire cluster at its base where it meets the log
- Avoid pulling or tearing, which can damage mycelium and reduce future flushes
- Harvest during dry conditions when possible to reduce moisture on the mushrooms
- Handle gently to prevent bruising
Expert Tip: Harvest in the morning when mushrooms have the highest moisture content and nutritional value.
How to store and preserve olive oysterling mushrooms?
Fresh Storage:
- Place harvested mushrooms in paper bags (not plastic) in the refrigerator
- Store at 34-38°F (1-3°C)
- Use within 5-7 days for optimal flavor and texture
Preservation Methods:
- Drying: Slice mushrooms and dry at 110-120°F (43-49°C) until crisp
- Freezing: Sauté briefly in butter, cool, then freeze in airtight containers
- Pickling: Creates a delicious preservation option with extended shelf life
- Powder: Completely dry mushrooms can be ground into powder for soups and sauces
Between Flushes
After harvesting, allow logs to rest for 6-8 weeks before initiating another fruiting cycle. During this rest period:
Some growers recommend a light “maintenance soak” (8-12 hours) between flushes
Keep logs in a cool, moderately humid environment
Avoid direct sunlight
Occasional light misting can be beneficial
Long-Term Maintenance and Productivity
Extending Log Productivity for olive oysterling mushrooms
While Olive Oysterling logs typically produce for 2-3 years, these strategies can maximize their productive lifespan:
- Nutrient Supplementation:
- After the first year, drill small holes between original inoculation points
- Insert a mixture of hardwood sawdust and 10-20% wheat bran
- Seal with wax as with original inoculation
- Strategic Soaking Schedule:
- Establish a regular soaking schedule (every 2-3 months)
- Use collected rainwater when possible
- Protection from Extreme Conditions:
- Shield logs from temperatures below 20°F (-6°C) and above 85°F (29°C)
- Provide adequate shade during summer months
- In winter, stack logs and cover with straw for insulation
how to recognize the end of productivity for olive oysterling mushrooms?
Signs that logs are depleted include:
- Significantly reduced yields (less than 25% of peak production)
- Visible decomposition of the log structure
- Appearance of competing fungi species
- Bark beginning to slough off extensively
When logs are spent, they make excellent additions to compost piles or can be broken down to create mulch for garden beds.
Spawn Running: Creating Your Own Spawn
Advanced growers often create their own spawn from successful harvests:
- Select healthy mushroom tissue from the inner stem of freshly harvested mushrooms
- Place on sterilized agar medium
- Transfer healthy mycelium to grain spawn
- Use this to inoculate new logs
This process creates spawn adapted to your specific growing conditions and can improve success rates over time.
How to cook olive oysterling mushrooms?
Preparation Basics
Olive Oysterlings should be:
- Cleaned with a dry brush or cloth (avoid washing if possible)
- Cooked thoroughly (never consumed raw)
- Prepared with complementary flavors like garlic, thyme, or soy sauce
Simple Sauté
The perfect way to appreciate the natural flavor of Olive Oysterlings
Ingredients:
- 1 pound fresh Olive Oysterlings, torn into bite-sized pieces
- 3 tablespoons butter or olive oil
- 3 cloves garlic, minced
- 1 tablespoon fresh thyme leaves
- Salt and freshly ground black pepper to taste
- 1 tablespoon lemon juice
Instructions:
- Heat butter or oil in a large skillet over medium-high heat
- Add mushrooms and cook without stirring for 2-3 minutes to develop browning
- Add garlic and thyme, stir, and continue cooking for 3-4 minutes until mushrooms are golden
- Season with salt and pepper, finish with lemon juice
- Serve immediately as a side dish or on toast
Troubleshooting Common Issues
Colonization Problems
Issue: No visible mycelium after 3-4 months
Possible Causes:
- Low-quality or contaminated spawn
- Logs too old or too fresh at inoculation
- Extreme temperature fluctuations
- Solutions:
- Ensure proper log selection timing
- Use spawn from reputable suppliers
- Maintain more consistent environmental conditions
Fruiting Difficulties
Issue: Fully colonized logs not producing mushrooms Possible Causes:
- Insufficient temperature drop
- Inadequate humidity levels
- Logs too dry internally Solutions:
- Try a more dramatic cold shock (overnight temperature drop of 15-20°F)
- Increase misting frequency or use a humidifier
- Soak logs for 24-48 hours in cold water
Pest and Competitor Management
Issue: Unwanted fungi appearing on logs
Possible Causes:
- Contaminated spawn
- Incomplete wax sealing
- Natural spore competition
- Solutions:
- Remove competing fungi manually
- Move affected logs away from healthy ones
- In severe cases, soak logs in salt water solution (2 tablespoons salt per gallon) for 12 hours
Frequently Asked Questions
Can I grow Olive Oysterlings indoors year-round?
Yes, Olive Oysterlings can be grown indoors throughout the year. For successful indoor cultivation:
- Create a dedicated fruiting chamber with humidity control
- Use a refrigerator or wine cooler to provide cold shock periods
- Provide indirect light for 6-8 hours daily
- Monitor temperature and humidity closely, as indoor environments can fluctuate
How do Olive Oysterlings compare to other oyster mushroom varieties?
Compared to common oyster mushrooms (Pleurotus ostreatus):
- Olive Oysterlings have a firmer texture and more complex flavor
- They require cooler temperatures for fruiting
- They typically have a longer incubation period
- They can be more resistant to some common contaminants
- They generally produce fewer but larger mushrooms per flush
Can I use Olive Oysterlings medicinally?
While research is ongoing, preliminary studies suggest Olive Oysterlings contain:
- Beta-glucans with immune-modulating properties
- Antioxidant compounds that may help reduce oxidative stress
- Antimicrobial compounds effective against certain bacteria
Always consult with a healthcare provider before using any mushroom for medicinal purposes.
How can I maximize yield from my Olive Oysterling logs?
To achieve optimal yields:
- Use logs with 20-35% moisture content
- Maintain proper spacing between inoculation points
- Perform seasonal soaking (especially during dry periods)
- Provide optimal fruiting conditions with temperature fluctuations
- Harvest promptly to avoid spore release, which signals the end of a fruiting cycle
Is it possible to grow Olive Oysterlings on substrates other than logs?
While logs are the traditional and most reliable substrate, some growers have had success with:
- Hardwood sawdust blocks supplemented with 10-20% wheat bran
- Hardwood wood chips mixed with straw in a 80:20 ratio
- Compressed hardwood fuel pellets rehydrated to proper moisture content
These alternative methods typically produce faster results but may not sustain as many fruiting cycles as logs.
Can I mix Olive Oysterling spawn with other mushroom species on the same log?
This is generally not recommended because:
- Different species compete for the same resources
- Optimal fruiting conditions vary between species
- One species typically dominates, reducing overall yield
For best results, dedicate separate logs to different mushroom species.
Conclusion
Growing Olive Oysterling mushrooms offers a rewarding blend of science, patience, and hands-on cultivation. While the process requires an investment of time, the unique flavors, potential health benefits, and satisfaction of harvesting your own gourmet mushrooms make it well worth the effort.
Remember that each cultivation environment is unique—success often comes through observation, adaptation, and learning from each growing cycle. With proper techniques and attention to detail, your Olive Oysterling logs can provide delicious harvests for years to come.
Whether you’re a beginner mushroom cultivator or an experienced grower looking to diversify your fungi portfolio, Olive Oysterlings represent an excellent choice that connects you to seasonal growing rhythms while providing a culinary ingredient rarely found in markets.